In the February 2020 release, we are continuing to port applications from the old interface to the new. Included in this release are the Visitations, Calendar, Audit Log, and Announcement applications. We are also excited to announce that we have added some brand new features to the application, such as contact photos, global filters, assessment charts and graphs, and the ACE assessment. Read on to learn about the new and improved features that will be available on your live site 2/10/2020!
Visitations
The Visitations application is where you may record and manage information related to a client’s visitations while the client is in detention. The Visitation application can be found in the menu tree underneath Detention when you have a client selected.
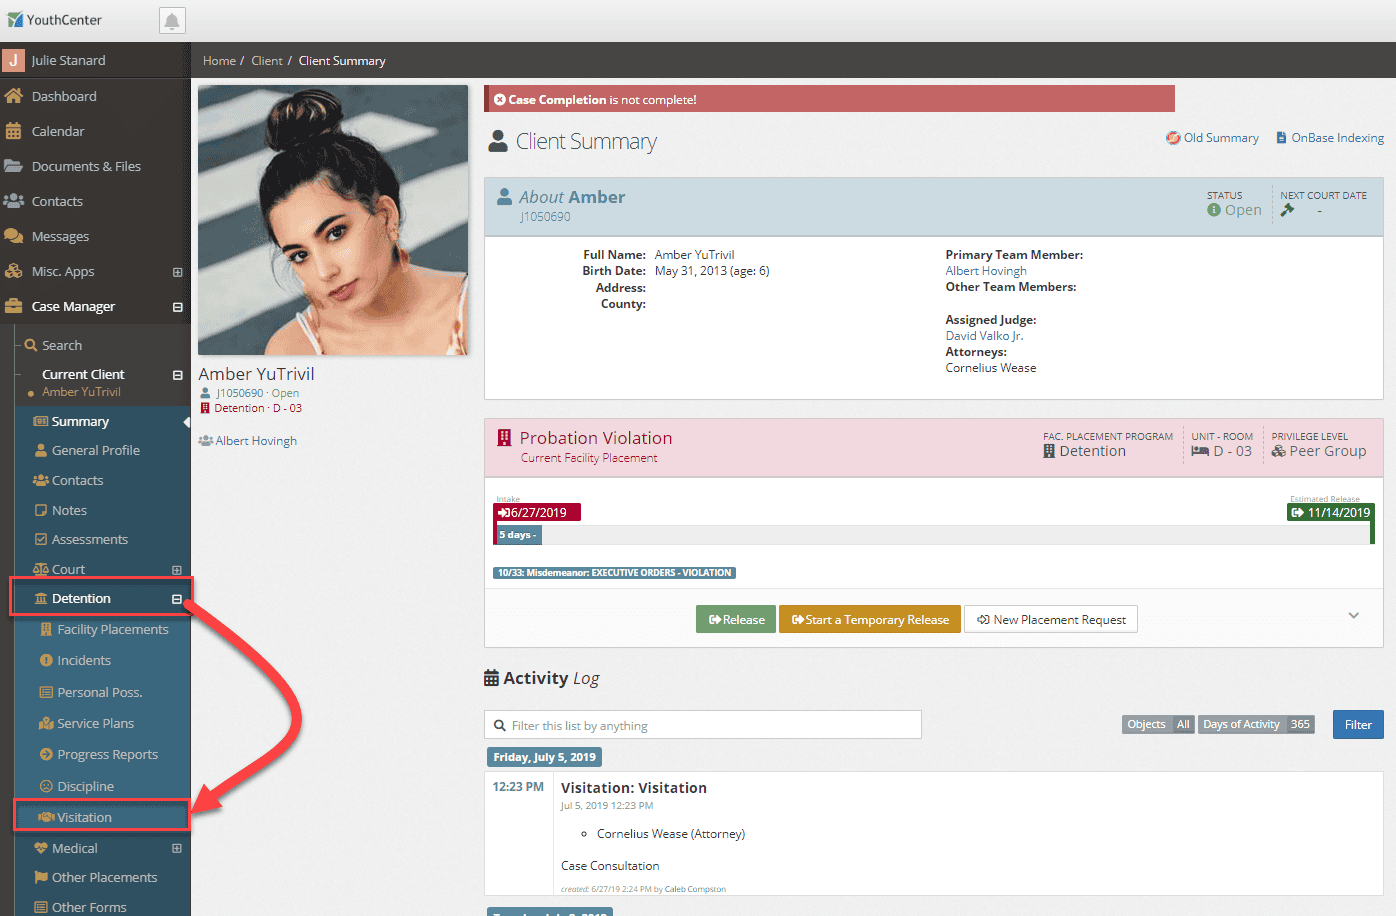
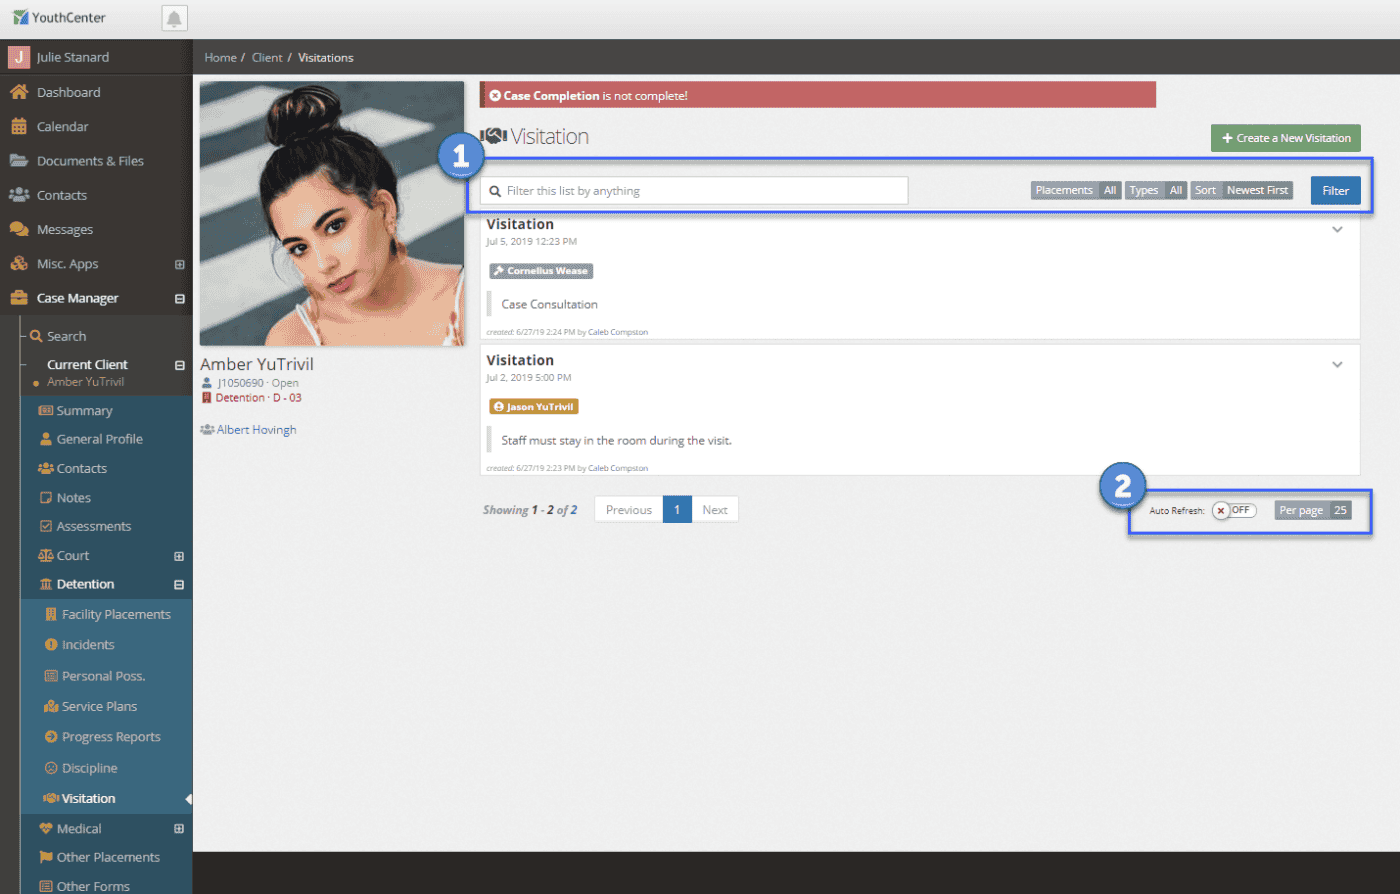
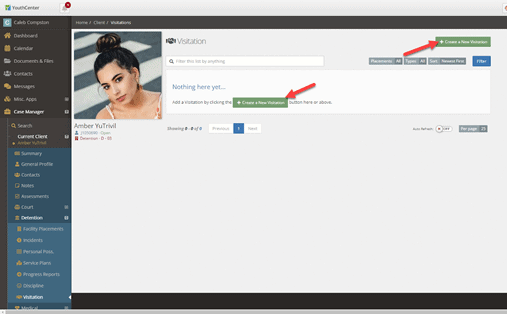
The Visitation Landing page will display all the visitations for the selected Client. Users can filter this list via the filters are the top of the page (1), as well as select how many results should show per page and whether visitations should Auto Refresh (2).
View a Visitation:
To view a visitation, simply click on the visitation you would like to view. This will direct you to the Visitation Detail view. To return to the Visitation Landing page, click “Back to the list”.
Edit or Delete a Visitation:
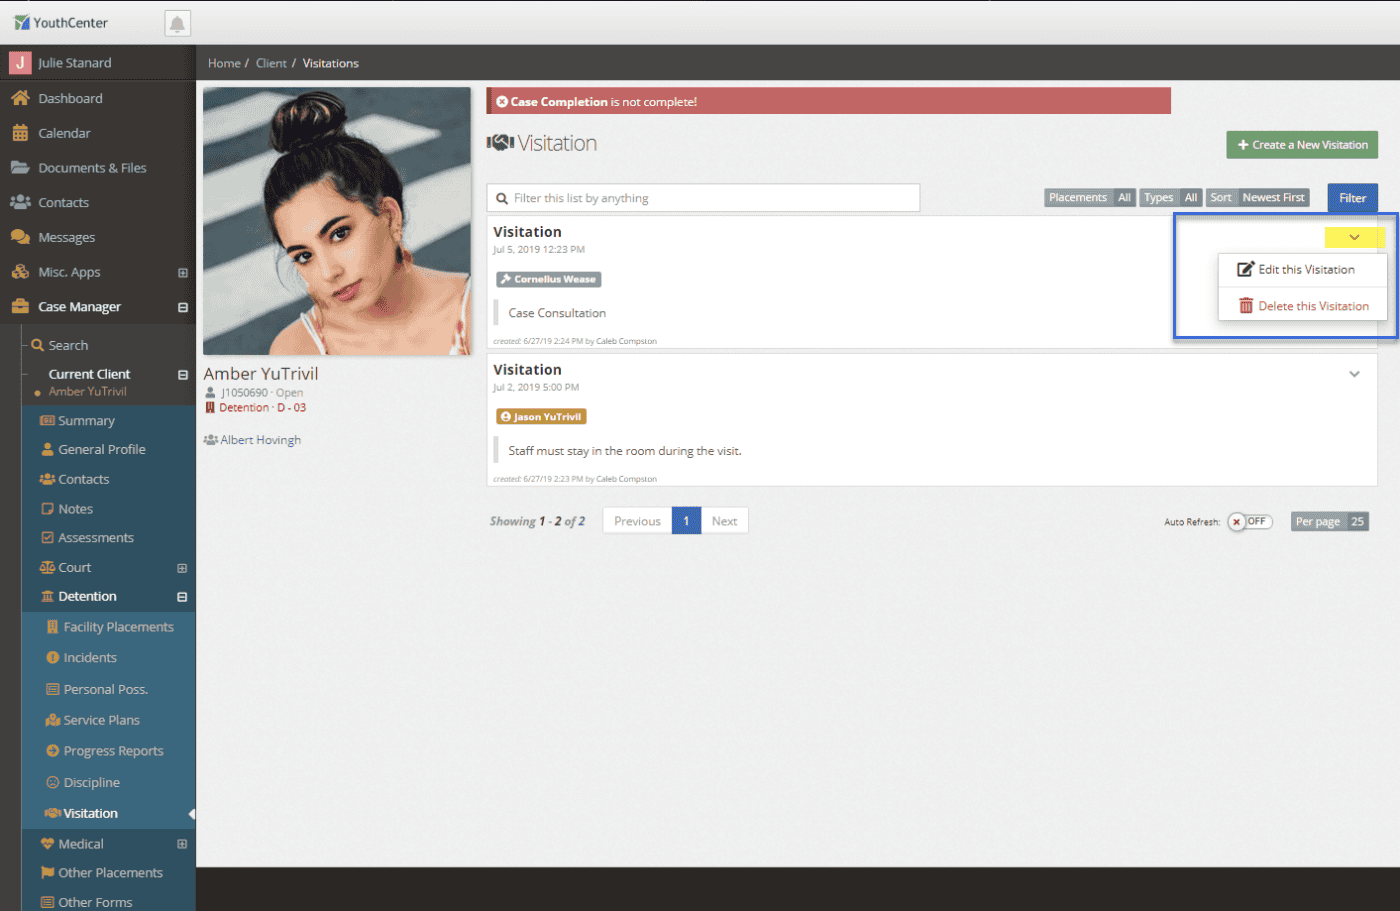
Existing visitations can be edited or removed in two different ways. On the Visitation Landing page, clicking the down caret on the desired visitation will display an option for editing or deleting the visitation.
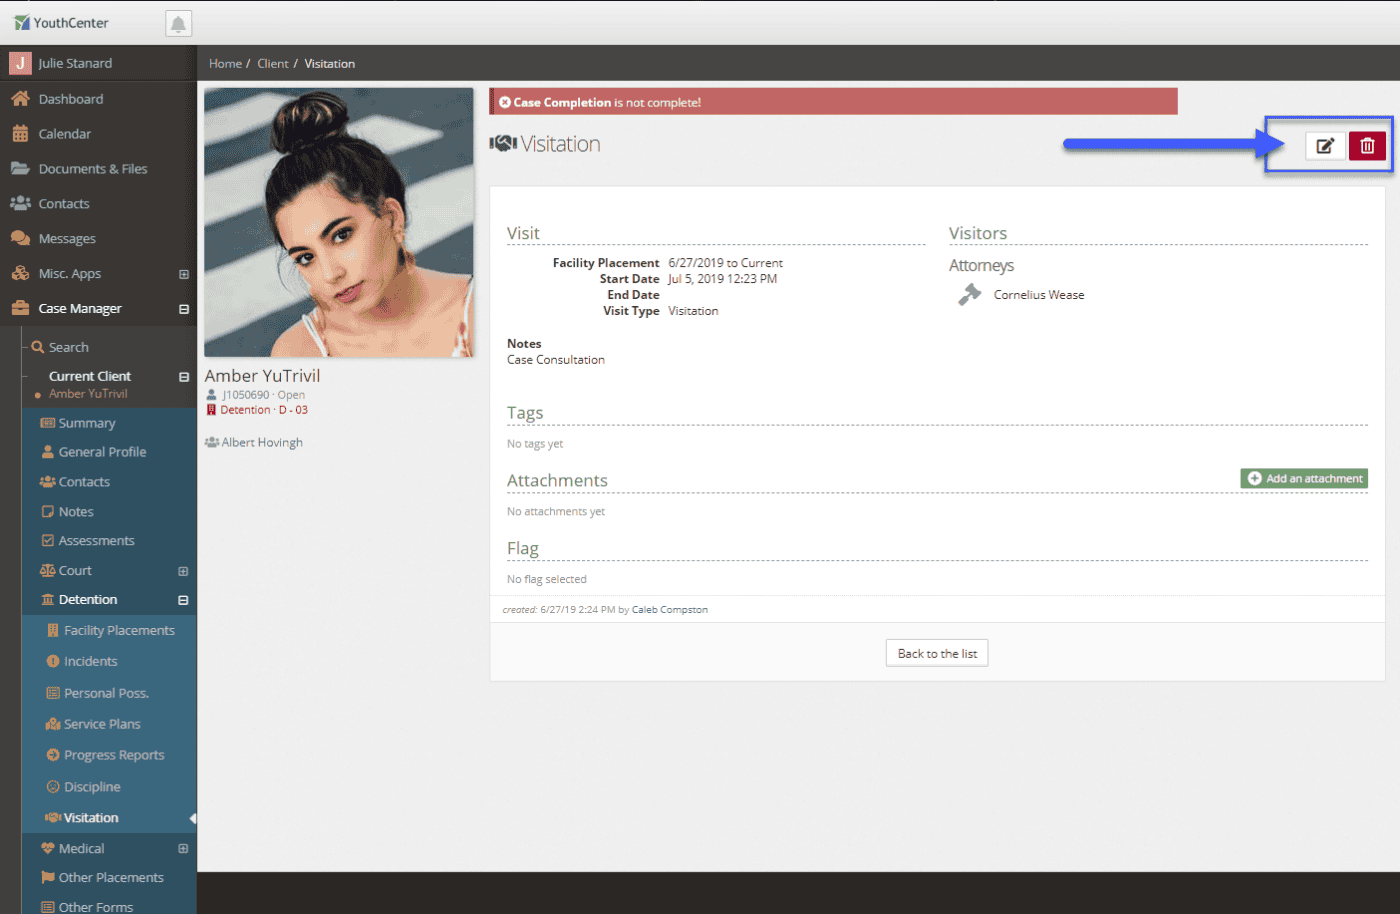
Additionally, these options are also located on the Visitation Detail page. Click the paper and pen icon to edit and the trash can icon to delete.
Add a New Visitation:
There are several ways to add a new visitation to a client. The option is available on the Visitation Landing page, the Contacts Landing page, the Contact New Relationship screen and the Relationship Detail page.
Visitation Landing page: Select the “+ Create a New Visitation” button in the upper right-hand corner. If the client currently does not have any visitation scheduled (as in the example below), you will also find the “+ Create a New Visitation” button listed in the Log. You may click on either button to add a visitation.
Contact Landing page: To navigate to the Contacts page, select “Contacts” in the menu navigation tree.
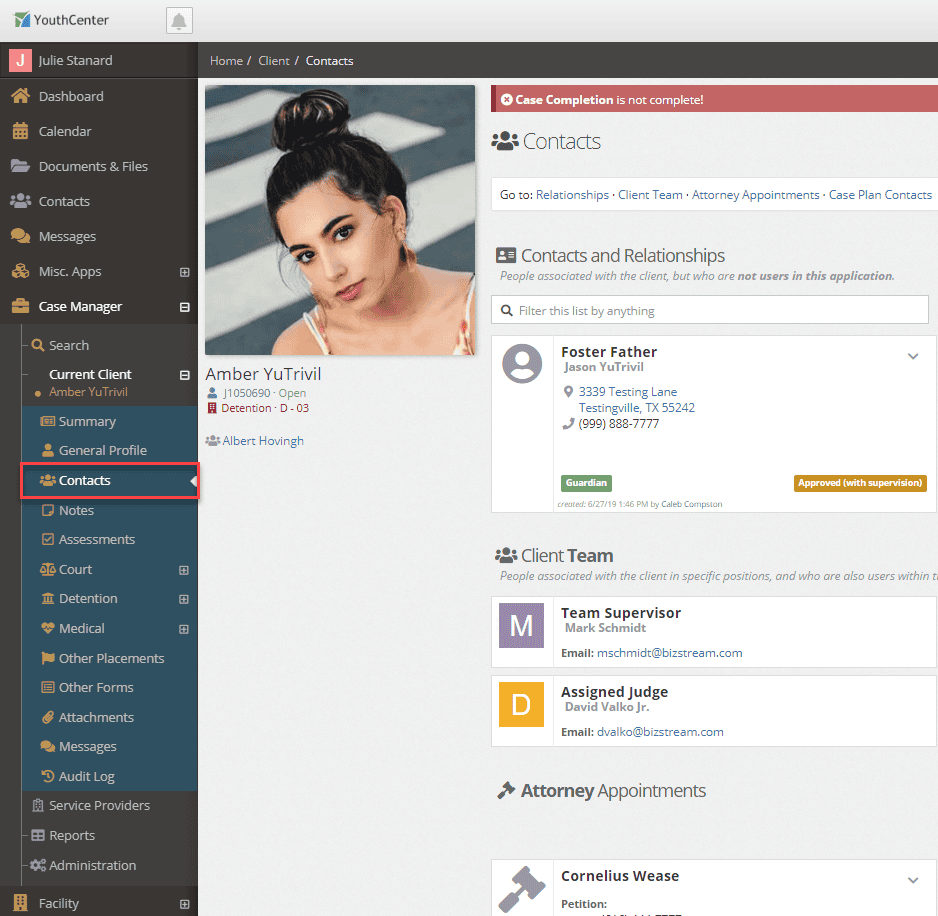
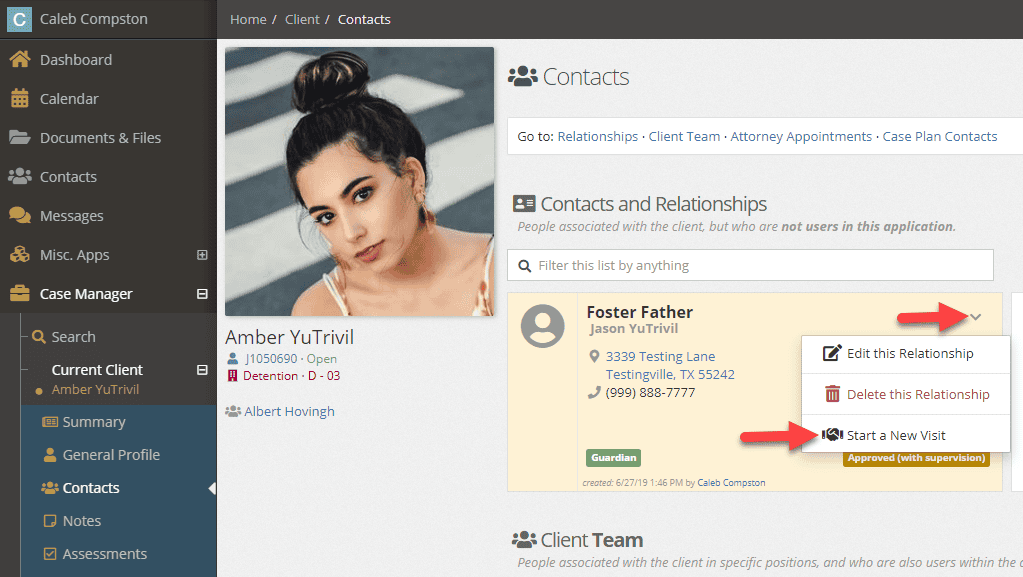
Once on the Contacts Landing page, click the down caret next to the contact that is visiting your client and select “Start a New Visit”
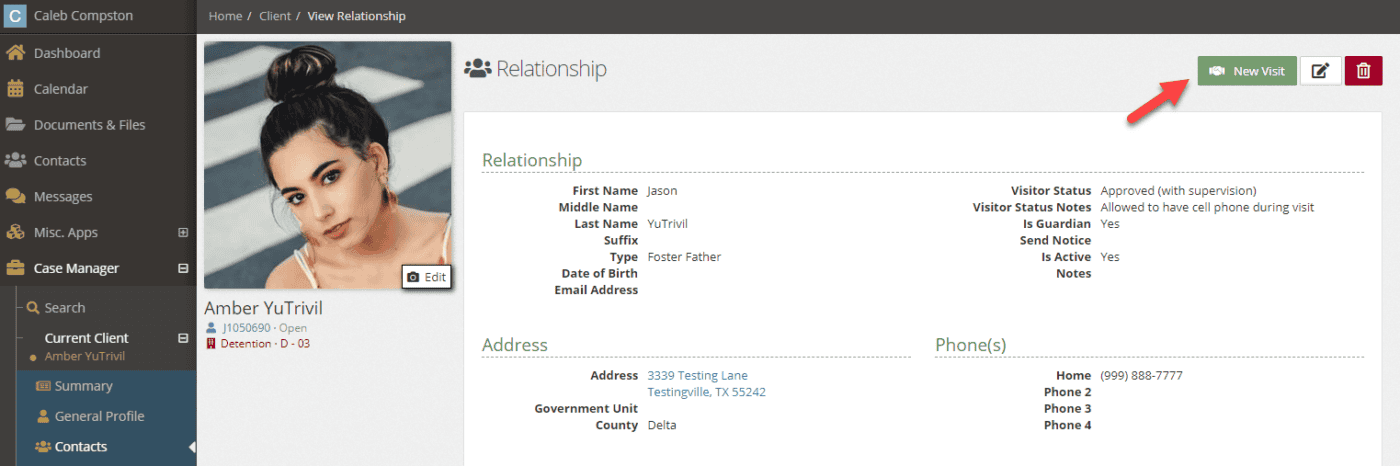
Relationship Detail page: To start a visit from the Details page of an existing contact, simply click the visitor from the existing contacts on the Contacts Landing page and select the “New Visit” button in the upper right-hand corner.
Create a New Relationship page: If a visitor has not been added to the system, you can schedule a visit directly when creating a new relationship. To create a new relationship on the Contacts landing page, click the “+ Create a New Relationship” button in the upper right corner.
Visitation Widget
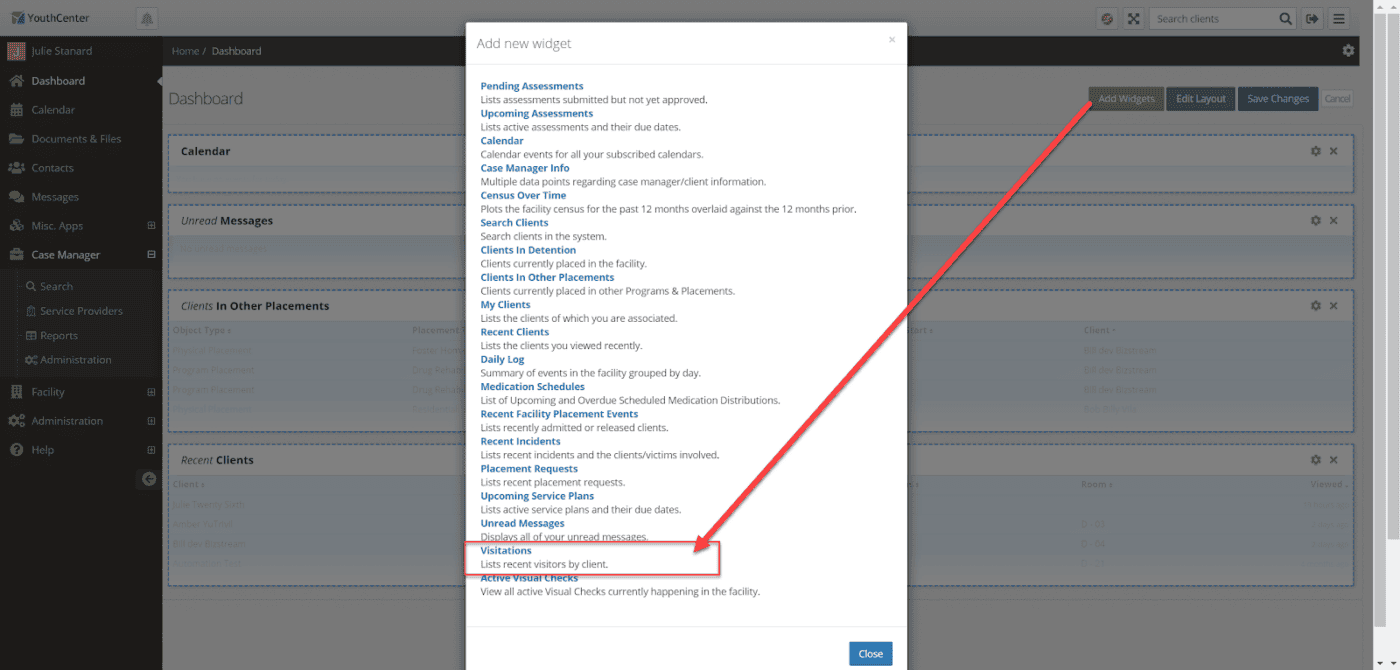
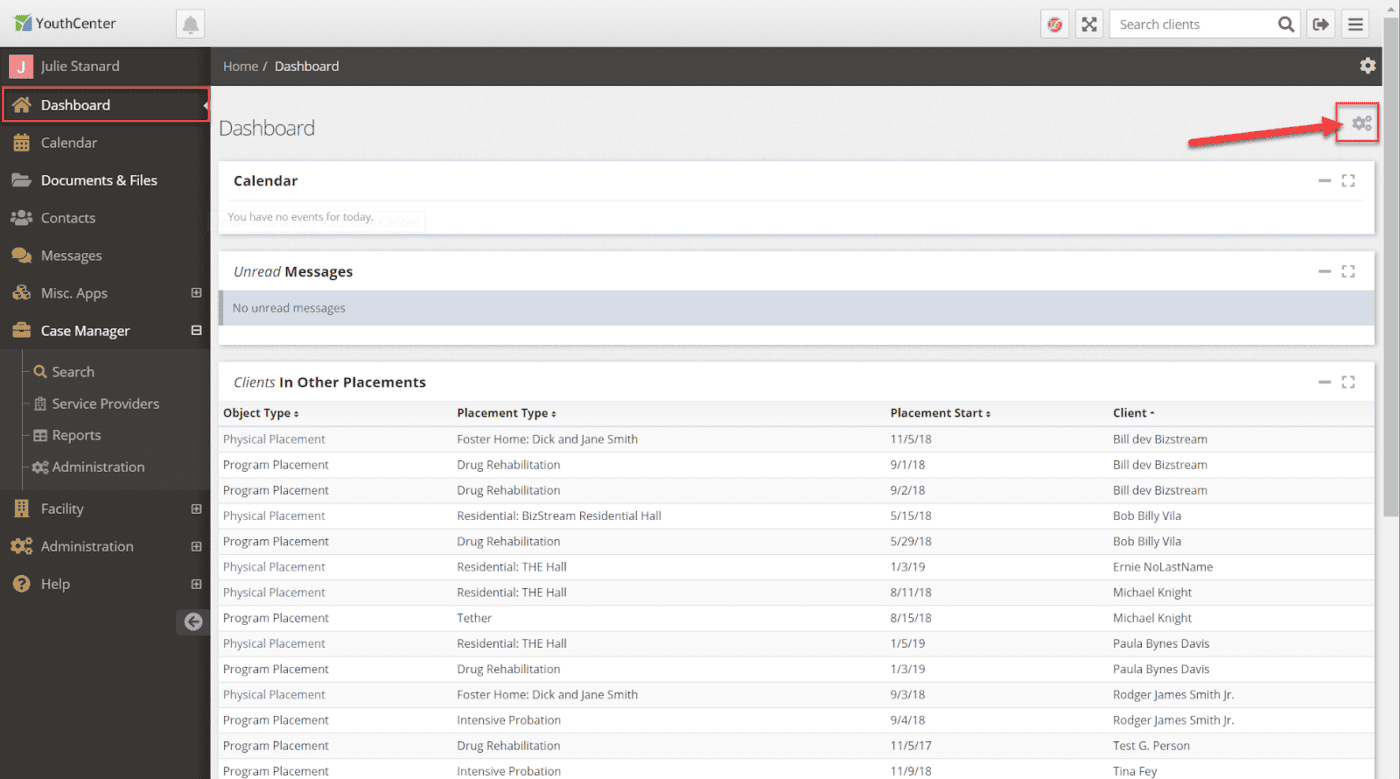
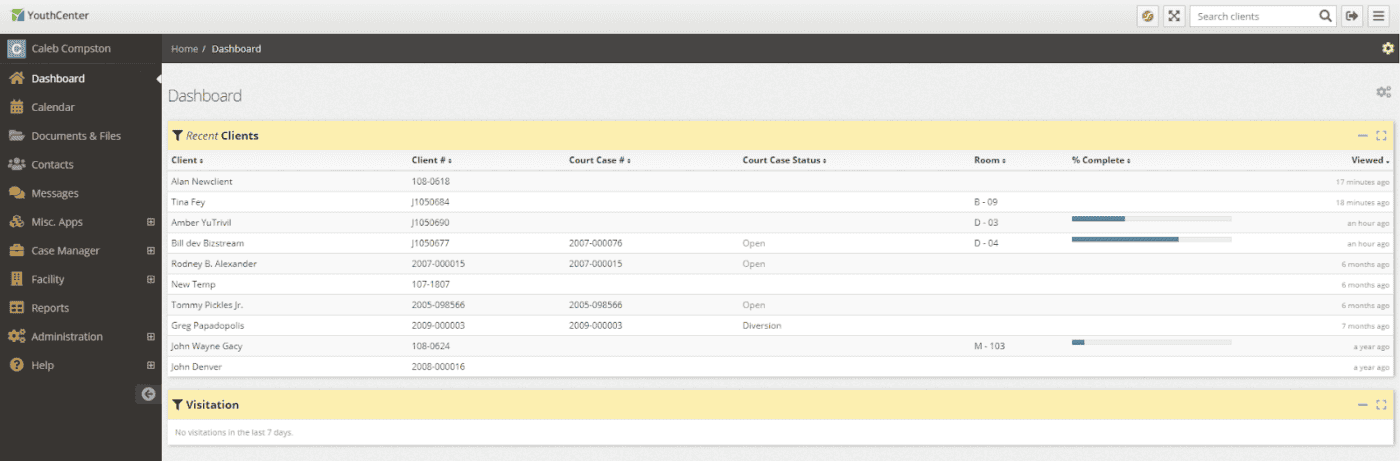
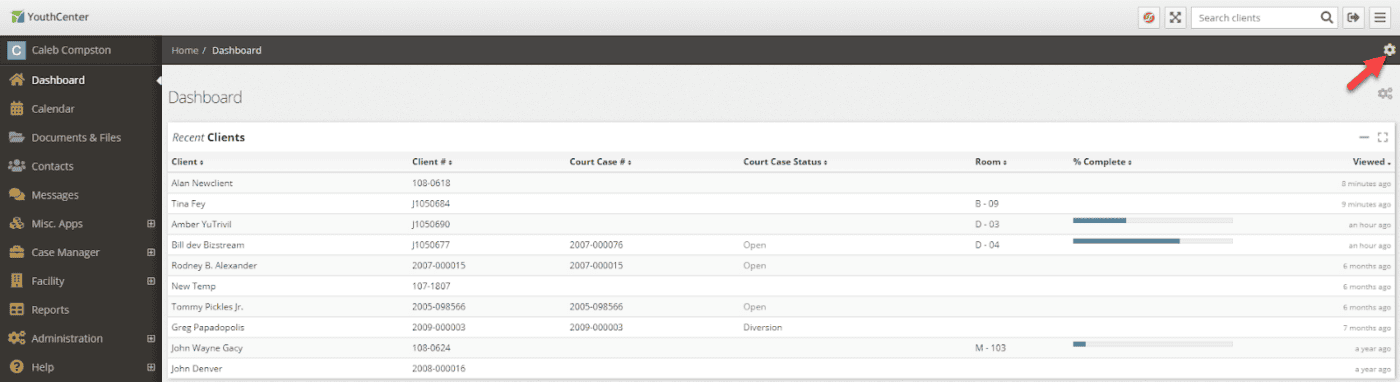
There is now a Visitation widget available that can be added to your dashboard. To add the widget to your dashboard, select the gear icon on the Dashboard page.

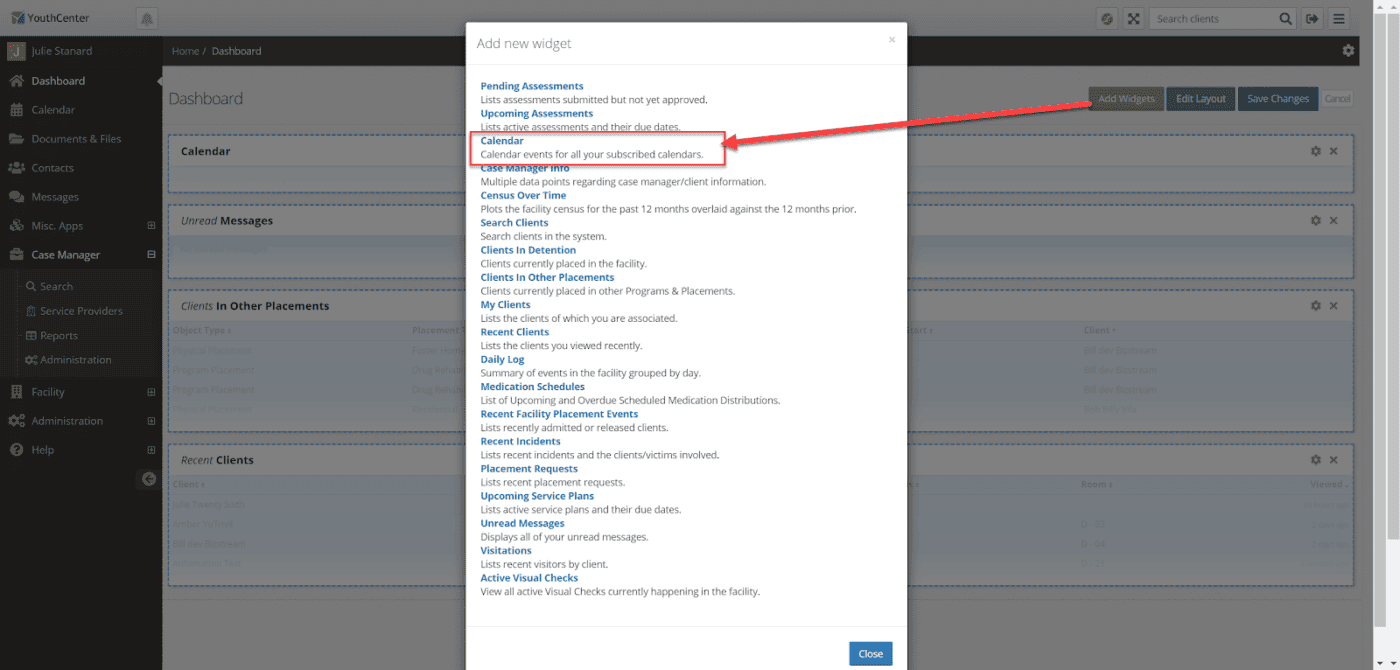
Select “Add Widgets” to bring up the list of available widgets. Select “Visitations” from this list.
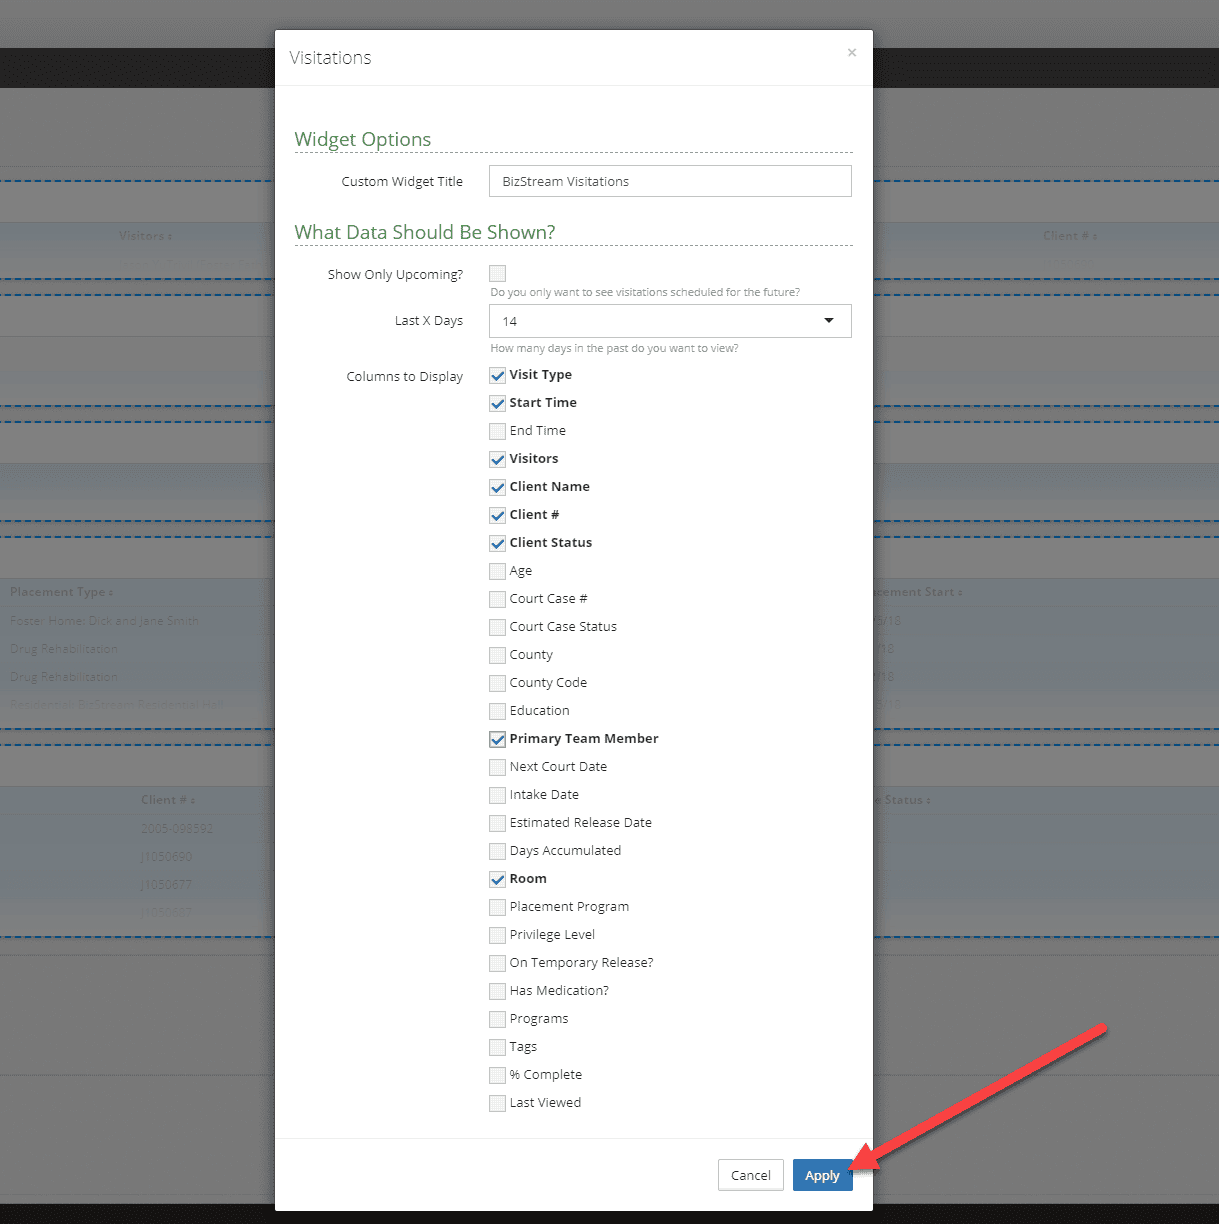
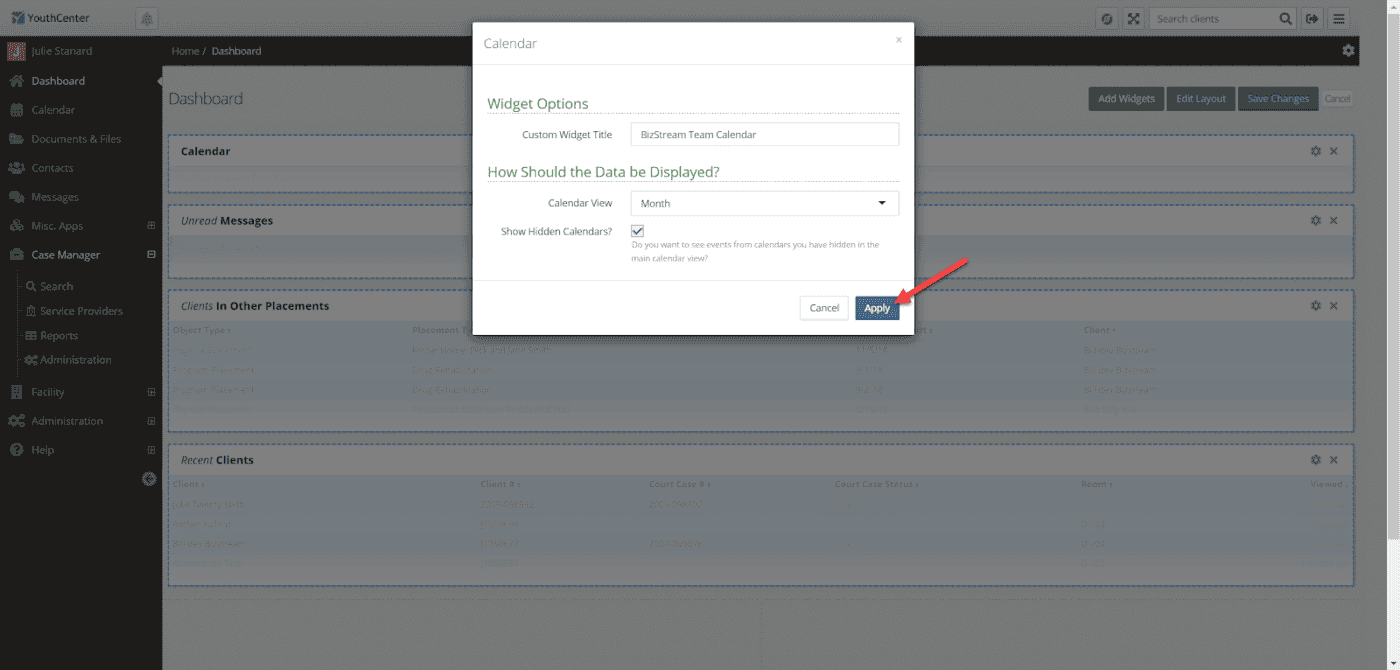
The Visitations widget will now display. To customize this widget, click the gear icon within the Visitations widget. Select the desired options then click “Apply” to confirm the changes.
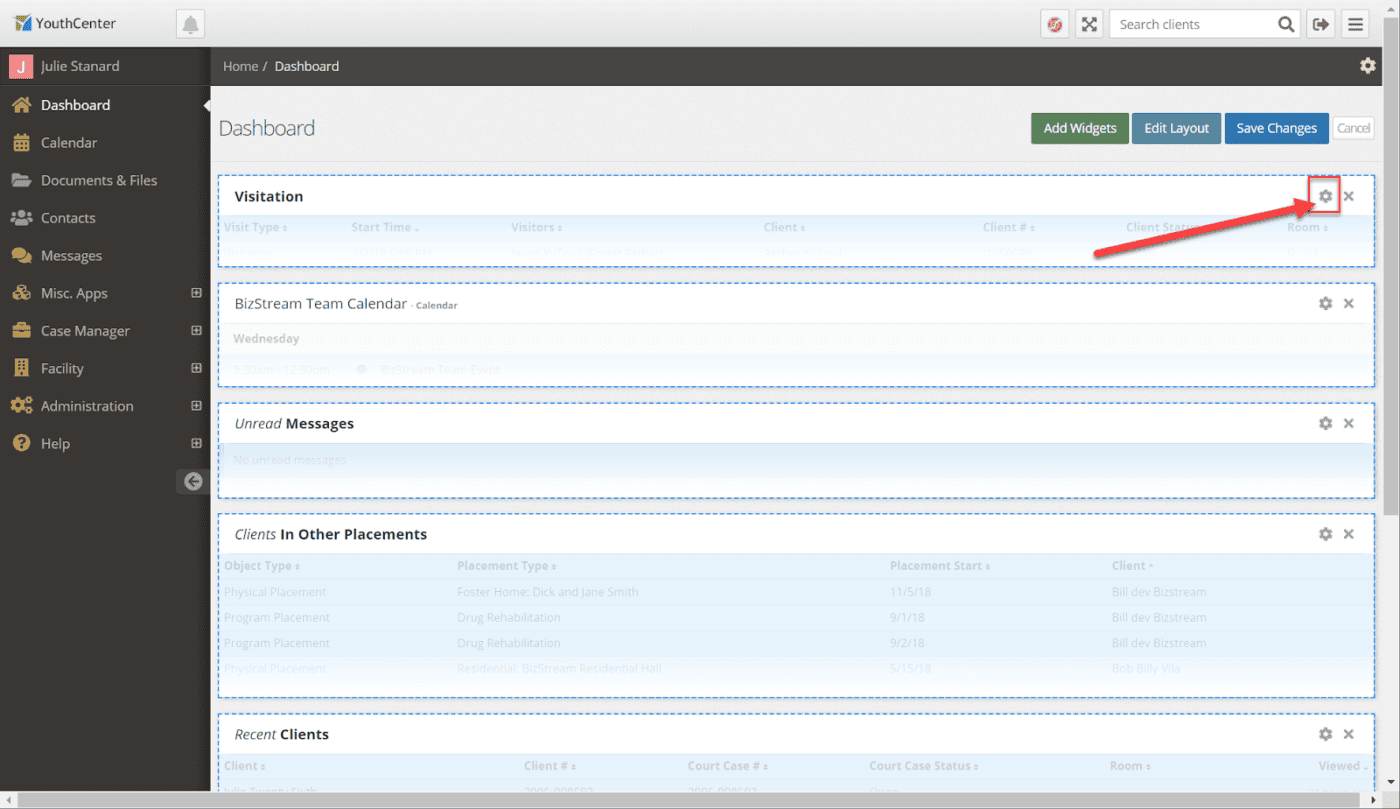
Click “Save Changes” to confirm the addition of the Visitation widget to the dashboard.
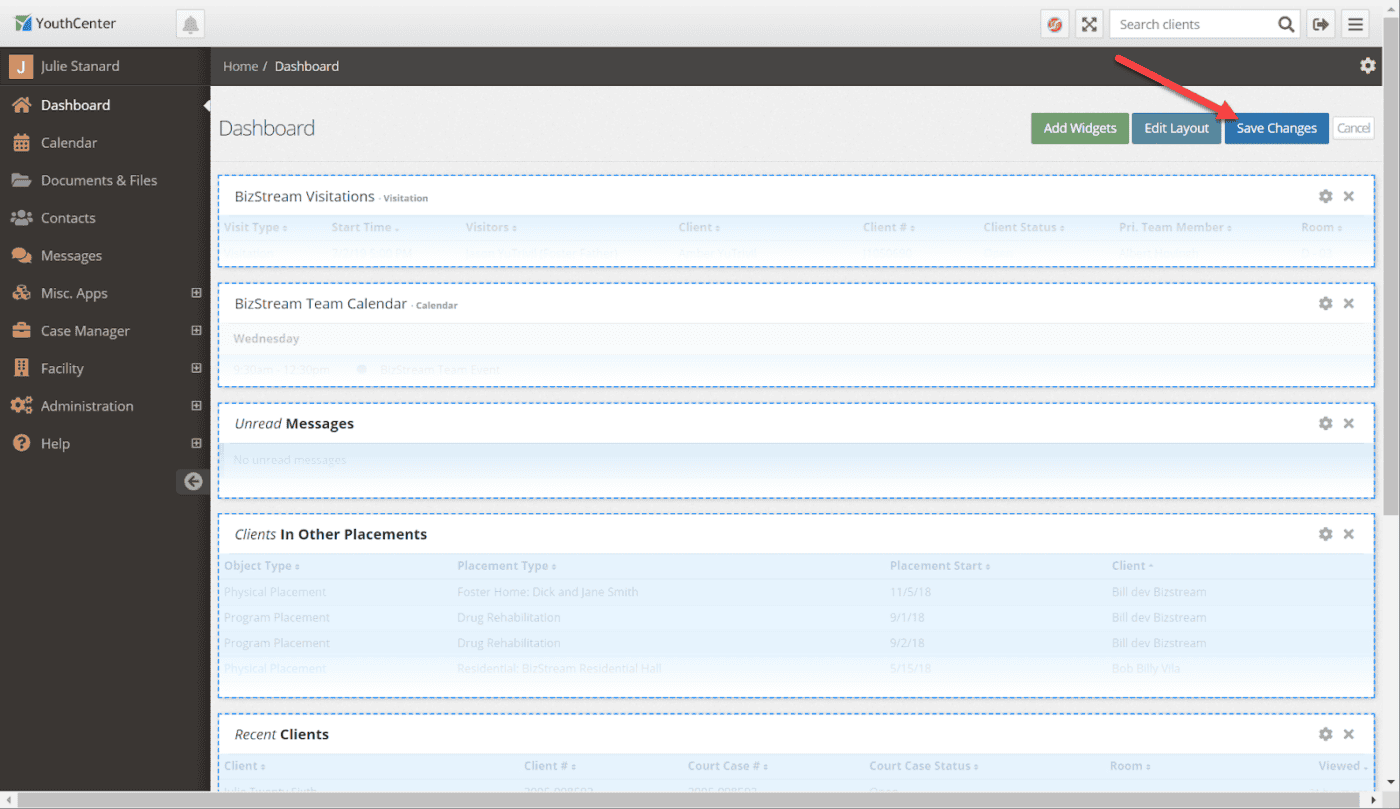
The Visitation widget will now display on your Dashboard!
Calendar
The Calendar application is a scheduling and time-management tool to keep track of events, classes and appointments, and is available to view in a List, Day, Weekly or Monthly format. There is also an addition of the Calendar widget to keep these commitments easily visible on the Dashboard.
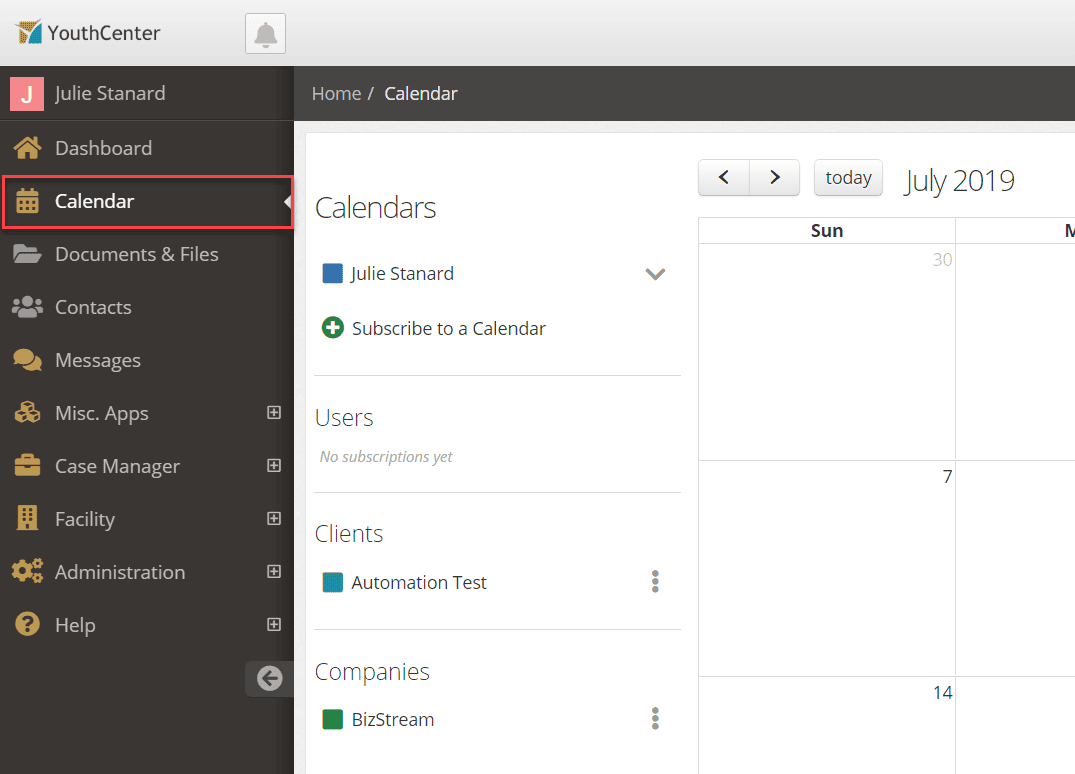
To access the Calendar, navigate to the “Calendar” banner on the main menu.
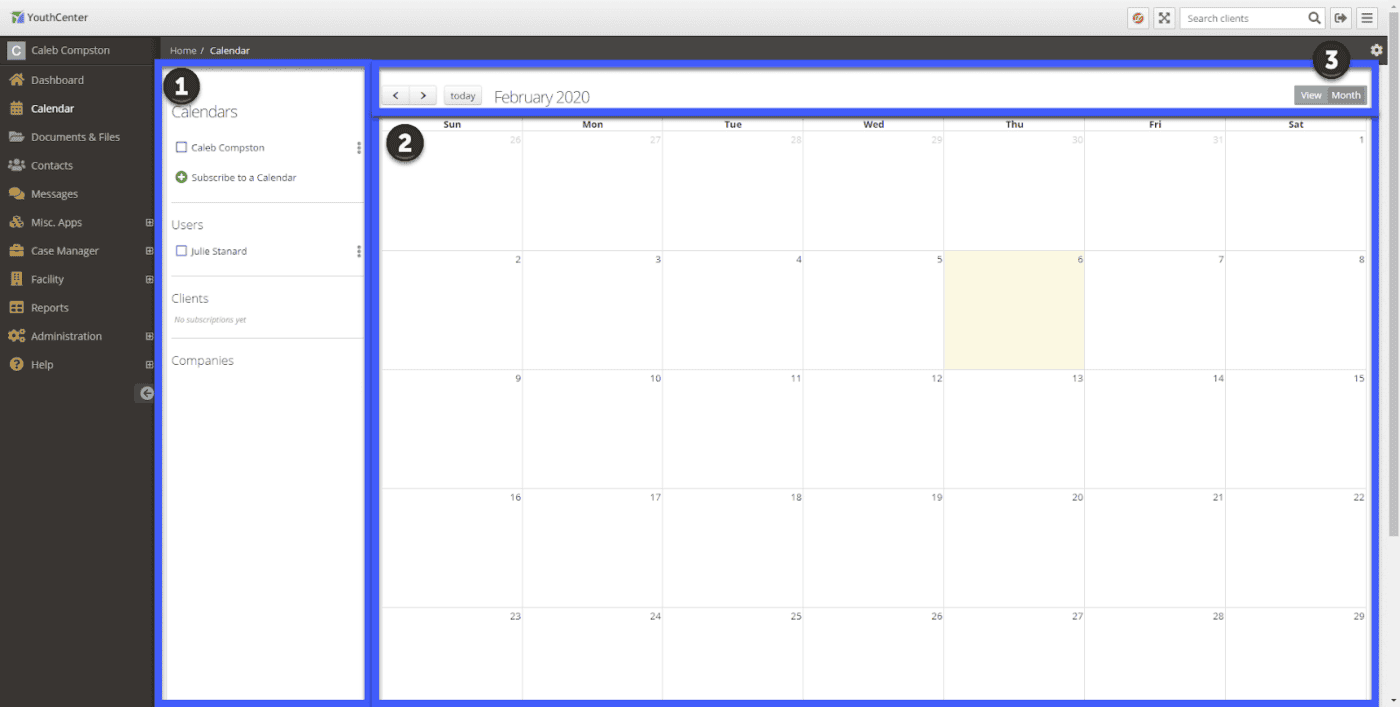
The Calendar has 3 sections. On the left-hand side (1) is where you can set up your calendar options, subscribe to other calendars and select which calendars you would like to view. The main body (2) is where the commitments will display in either a monthly, weekly, daily or list view. The top of the calendar (3) has navigation buttons as well as the view selection.
Set Up Your Calendar Options
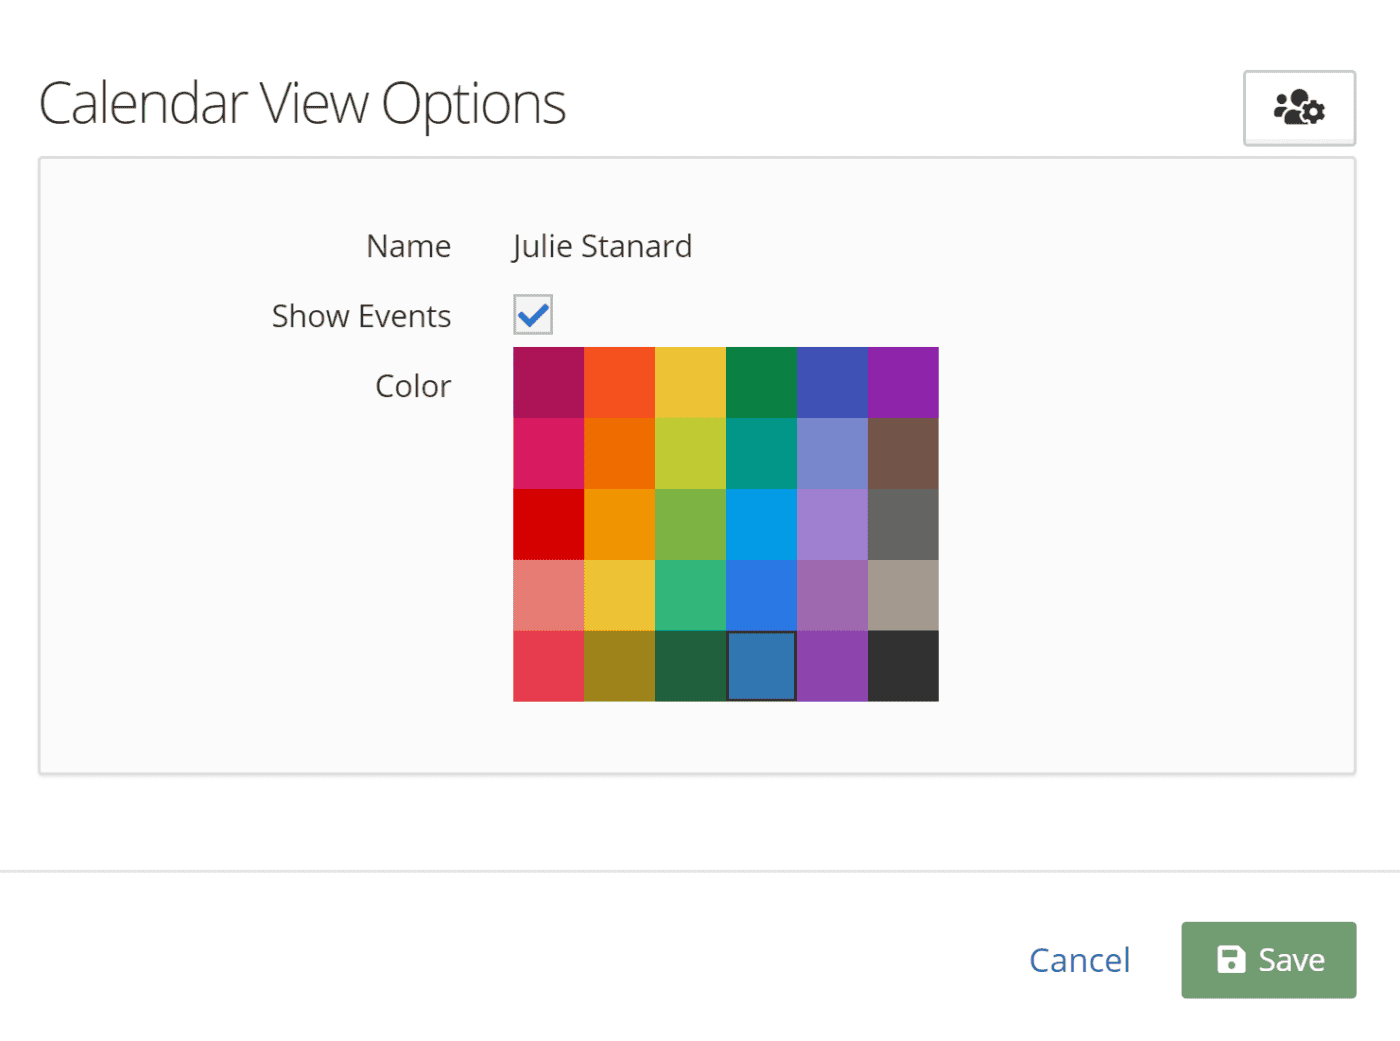
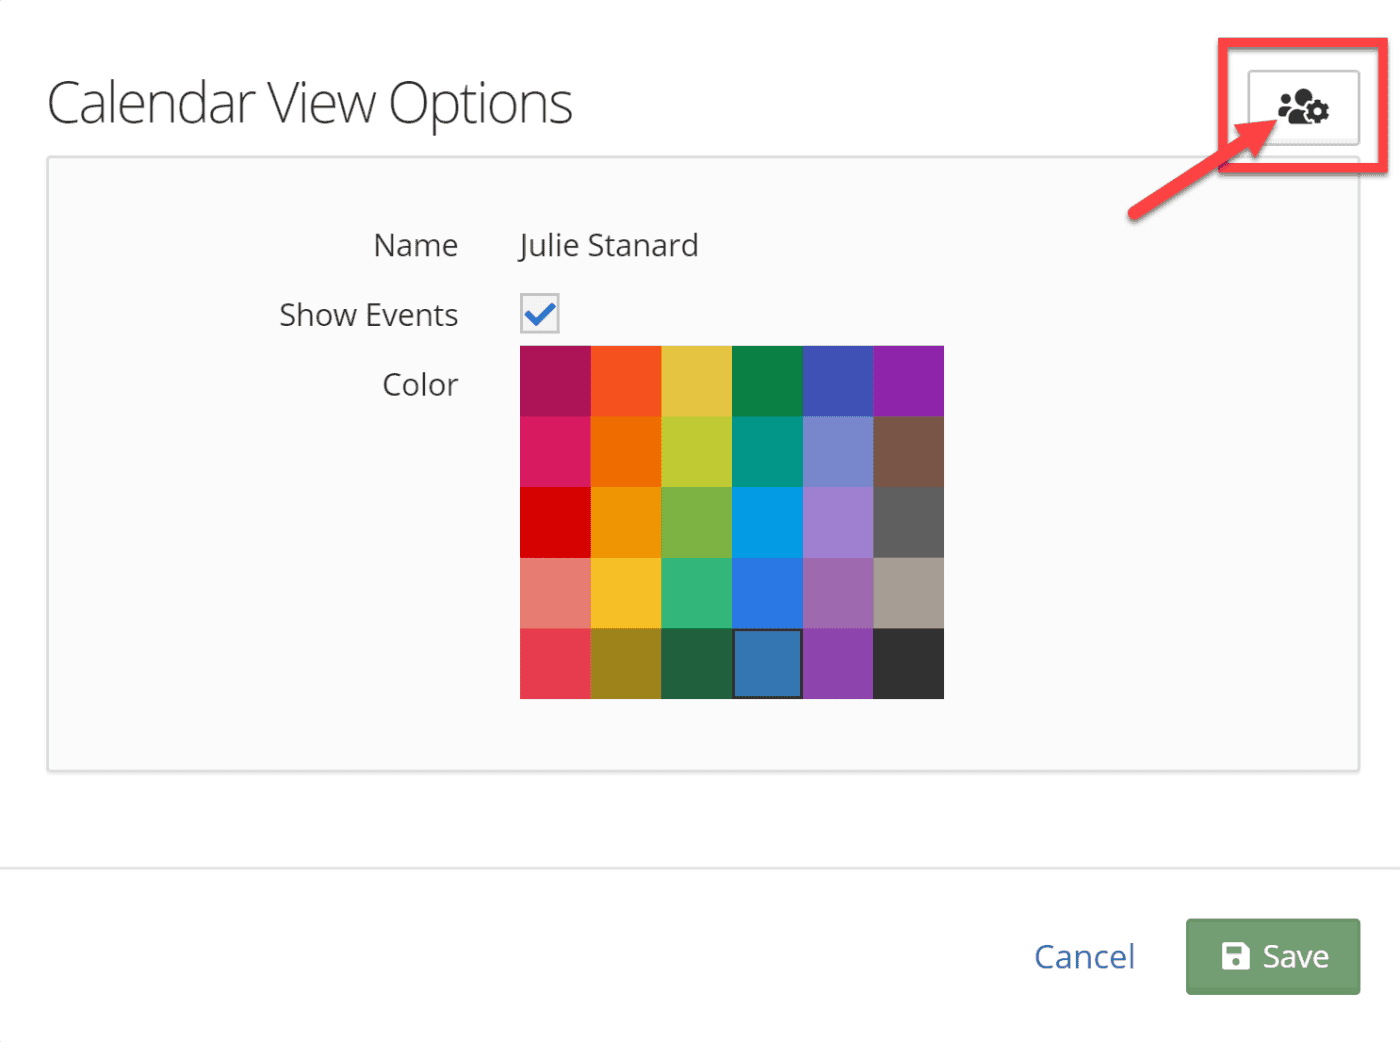
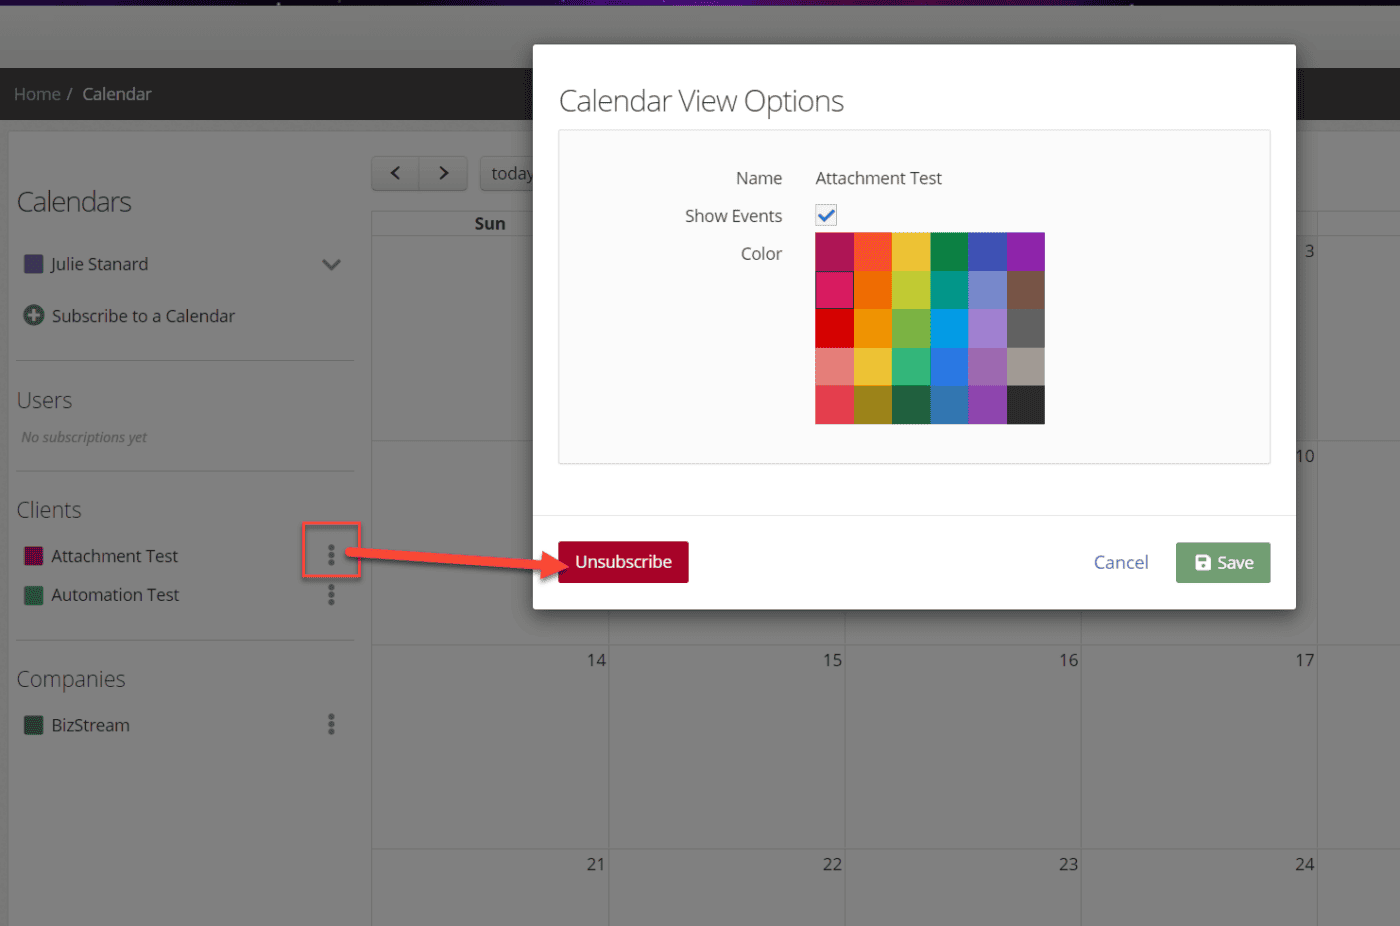
Clicking the kebab menu next to your calendar name will display the Calendar View Options menu.

On this screen, you can set your calendar colors and whether to display events.
To set up who can view and/or manage your calendar, and to set default notification options, click the gears icon in the upper right corner.
Subscribe to a Calendar
You can subscribe to as many calendars as you would like, but it is important to note that you can only subscribe to calendars that have set up permissions to be viewable by you. To subscribe to a calendar, click “+ Subscribe to a Calendar” and type the name of the user, client or company you wish to subscribe to in the search bar and click “Search”, then select the name in the search results to subscribe.
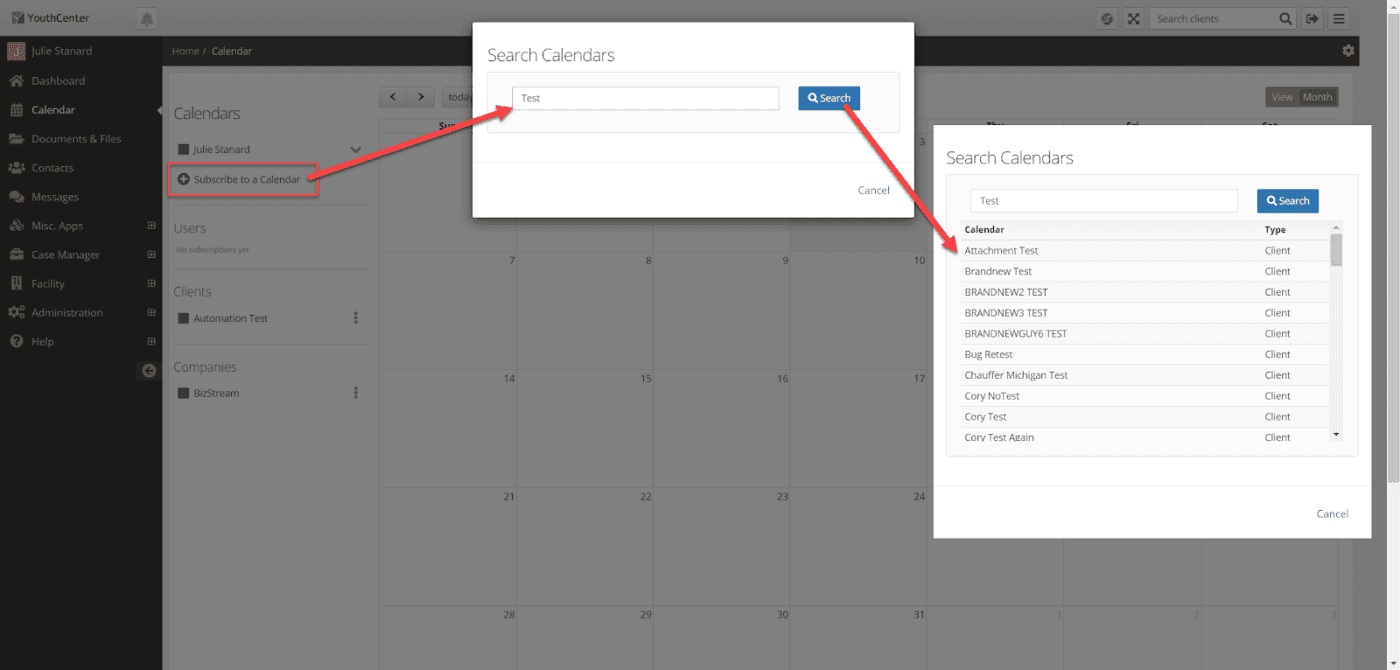
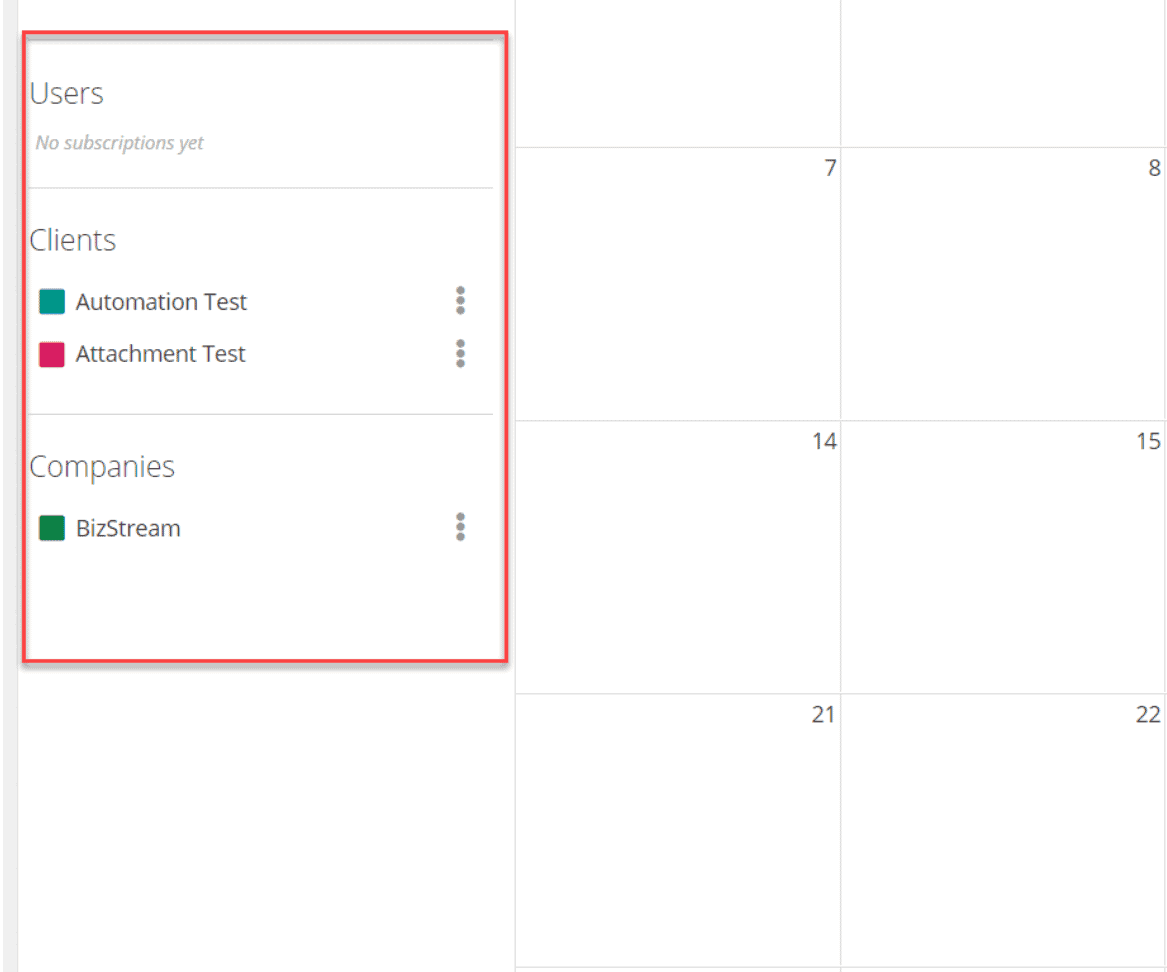
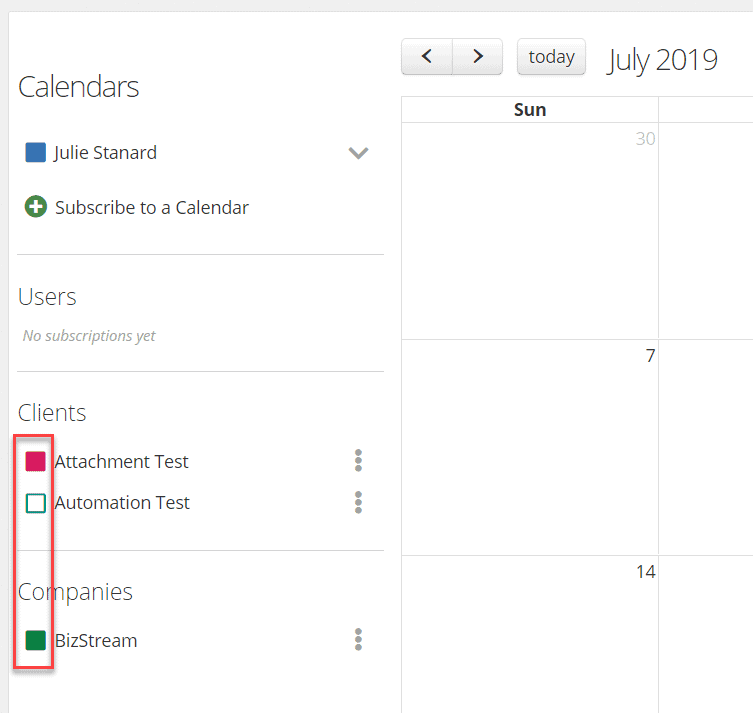
The calendar name will now display in your calendar’s toolbar either under “User”, “Client” or “Company”, depending on that calendar’s classification.
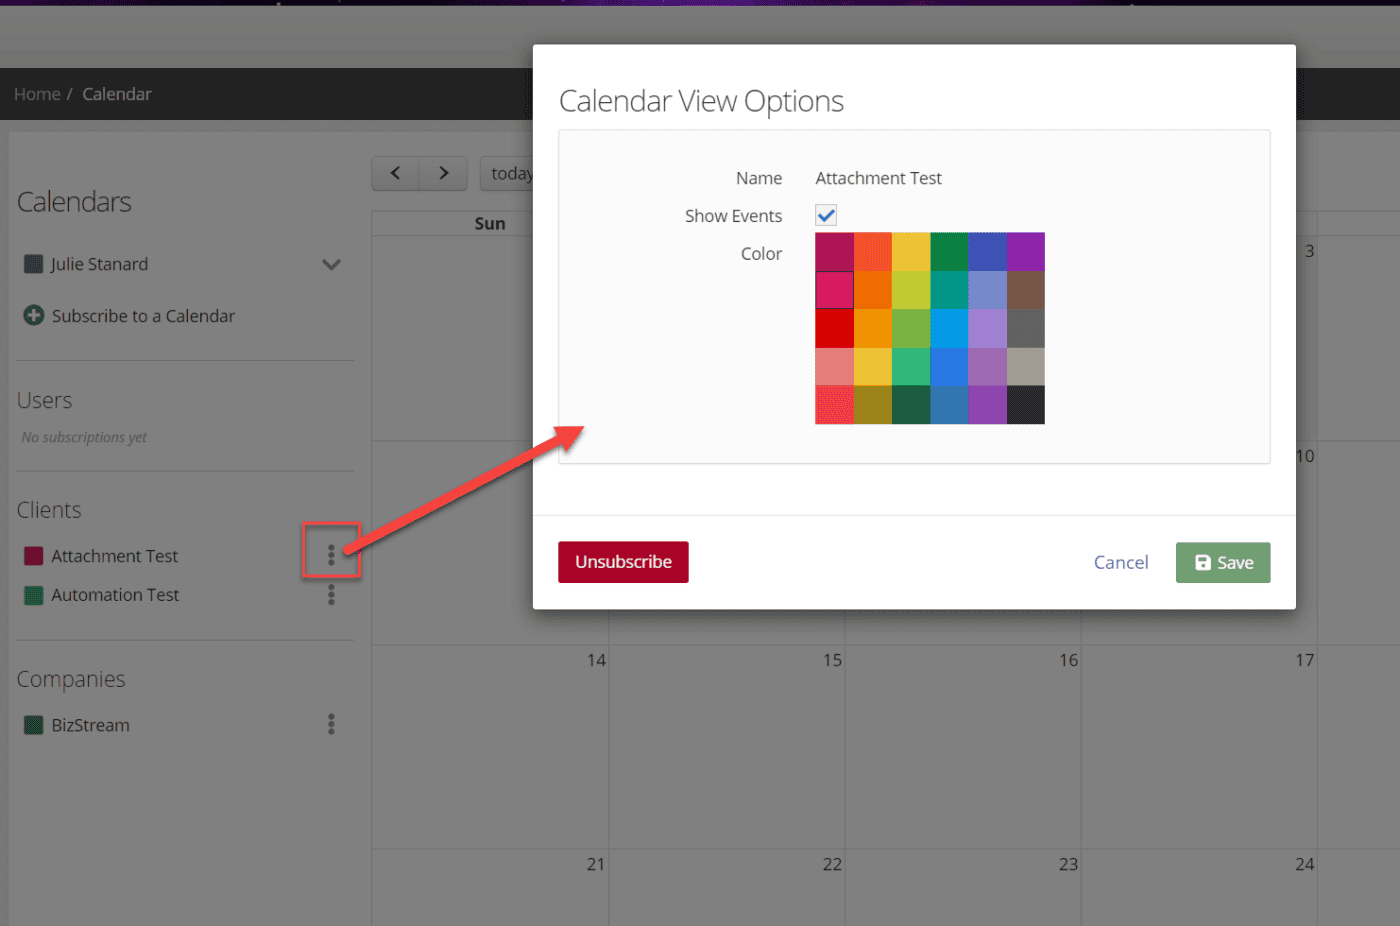
Clicking the kebab (3 dots) menu icon next to the calendar name will allow you to set up a specific color for that calendar’s events (a great way to visually separate what events are on what calendar!).
Unsubscribe from a Calendar
If at any time you wish to unsubscribe from a calendar, you can do so by clicking the dots icon next to the desired calendar and select the “Unsubscribe” button. The calendar will then be removed from your toolbar.
View Calendars
Checking the box next to a calendar’s name will display that calendar’s events. You can have multiple calendars selected to display at a time (this is when it is helpful to have the calendar’s different colors to differentiate between them). To hide a calendar’s events from your calendar (but remain subscribed), simply uncheck the box next to that calendar’s name and the events will no longer display on your calendar.
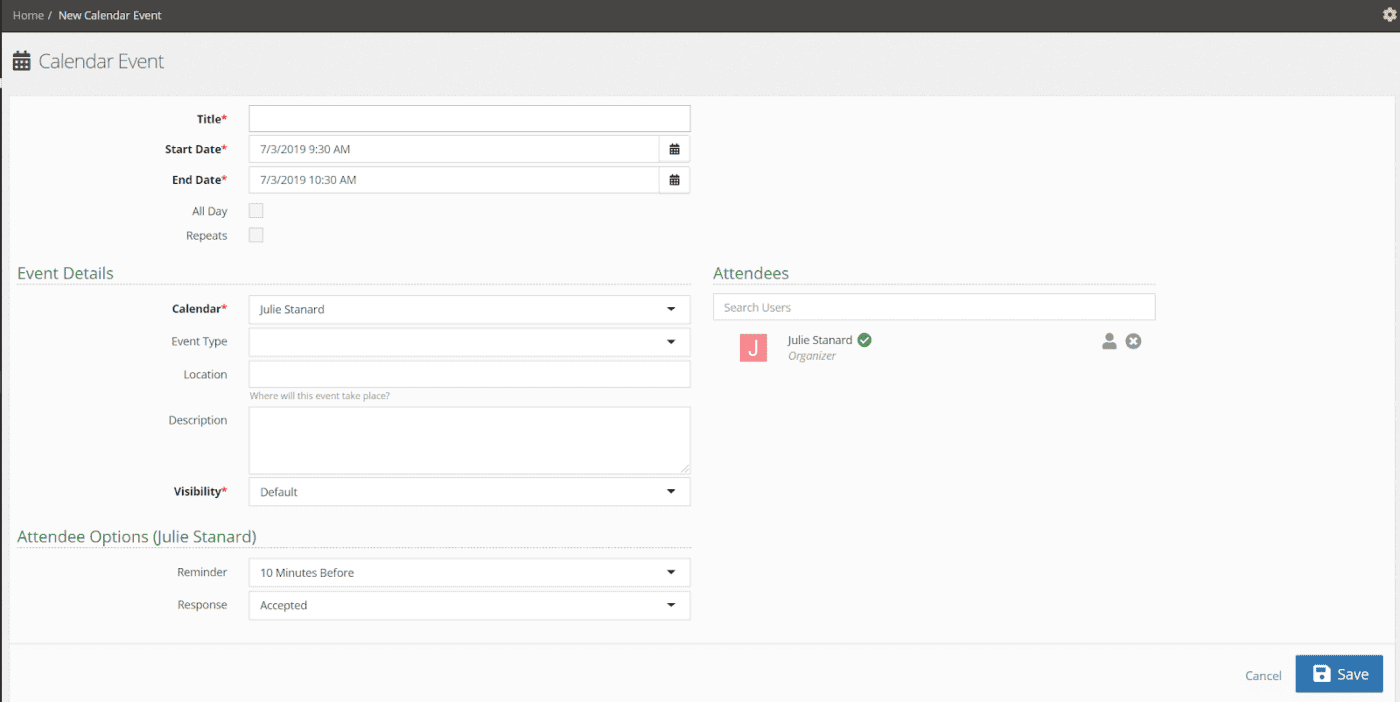
Add Calendar Events
To add a calendar event from the calendar view, click a date on the calendar to bring up the New Calendar Event form. Here you will select the event’s title, date and time, calendar, type, location, visibility, and attendees. There are also helpful reminder options at the bottom of the form.
View Calendar Events
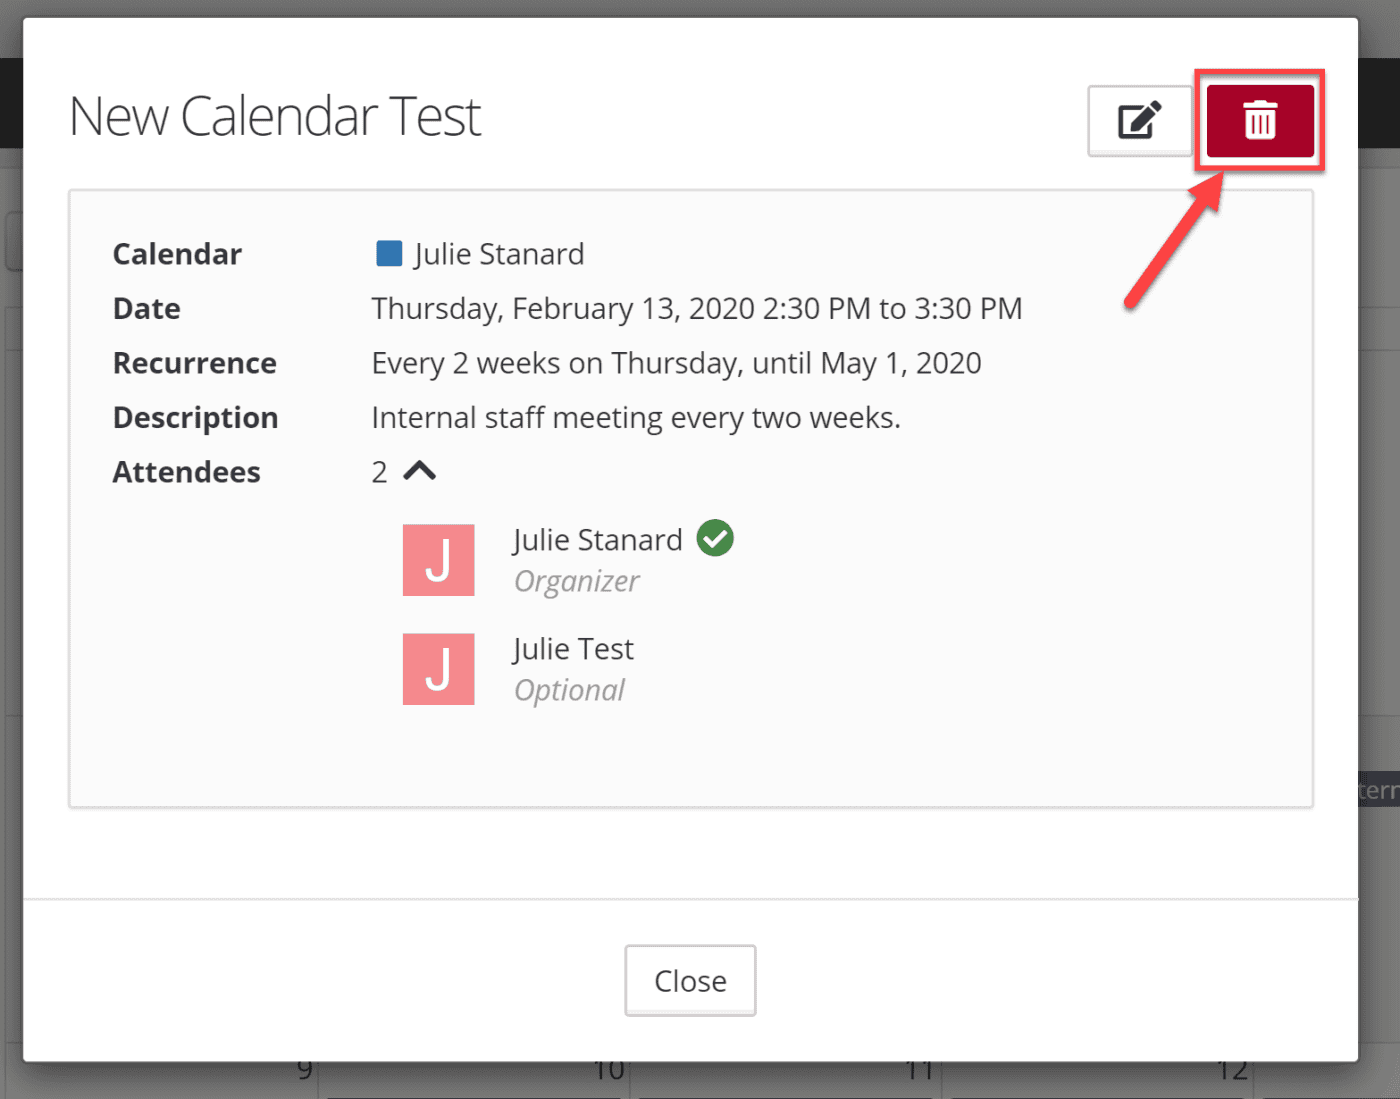
To view an event, click the appointment on the calendar to bring up the appointment details screen. Here you can quickly view important details of the event. To return to the calendar, click the “Close” button.

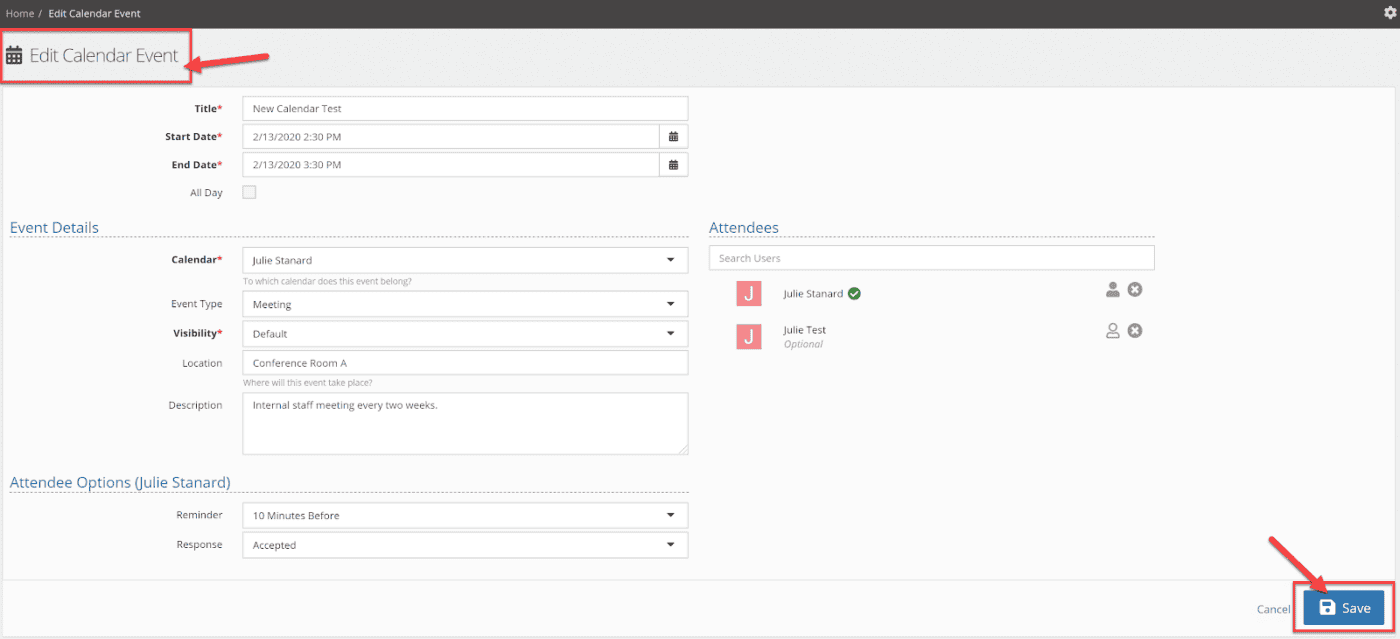
Edit a Calendar Event
To edit an event, click on the event you wish to edit and select the pencil icon in the upper right corner of the details screen. Note: this icon will not display if your user does not have permission to edit calendar events.
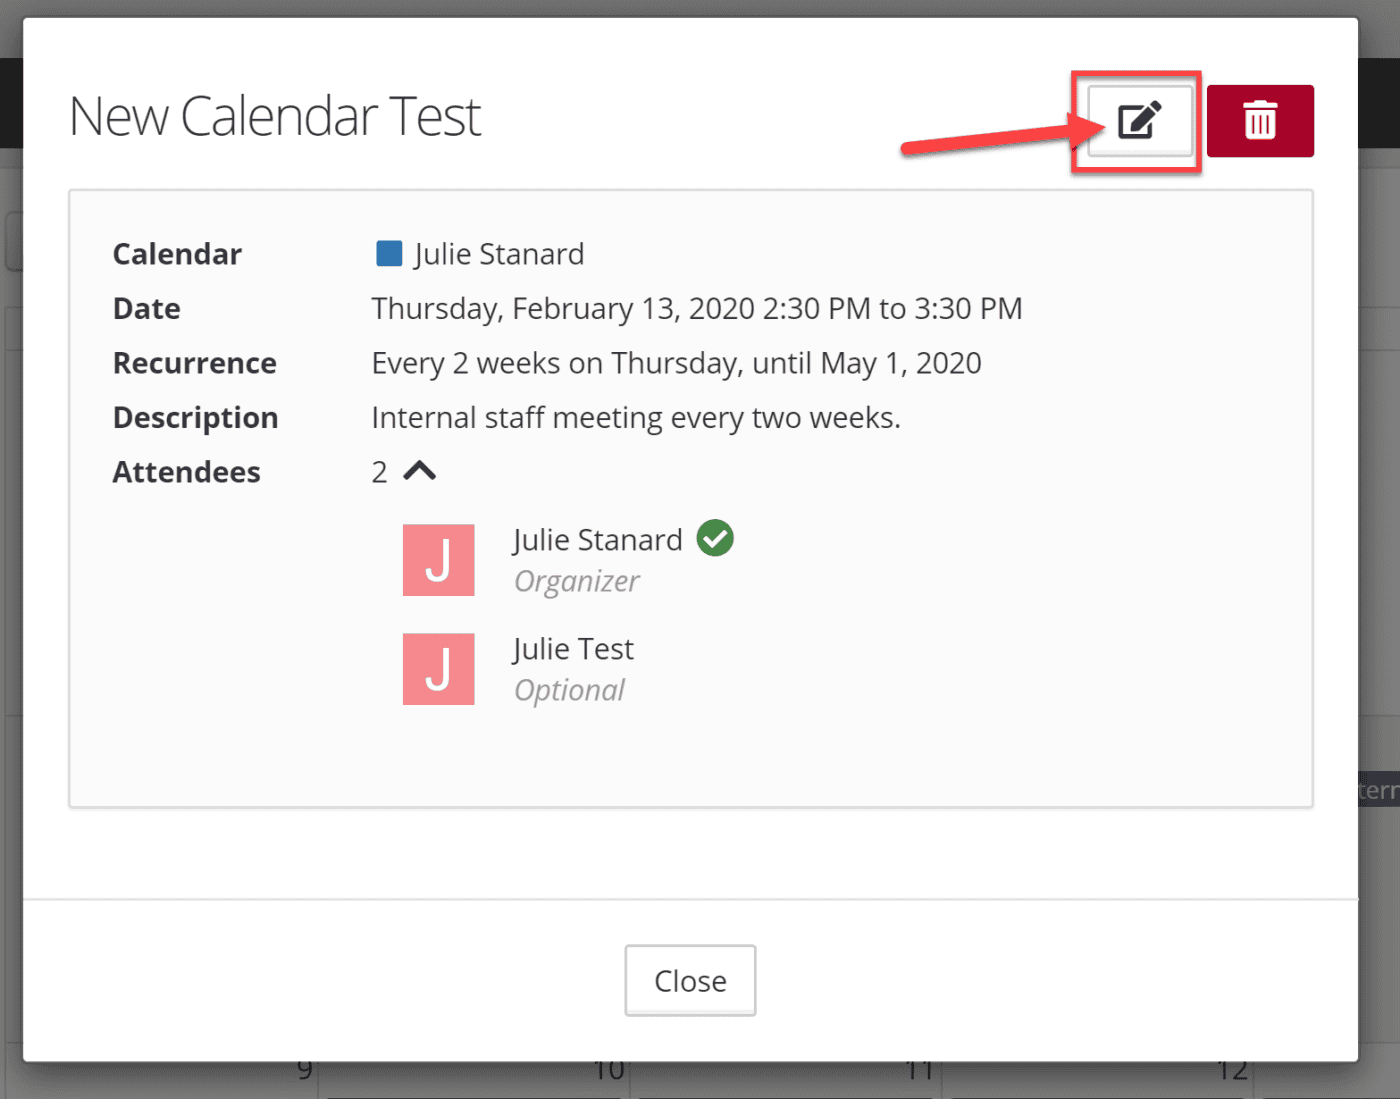
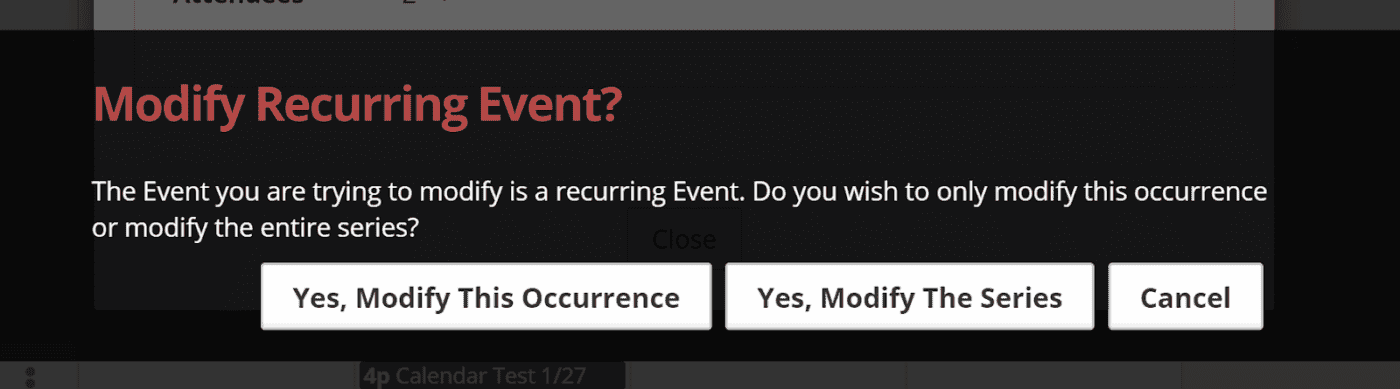
If the event is recurring, a message will display asking if you wish to modify the entire series or a single occurrence.
Make the necessary changes to the Edit Calendar Event form and click “Save” to commit the changes.
Delete a Calendar Event
To delete an event, click on the trash can icon in the upper right corner. Note: this icon will not display if your user does not have permission to delete calendar events.
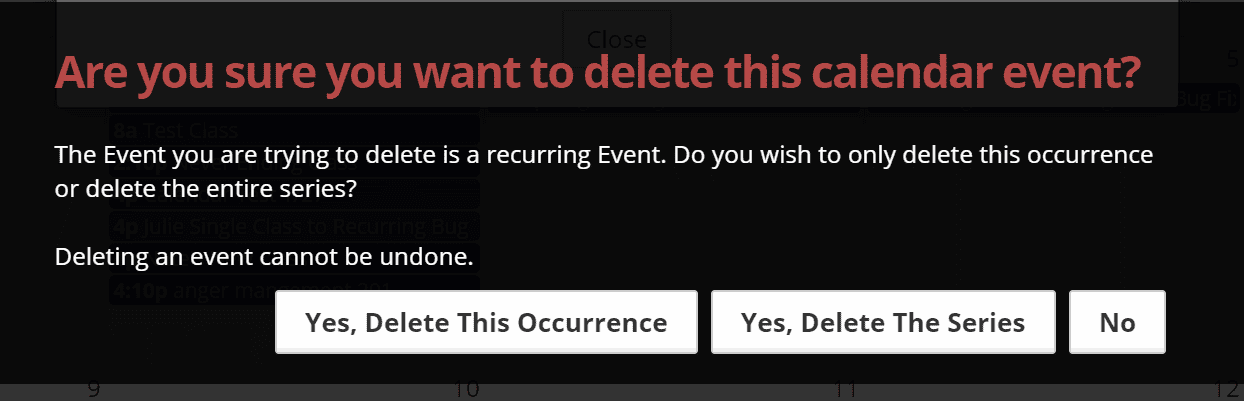
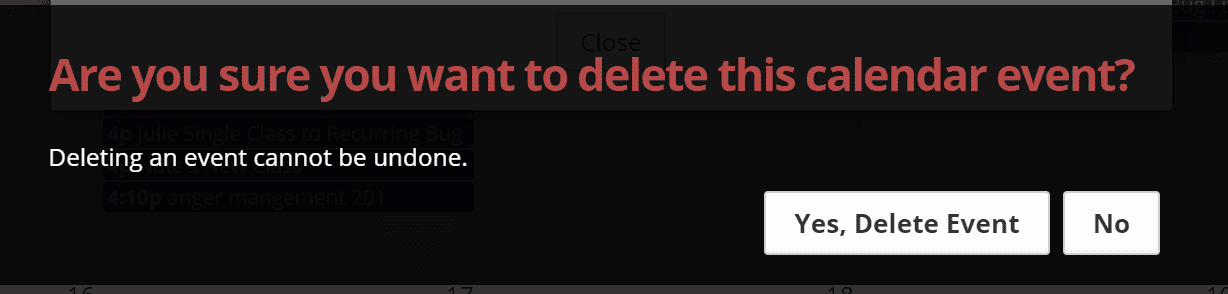
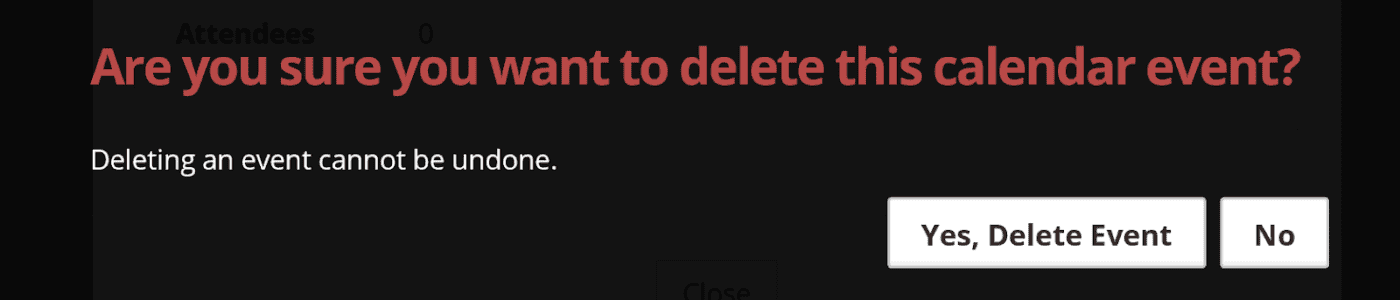
If the event is a recurring, a message will display asking if you wish to delete the entire series or a single occurrence. Click the appropriate response and the event(s) will be deleted. Note: deleting an event cannot be undone.
If the event is non-recurring, a message will display asking for confirmation that you would like to delete the single event. Click “Yes, Delete Event” to remove the event. Note: deleting an event cannot be undone.
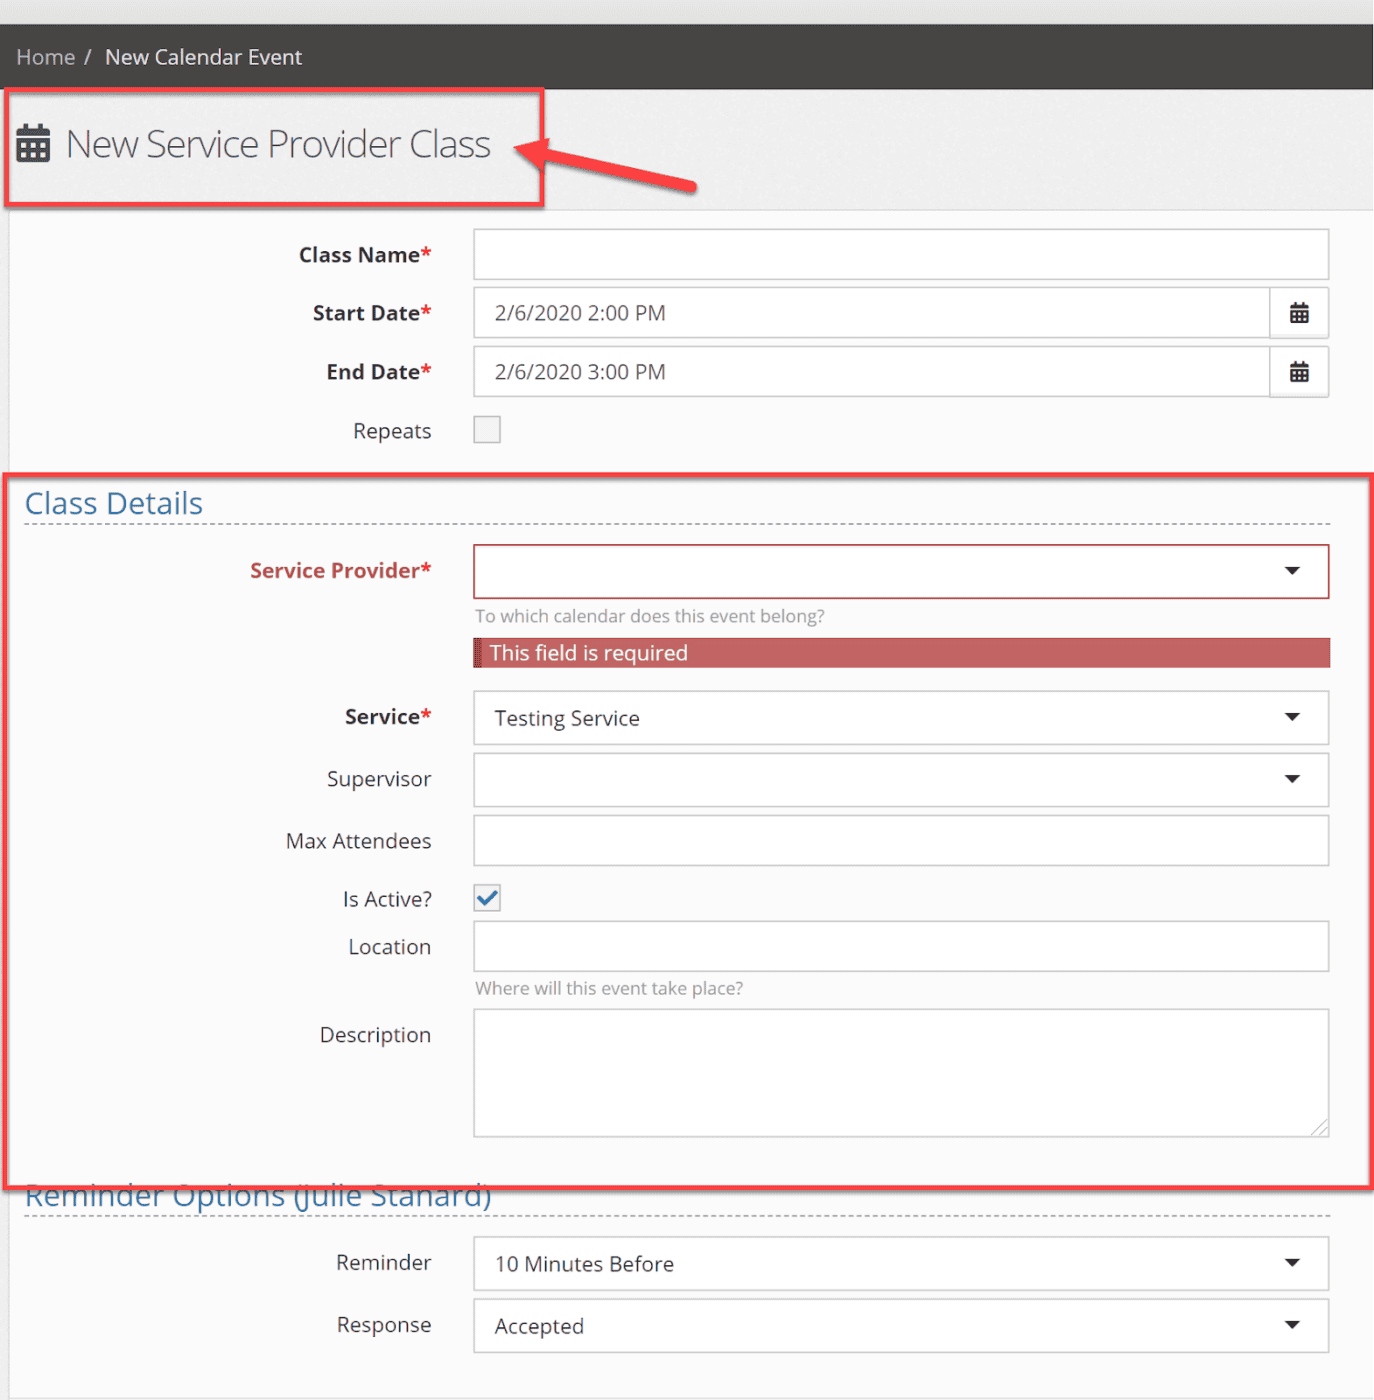
Add a Service Provider Class
The service provider class form now uses the upgraded user interface of the calendar event form. When creating a new class, note that the top of the form displays “New Service Provider Class” and will have fields pertaining to Class Details instead of Event Details.
View Service Provider Class Details
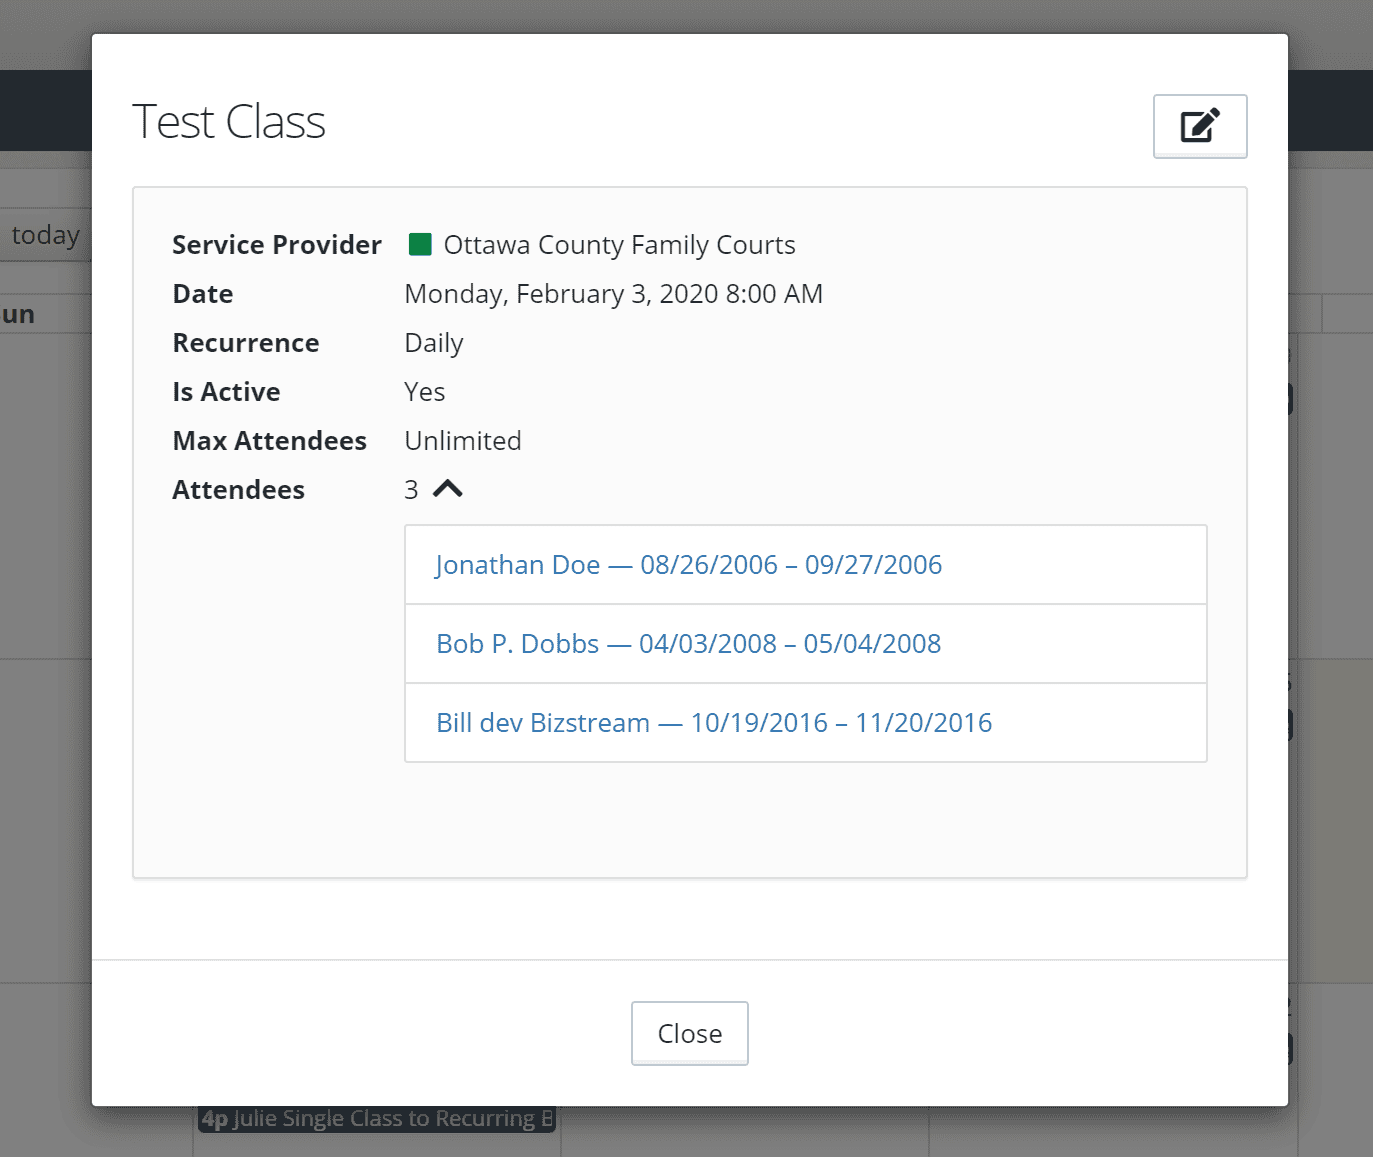
Classes can be viewed directly from the Calendar.
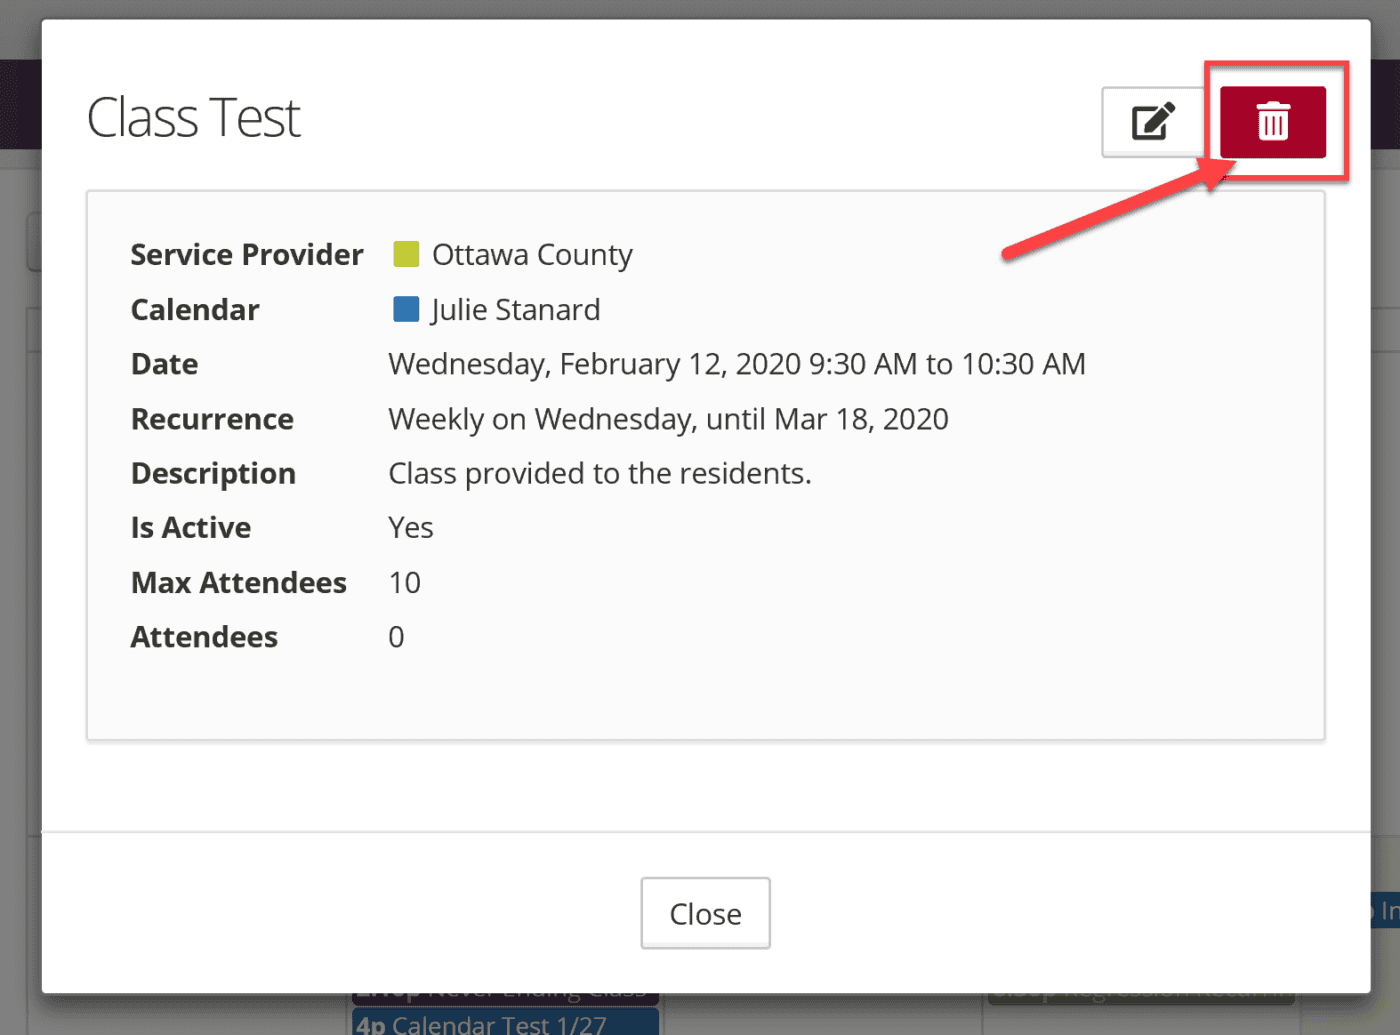
To view a class, click the class appointment on the calendar to bring up the appointment details screen. Here you can quickly view important details of the class, such as what clients are enrolled and the maximum number of participants allowed. To return to the calendar, click the “Close” button.
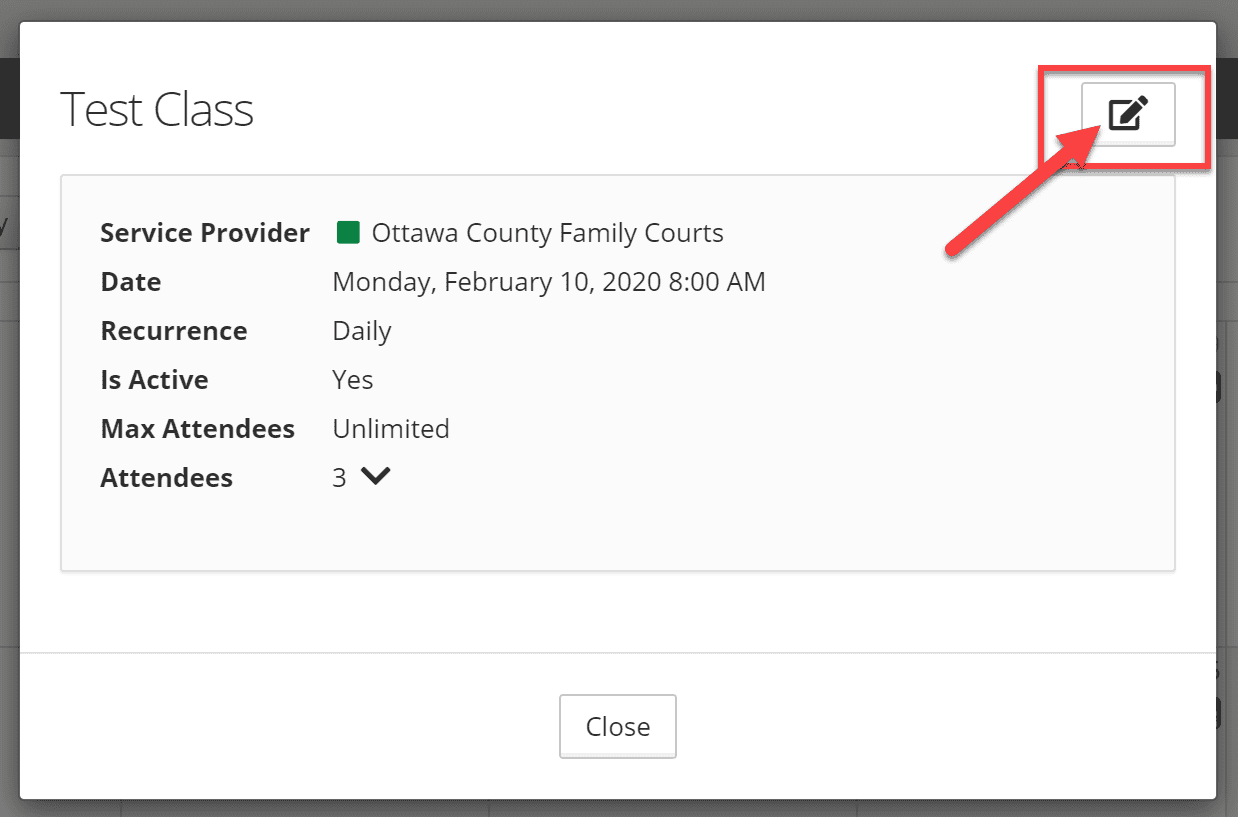
Edit a Service Provider Class
To edit a class, click on the class you wish to edit on the calendar (conversely, you may also select the class from the Service Providers application menu) and select the pencil icon in the upper right corner of the details screen. Note: this icon will not display if your user does not have permission to edit class events.
If the class is a recurring class, a message will display asking if you wish to modify the series.
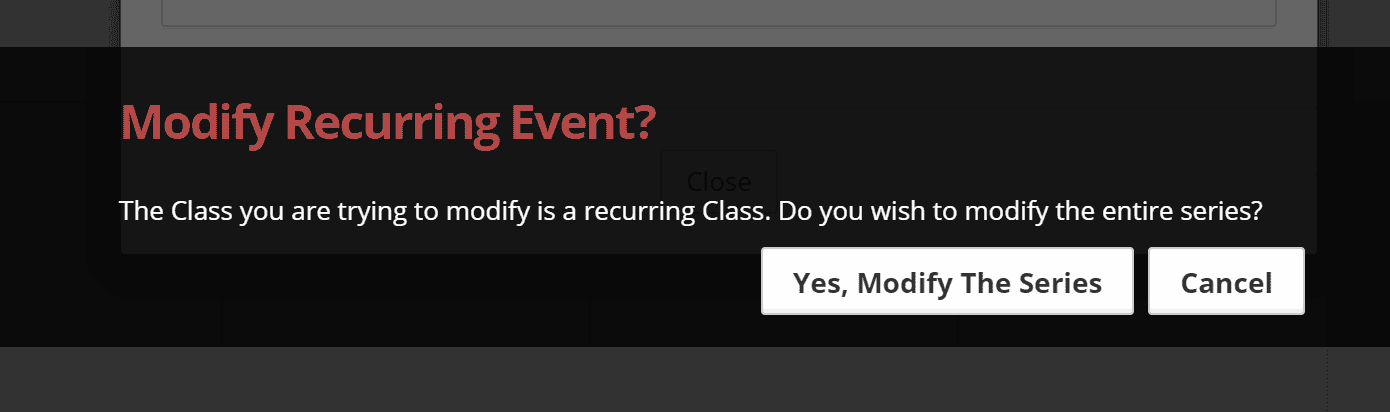
Make the necessary changes to the Edit Service Provider Class form and click “Save” to commit the changes.
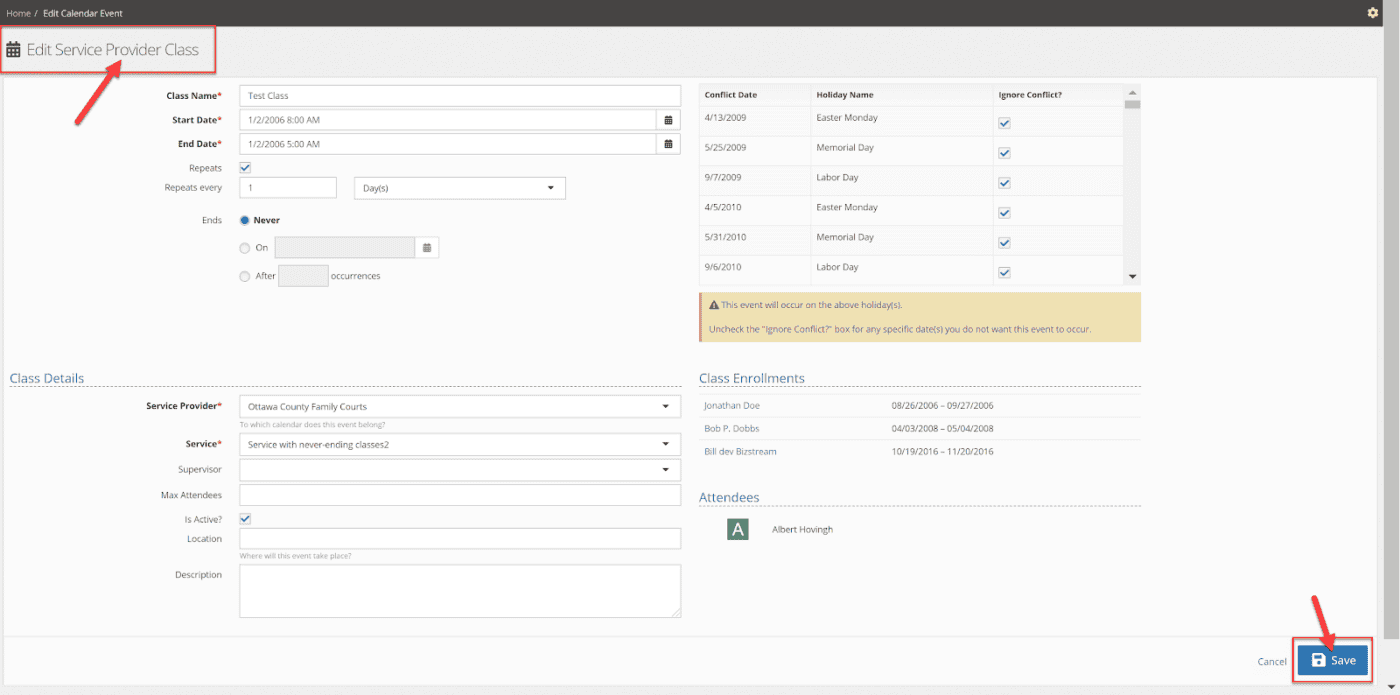
The class information and calendar will be updated with the new information.
Delete a Service Provider Class
To delete a class, click on the trash can icon in the upper right corner. Only classes that do not have any attendees may be deleted. Note: this icon will not display if your user does not have permission to delete calendar events, or if a class has attendees enrolled.
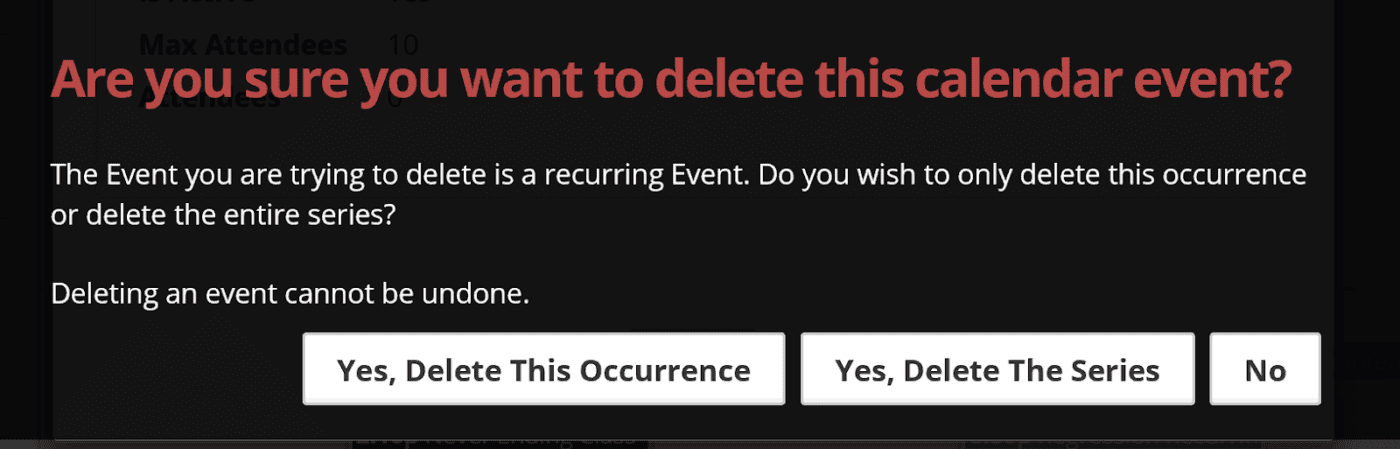
If the class is recurring, a message will display asking if you wish to delete the entire series or a single occurrence. Click the appropriate response and the classe(s) will be deleted. Note: deleting a class cannot be undone.
If the class is non-recurring, a message will display asking for confirmation that you would like to delete the single class. Click “Yes, Delete Event” to remove the class. Note: deleting a class cannot be undone.
Calendar Widget
There is now a Calendar widget available that can be added to your dashboard. To add the widget to your dashboard, select the gear icon on the Dashboard page.
Select “Add Widgets” to bring up the list of available widgets. Select “Calendar” from this list.
The Calendar widget will now display. To customize this widget, click the gear icon within the Calendar widget. Select the desired options then click “Apply” to confirm the changes.
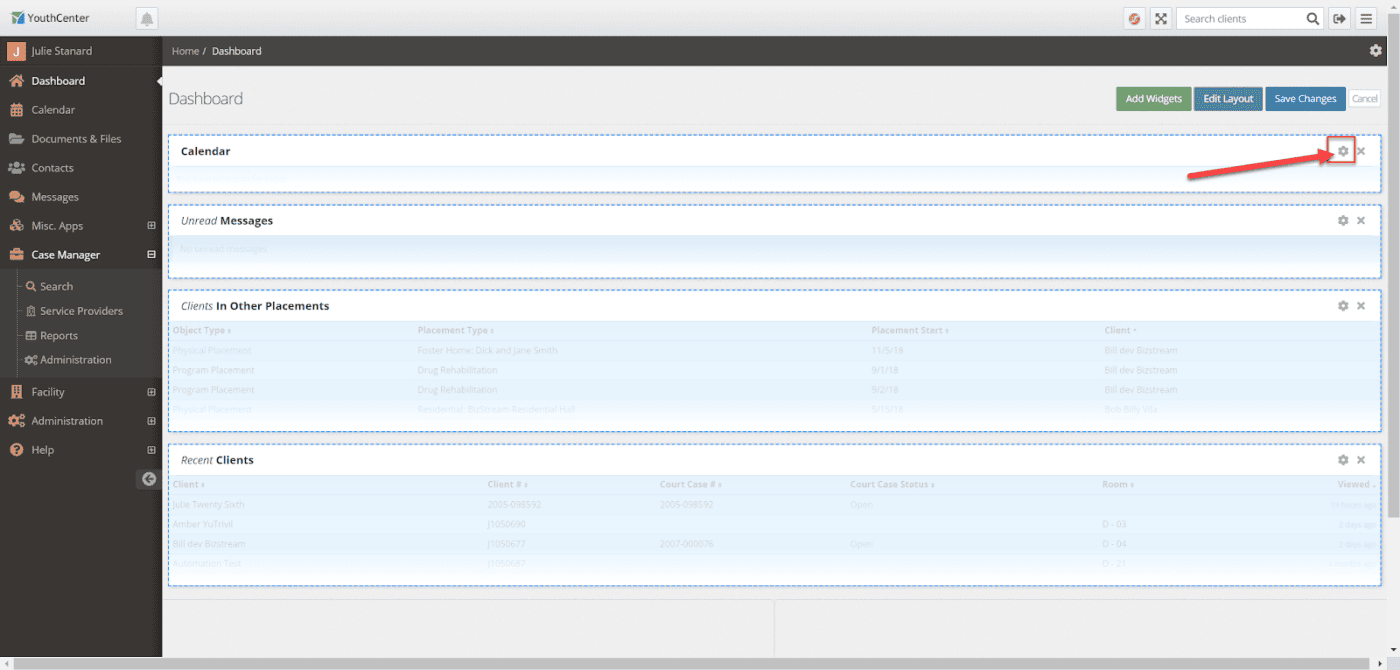
Click “Save Changes” to confirm the addition of the Calendar widget to the dashboard.
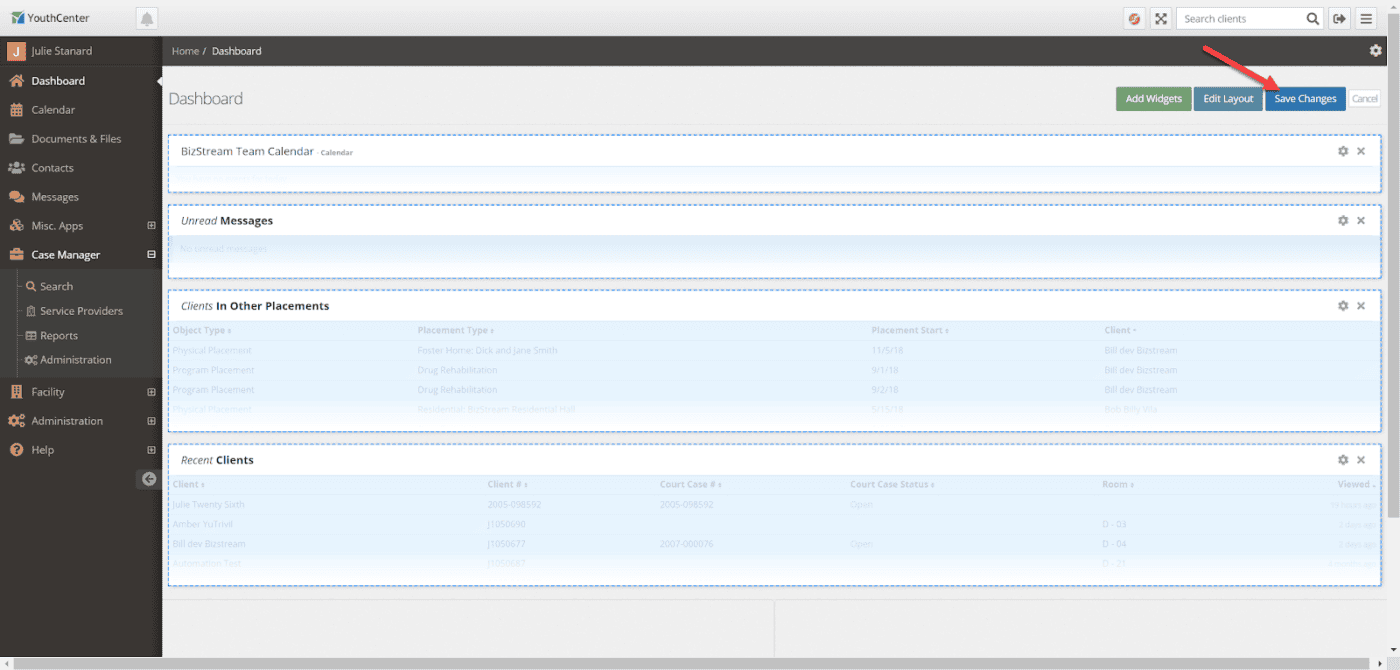
The calendar will now display on your Dashboard!
Audit Log
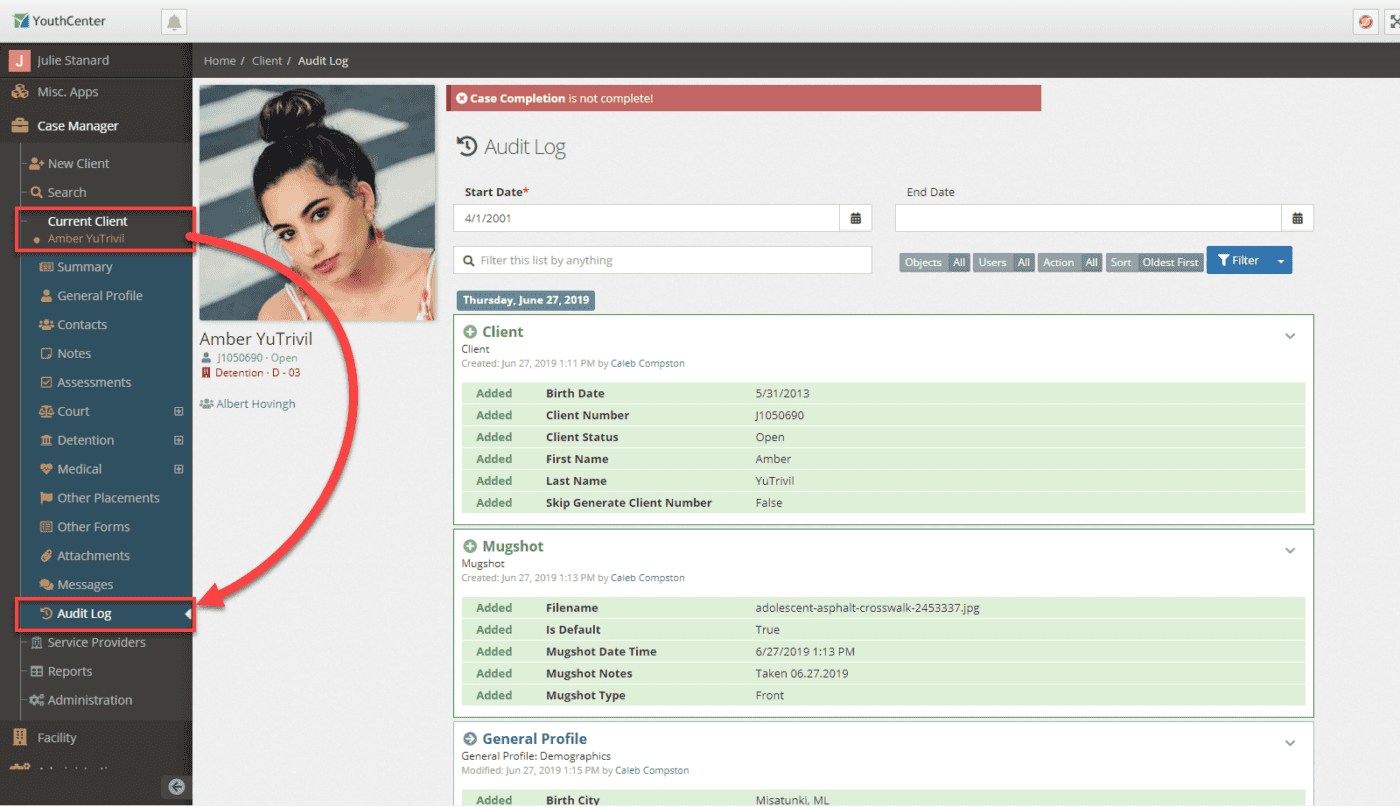
The Audit Log application is where user actions on client records are recorded and displayed by the system. The Audit Log application can be found in the menu tree underneath the Current Client banner when you have a client selected. It is important to note, not all users will have access to this application. It is typically reserved for Administrator users.
Viewing the Audit Log:
The Audit Log page records when information is either added, modified, or deleted on a client’s account, and can become quite long depending on the amount of actions taken. The log is displayed in list form, and to help narrow a potentially long list, we have added multiple ways to filter and visualize the different actions so that users can find the information they need quickly.
Filter the Audit Log:
There are two ways to filter the audit log. They can be used alone or combined to really fine-tune the results!
Header Filters
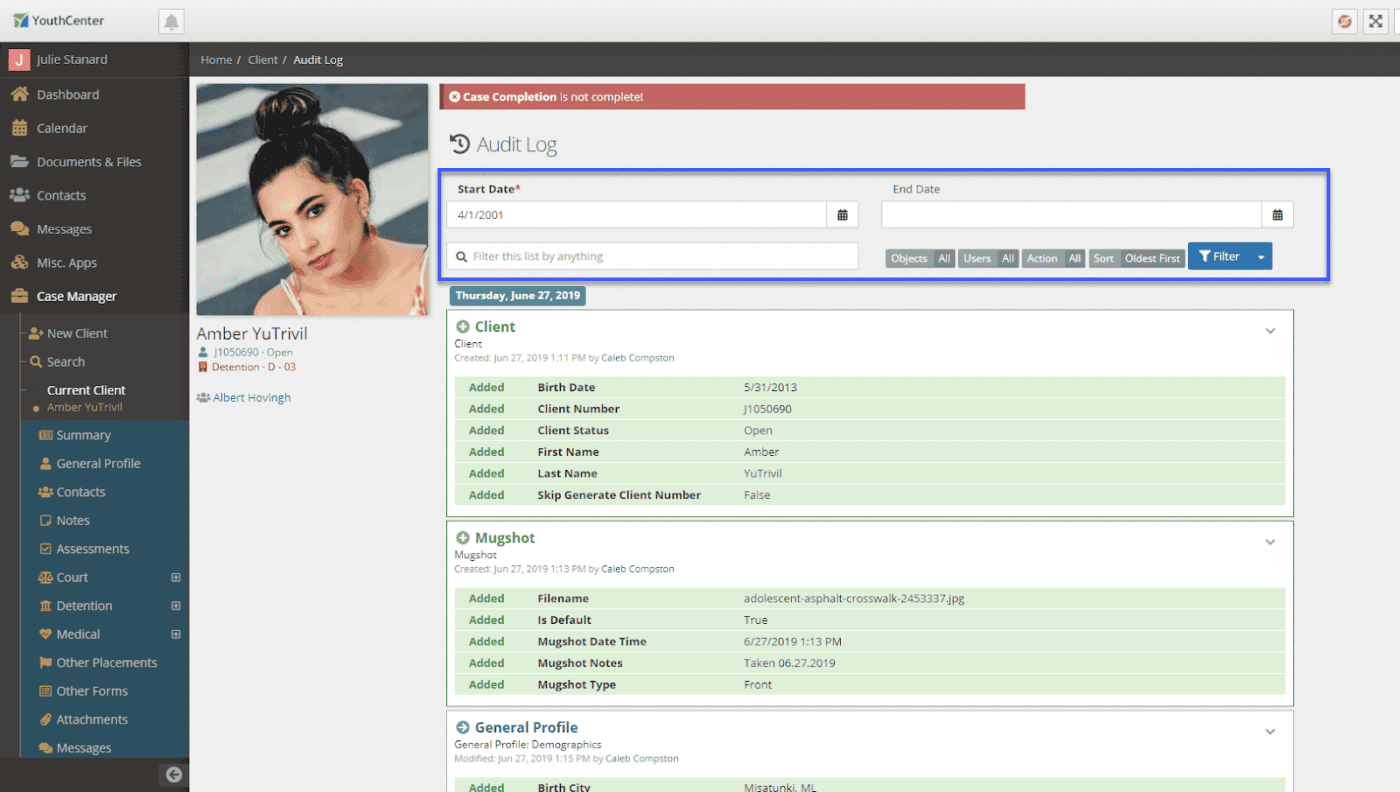
Filter the entire list with the filtering options that are located at the top of the Audit Log page. The list can be filtered by start date, end date, text, objects, users, and actions. It can also be sorted by oldest or newest.
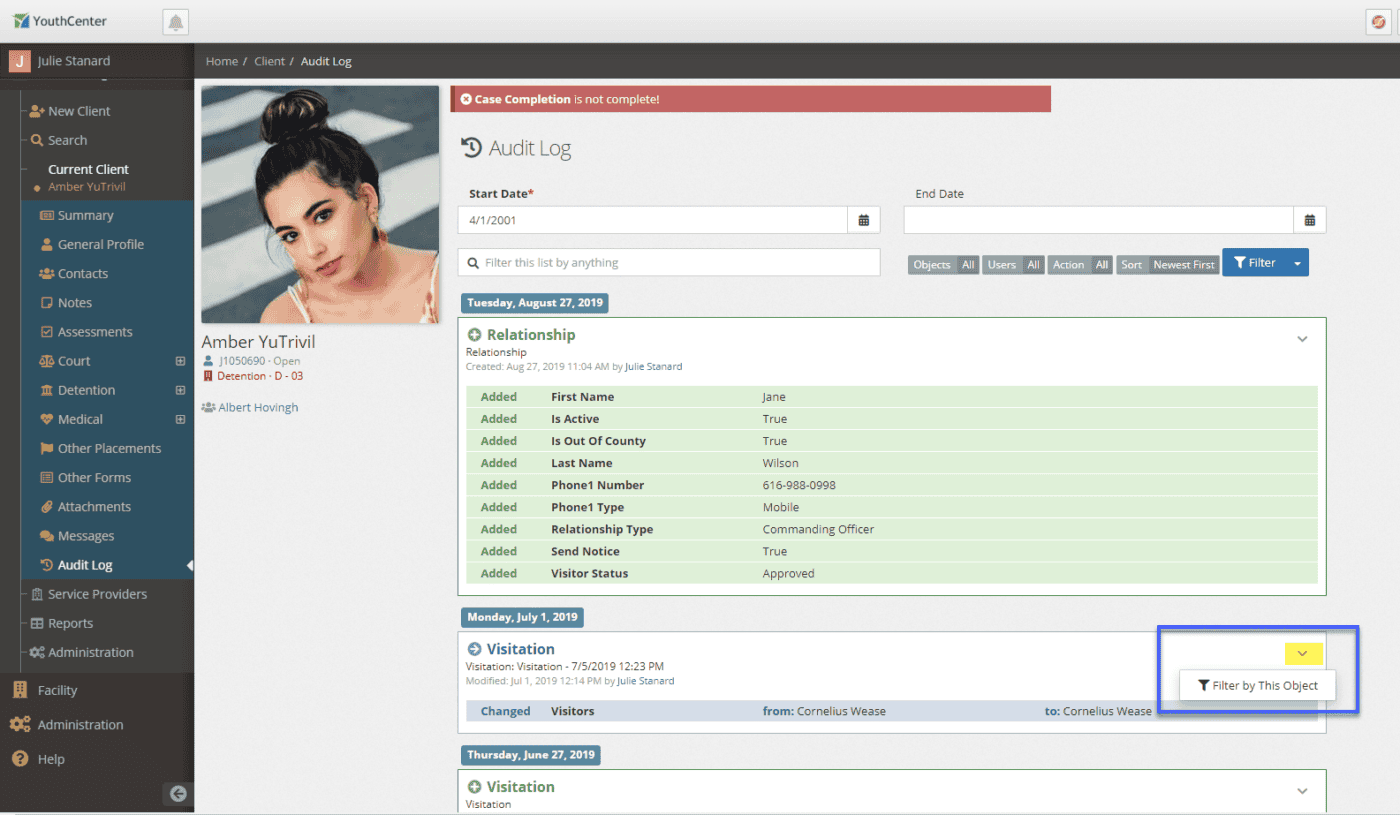
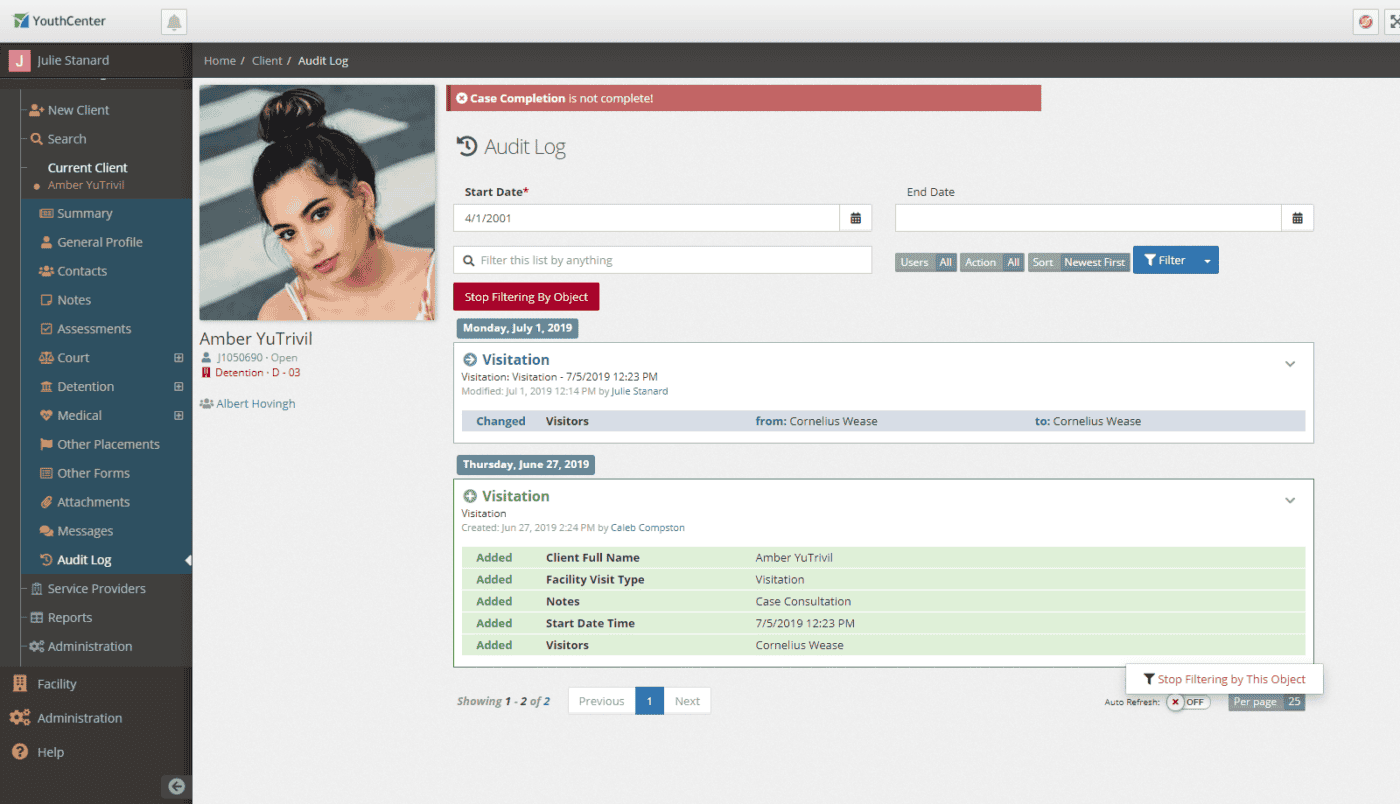
Object History Filter
Filter on an individual entry by clicking the down caret within the record and select “Filter by This Object”. The list will then filter by that entry and include historical information that is related to the entry.
To demonstrate in the example below, see that filtering the entry for a changed visitation then displays that vistiation’s historical data.
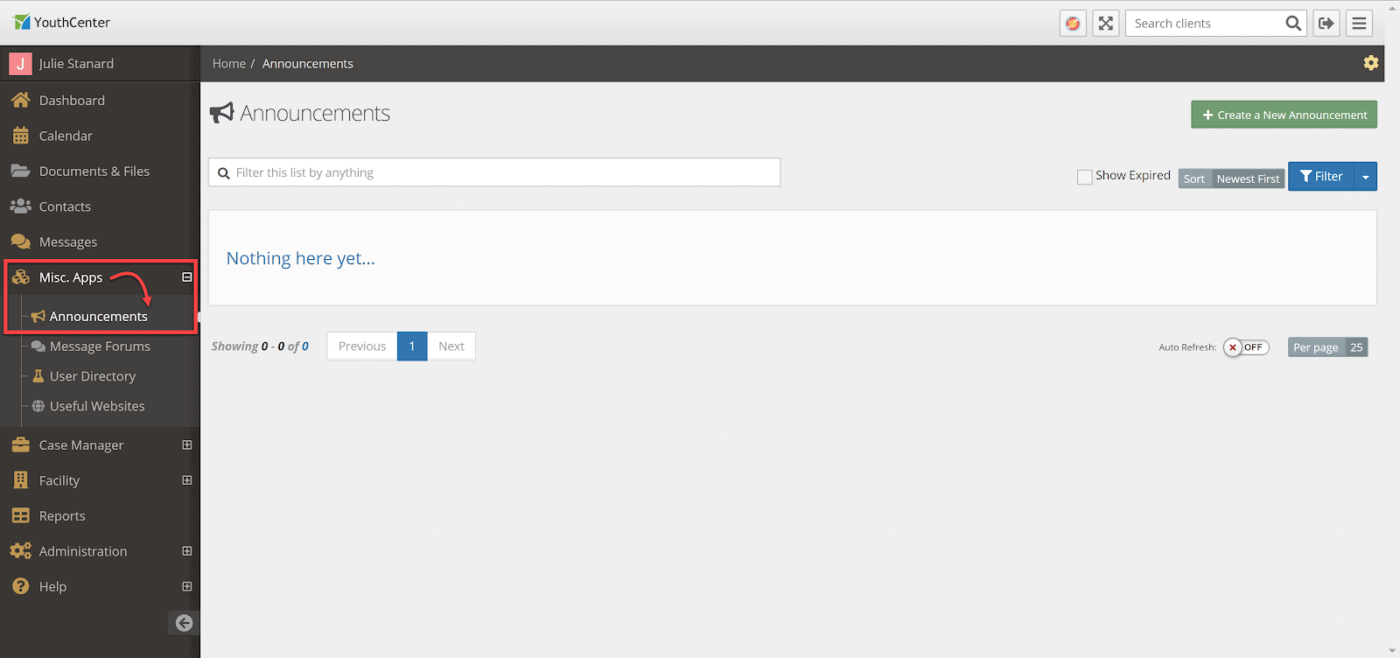
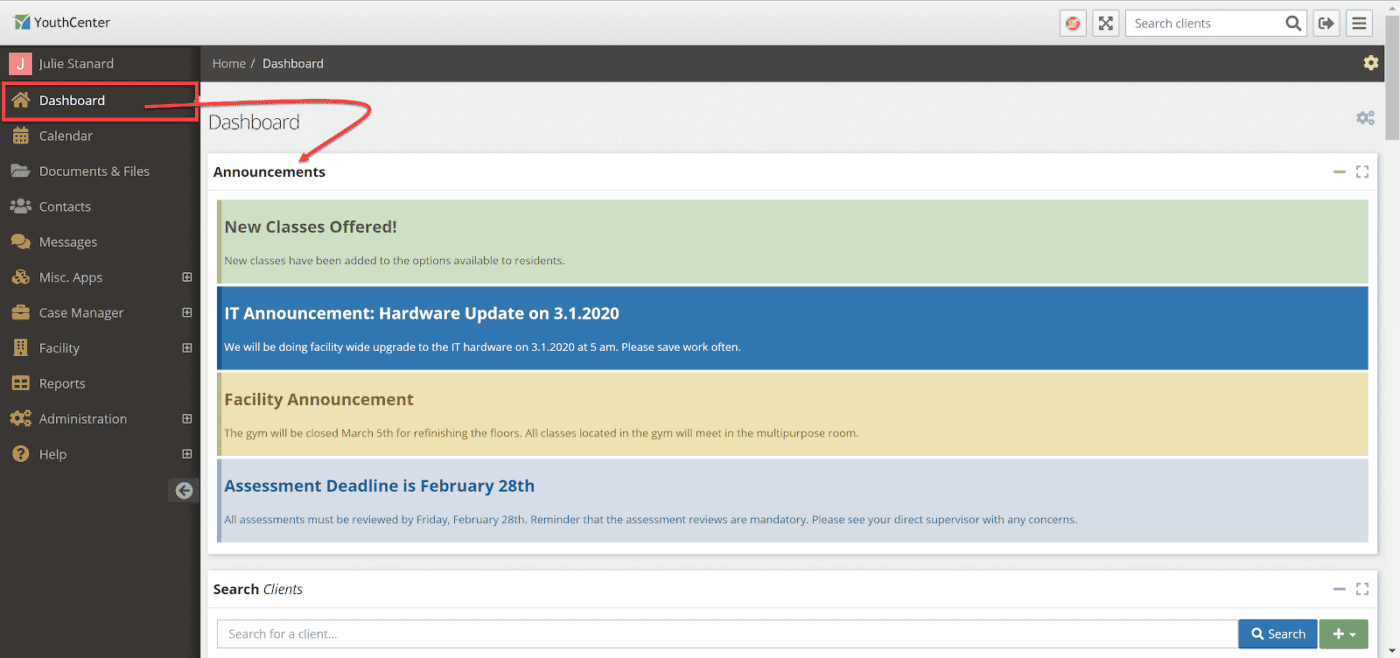
Announcements
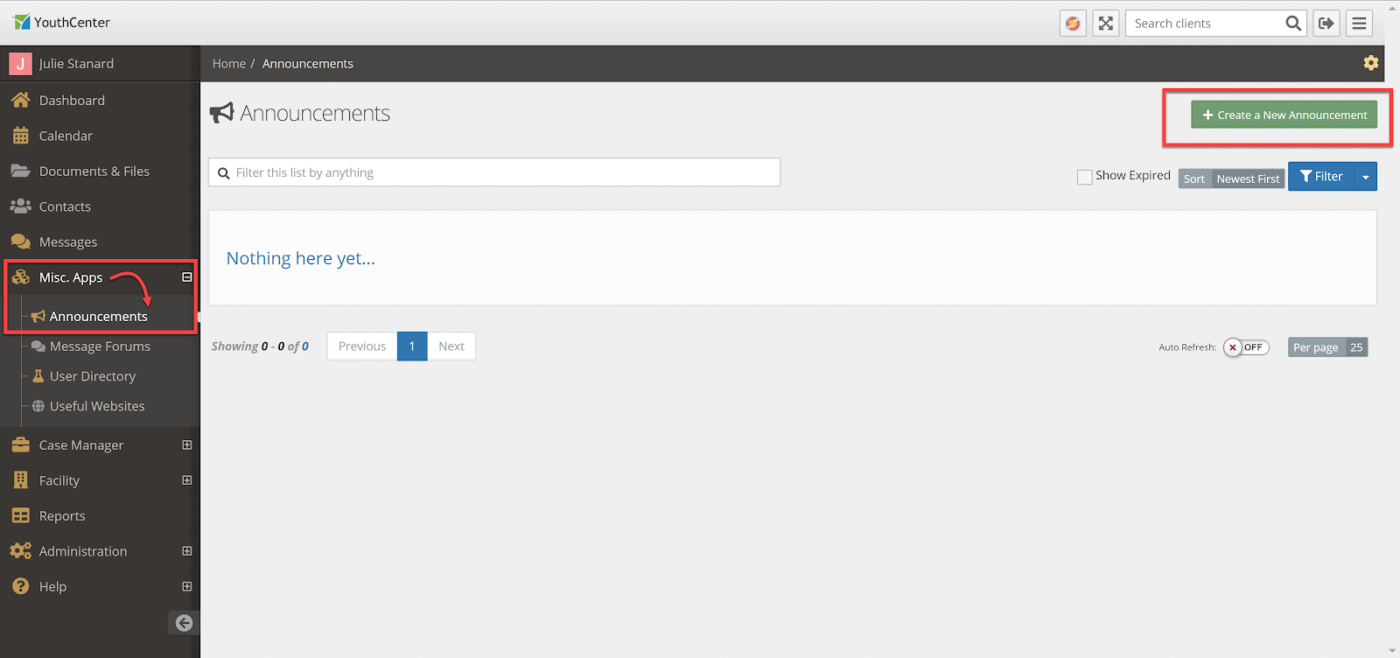
The Announcement application is where you can create, view and manage important information that needs to be broadcast across users within your YouthCenter application. The announcements can be customized visually as well as with page and group security. The Announcement application can be found in the menu tree underneath the Misc App banner.
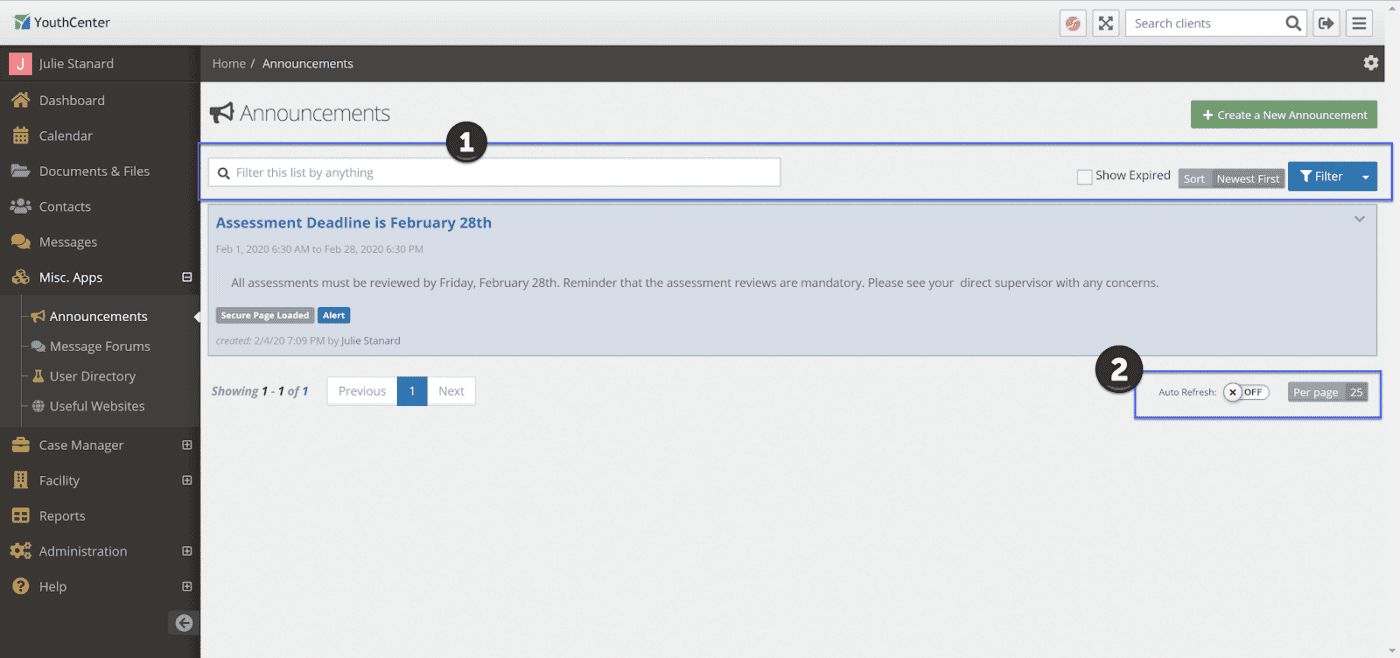
The Announcement Landing page will display all the announcements viewable to your user. The announcements can be filtered via the filters at the top of the page (1), and you can select how many results should show per page and whether announcements should Auto Refresh (2).
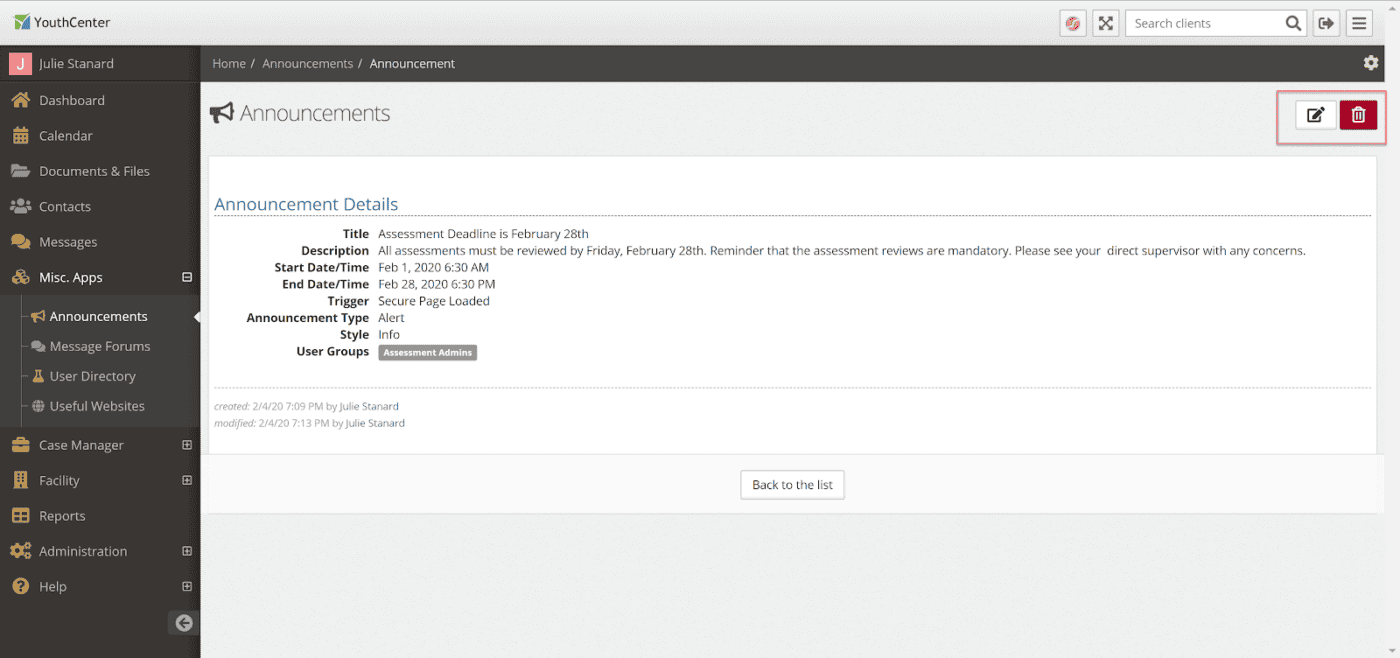
View an Announcement
To view an individual announcement, simply click on the announcement you would like to view. This will direct you to the Announcement Detail view. To return to the Announcement Landing page, click “Back to the list”.

Announcements can also be viewed on the Dashboard with the Announcement widget. Instructions for adding the widget to your dashboard are located in the Announcement widget section.
Add an Announcement
To add an announcement, navigate to the Announcement Landing page (located underneath the “Misc. Apps” menu item) and click the green “+ Create a New Announcement” button in the upper right-hand corner to open the Announcement Details screen.
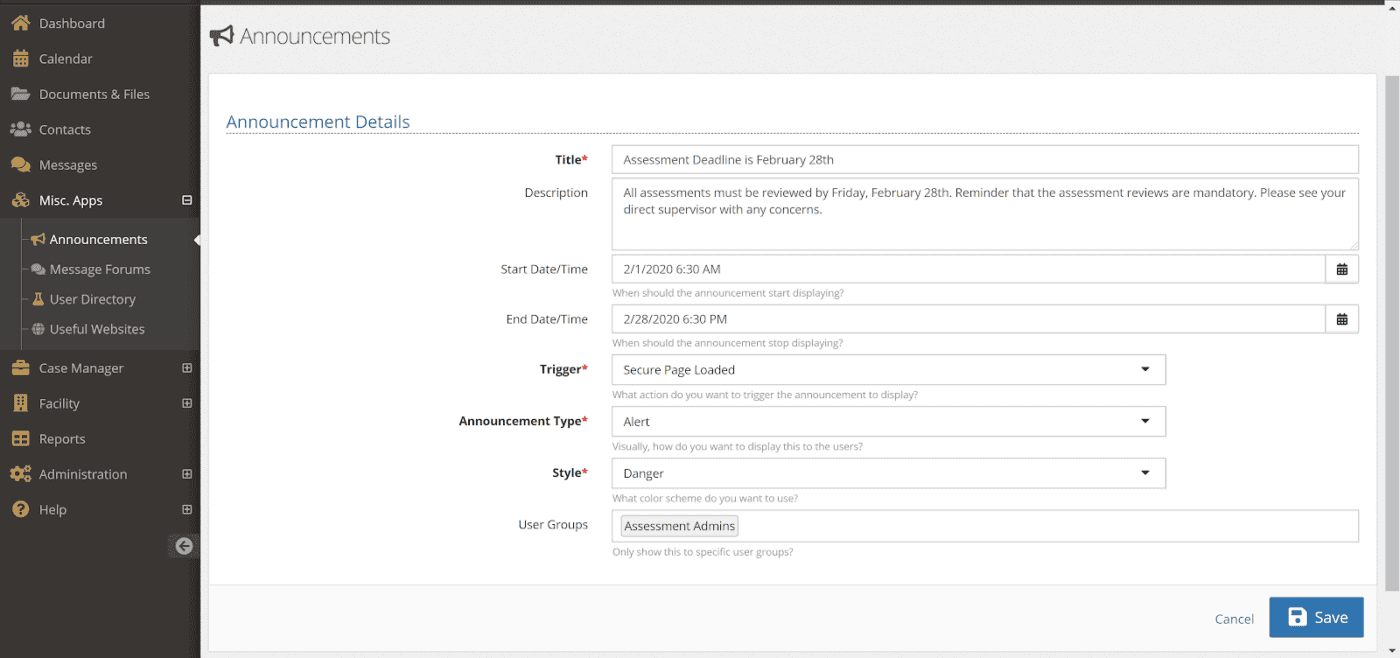
Customize Announcements
The functionality of an announcement is customized by utilizing the fields on the Announcement Detail screen. Note that a field marked with an asterisk (*) is required and must be filled in before the announcement can be saved.
- Title: this field will display as the header of the announcement.
- Description: text entered in this field will display in the body of the announcement.
- Start Date/Time: select a date and time for when the announcement should begin displaying on the site.
- End Date/Time: select a date and time for when the announcement should stop displaying on the site.
- Trigger: select whether you want an announcement to display on the login page, or after a user has logged into the program.
- Announcement Type: select where you would like the announcement to visually appear on the page to users.
- Style: select what color scheme you would like to make the announcement.
- User Groups: to make the announcement visible to specific user groups, select group names from the drop-down menu that appears on click. To make the announcement viewable to all, leave the “User Groups” field empty.
When the fields have been entered, click “Save” to finalize your announcement.
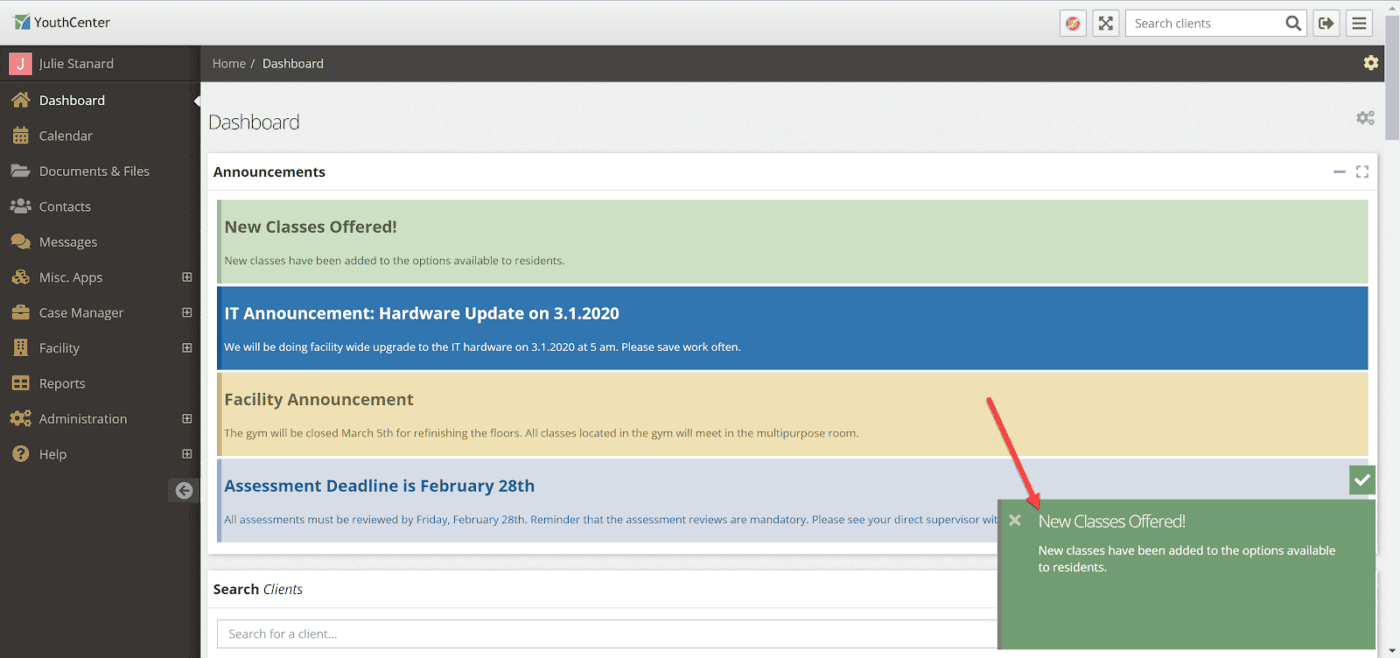
Dismiss an Announcement
To dismiss an announcement that has popped up on the screen, simply click on the announcement. The announcement pop up will close, however the announcement will still be visible on the Announcement Landing page and Announcement widget (widget note: the “show dismissed announcement” option must be selected to view dismissed announcements).
Edit or Delete an Announcement
Existing announcements can be edited or removed in two different ways. On the Announcement Landing page, clicking the down caret on the desired announcement will display an option for editing or deleting the announcement.
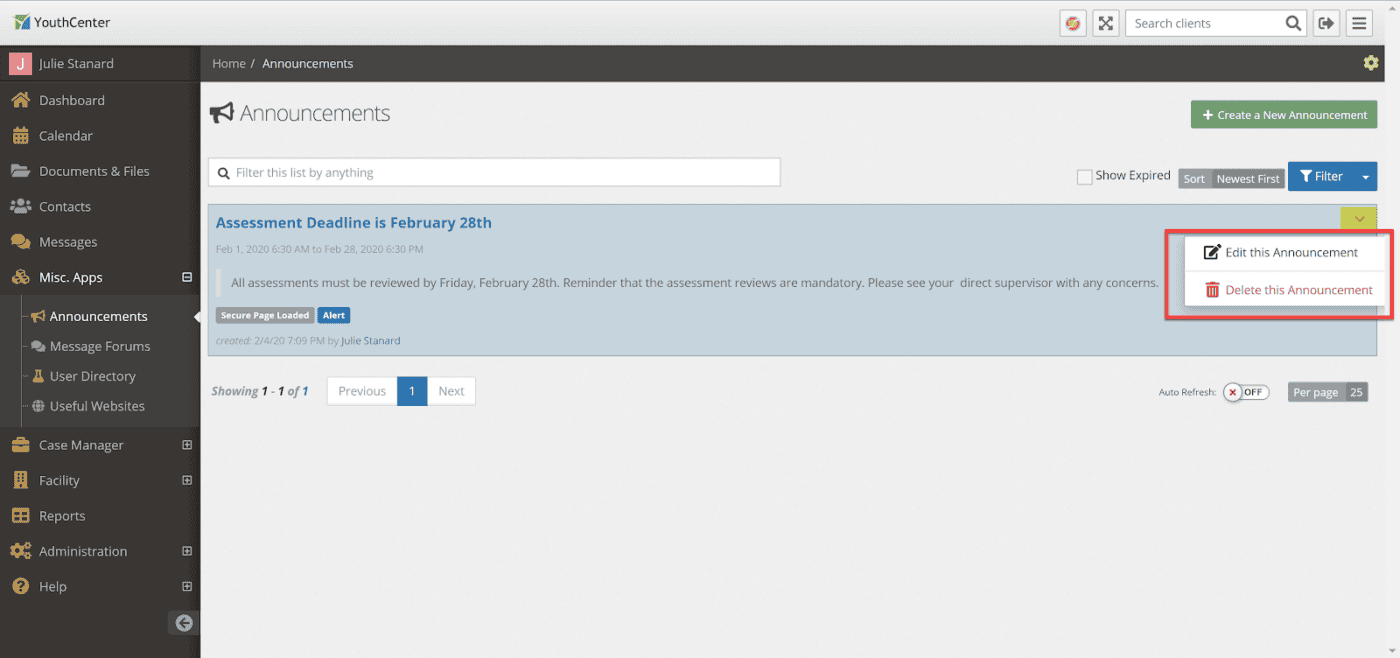
Additionally, these options are also located on the Announcement Details page. Click the paper and pen icon to edit and the trash can icon to delete.
Announcement Widget
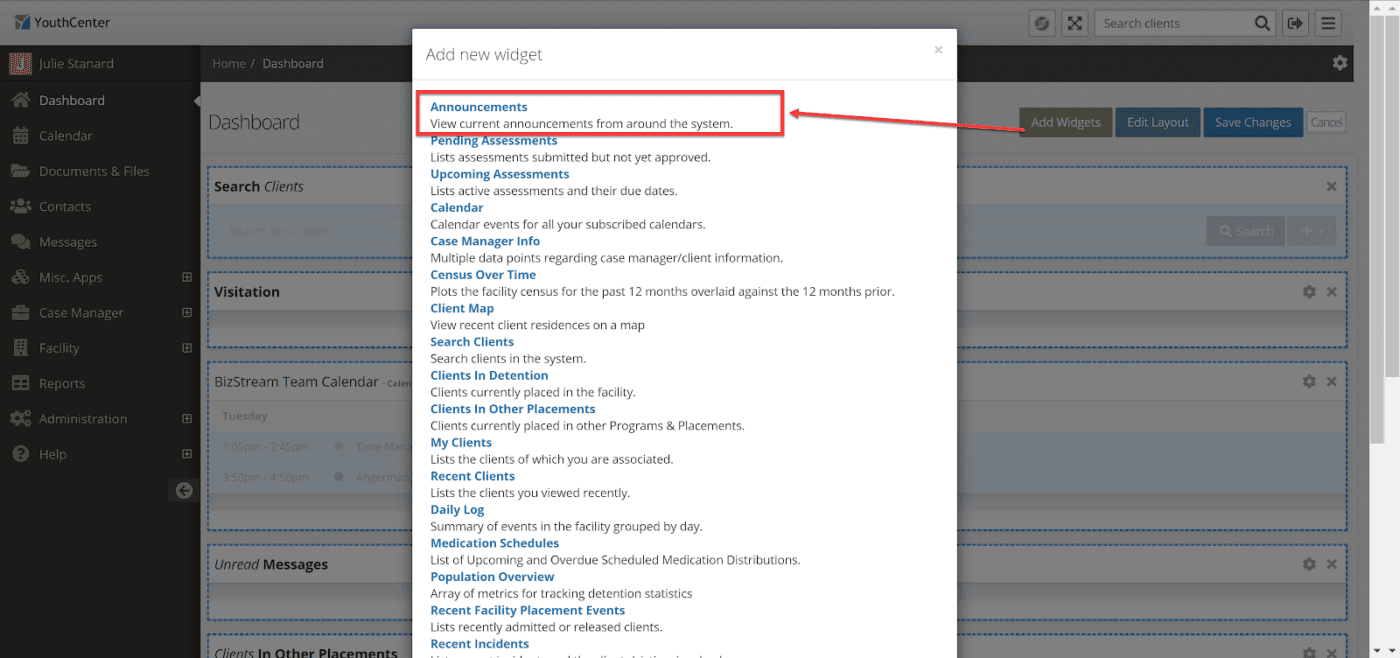
There is now an Announcement widget available that can be added to your dashboard. To add the widget to your dashboard, select the gear icon on the Dashboard page.

Select “Add Widgets” to bring up the list of available widgets. Select “Announcements” from this list.
The Announcement widget will now display. To customize this widget, click the gear icon within the Announcement widget.
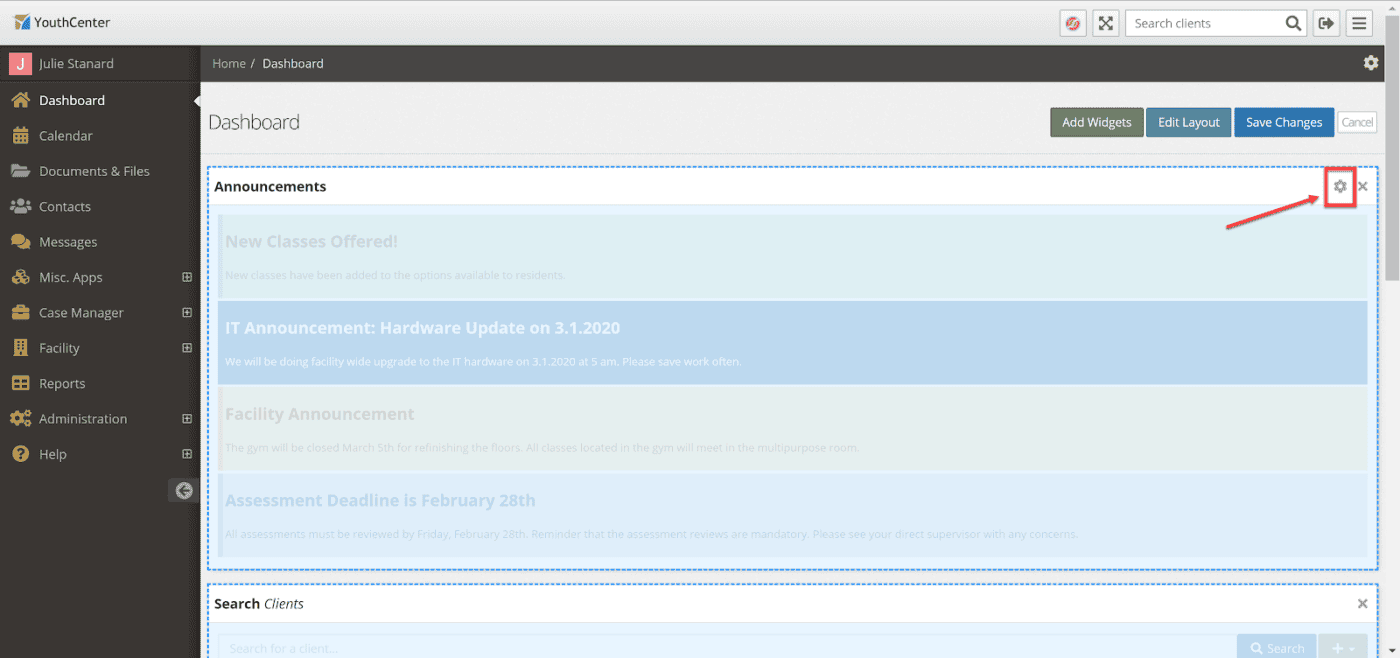
Select the desired options, then click “Apply” to confirm the changes.
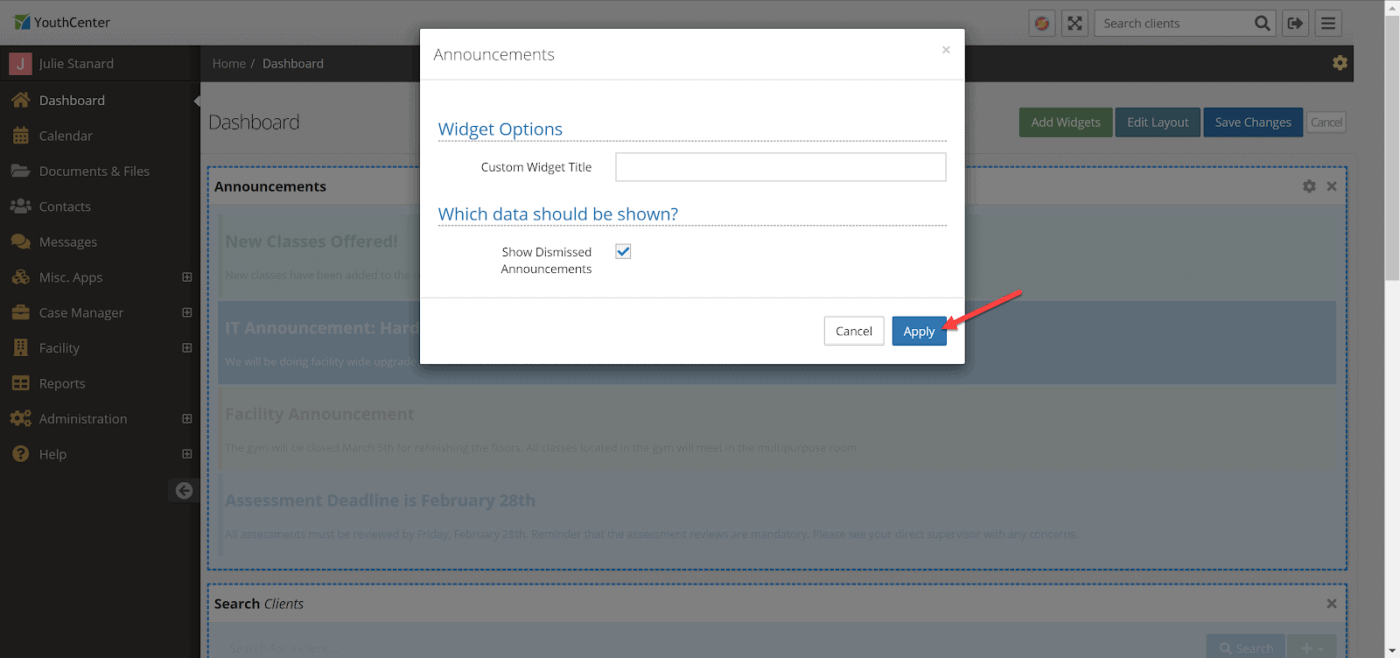
Click “Save Changes” to confirm the addition of the Announcement widget to the dashboard.

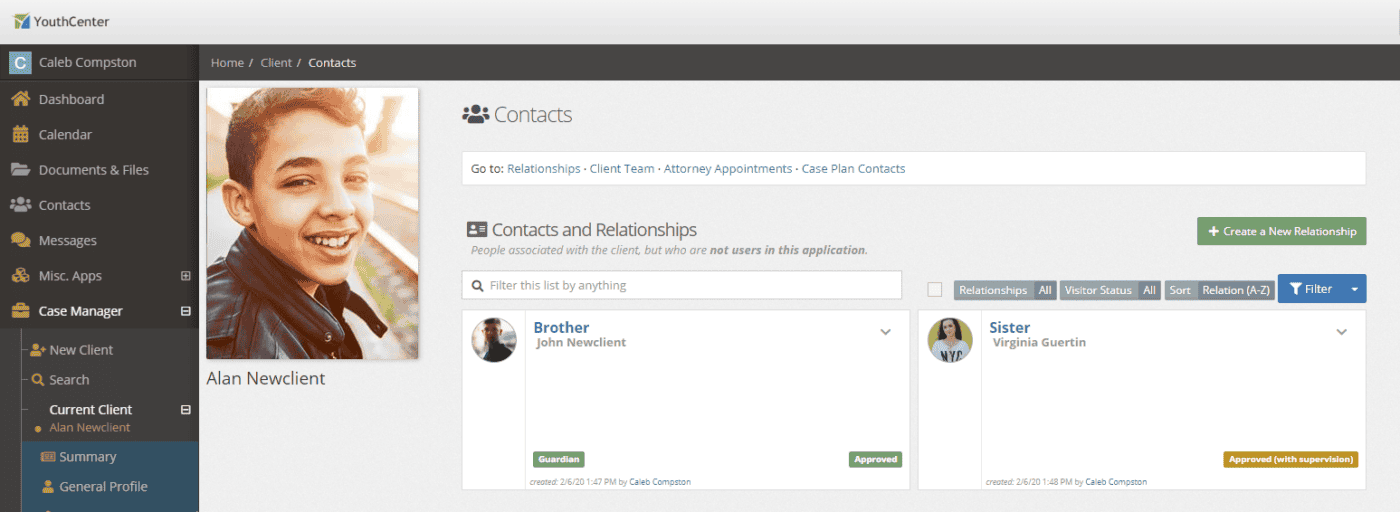
Contacts with Photos
Contacts can now have a photo associated with them. A small version is visible on the client contacts page, and the full image is visible in the contact details.
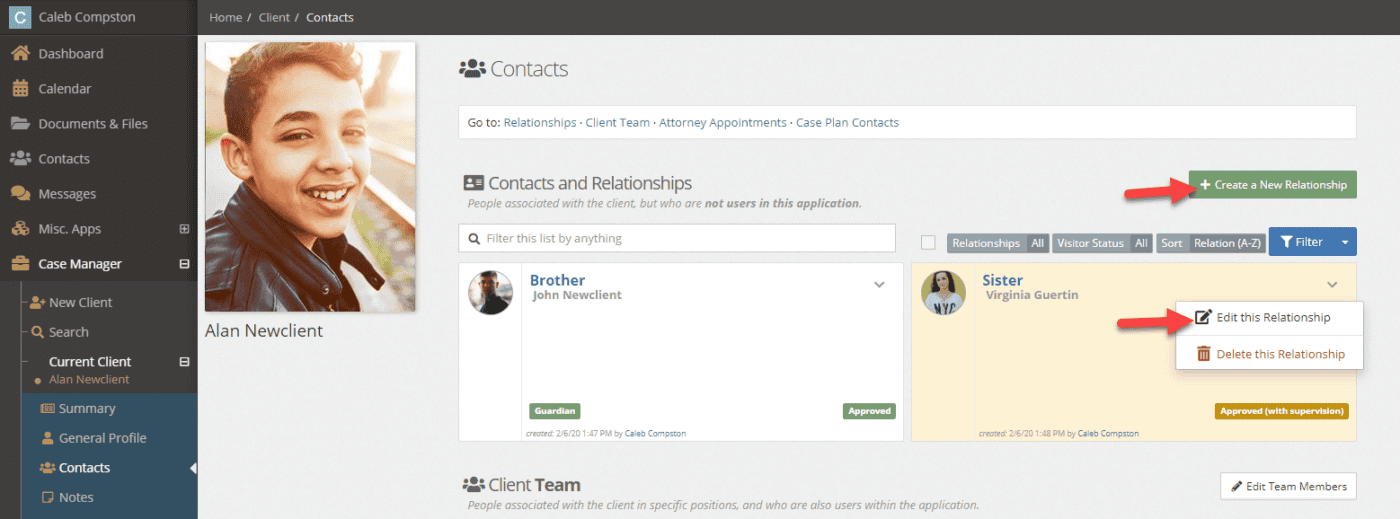
Adding or editing a contact photo
From the client contact page, choose to either create a new contact by pressing the green “+ Create a New Relationship” or by selecting the dropdown on an existing contact and pressing the Edit this Relationship option.
After ensuring all mandatory fields are filled in correctly, scroll down to the bottom of the contact edit form. Choose to either add a new photo if one doesn’t exist or replace a photo if one does exist.
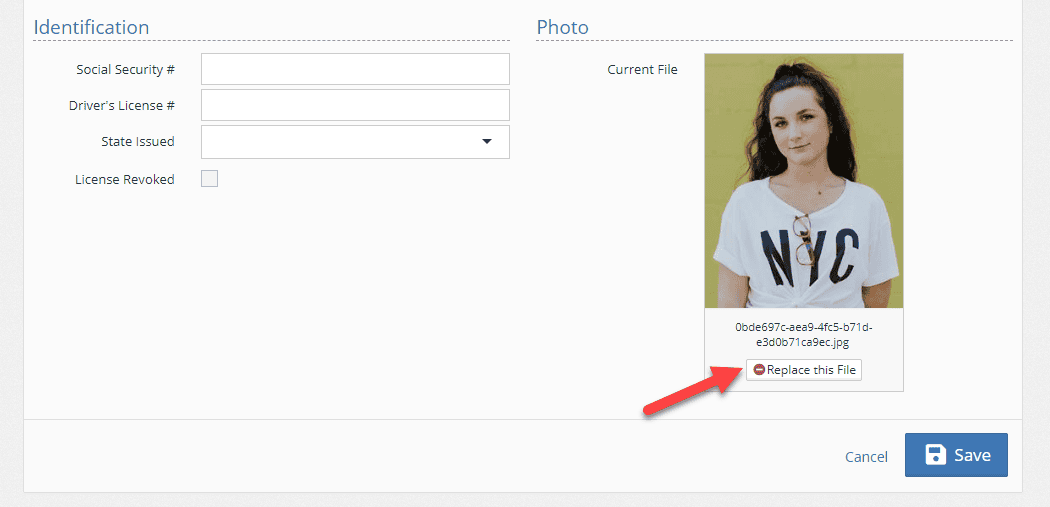
Once the photo is uploaded, press save
Note: You can remove a photo altogether by selecting Replace this File and pressing Save without uploading another photo.
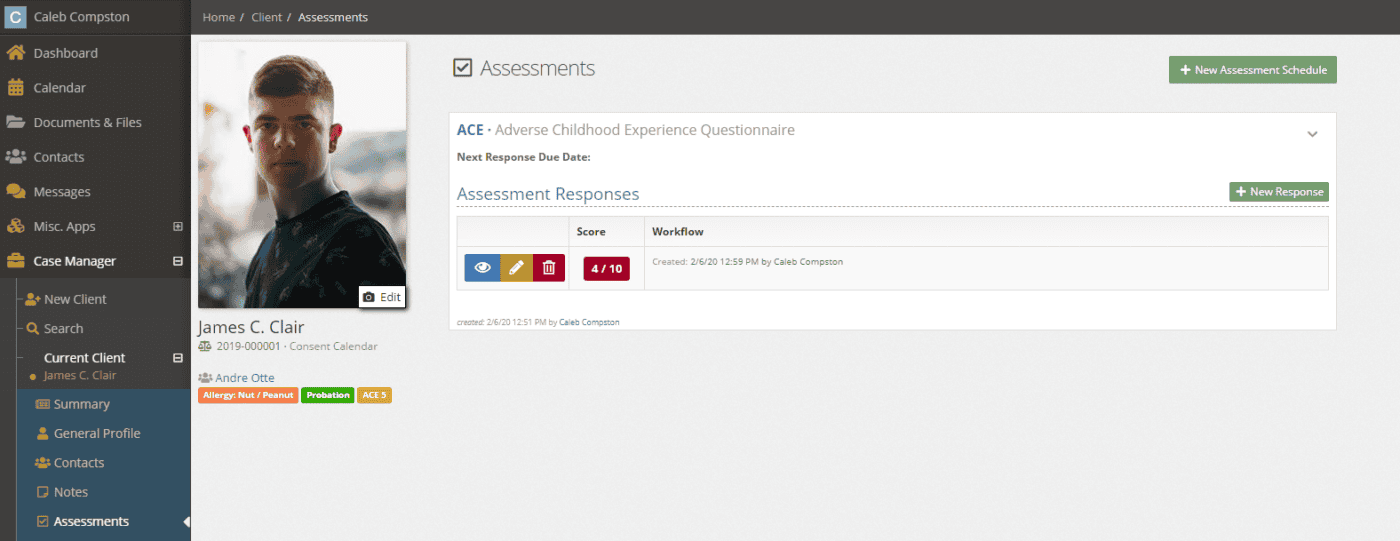
ACE assessment
The ACE assessment is a leading assessment for evaluating youth and adults. In this release, the ACE assessment has been integrated into the robust Assessment application.
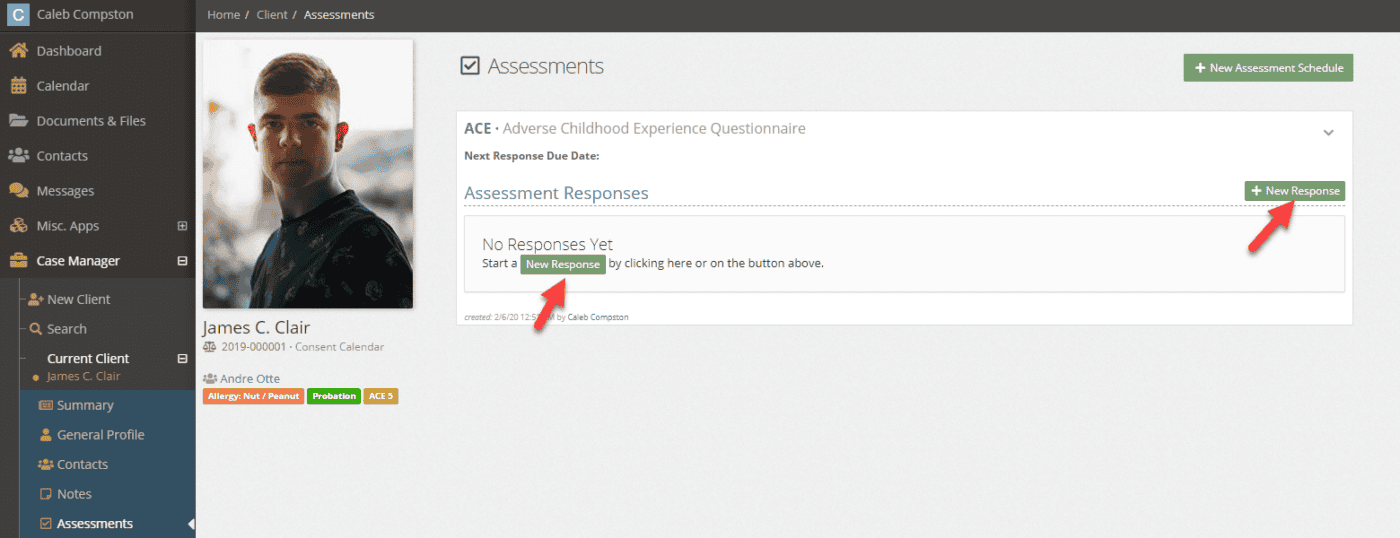
Starting or scheduling a new ACE assessment
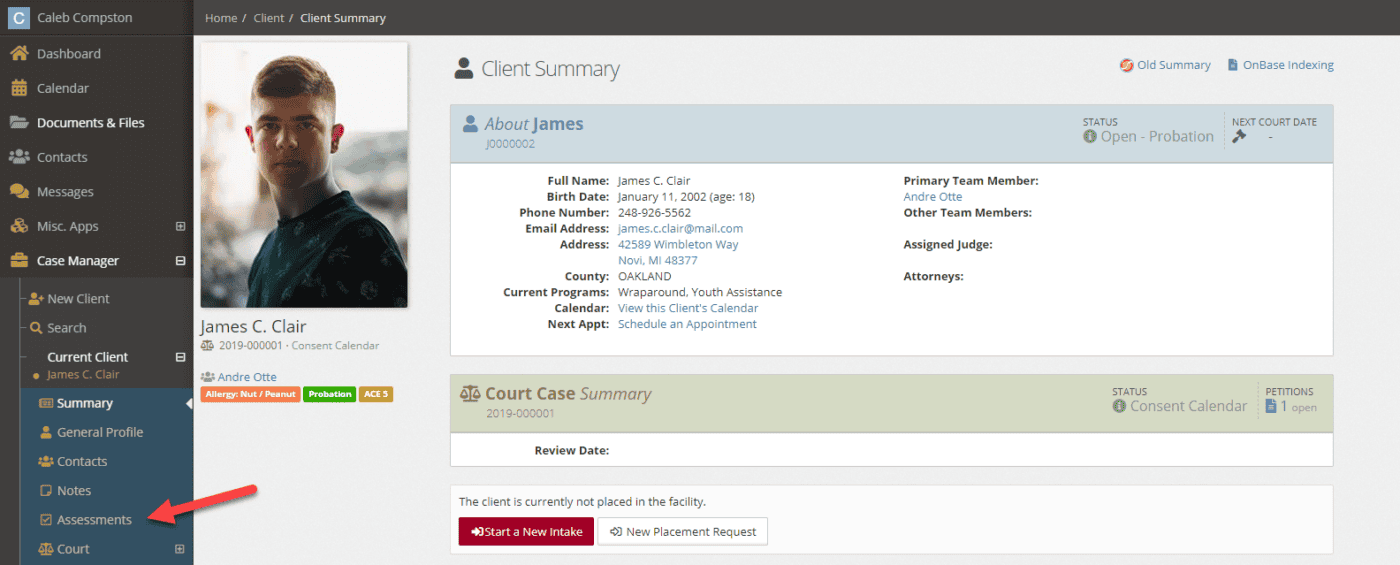
After selecting the client you wish to assess, select the Assessment application.
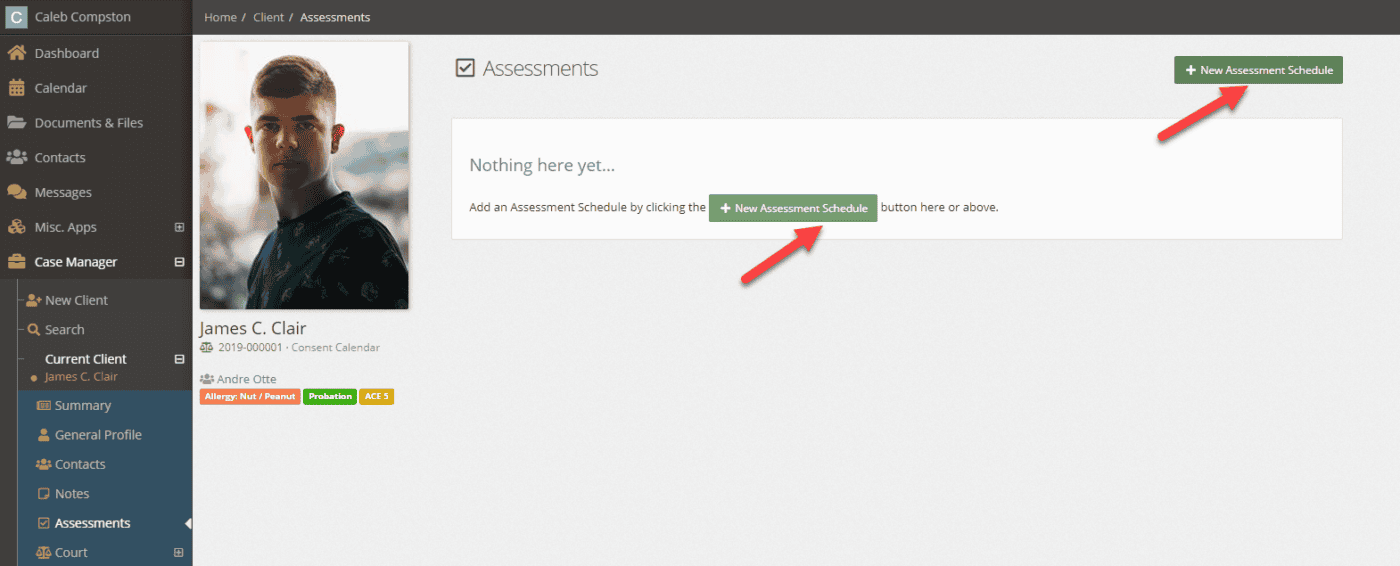
Select the + New Assessment Schedule button.
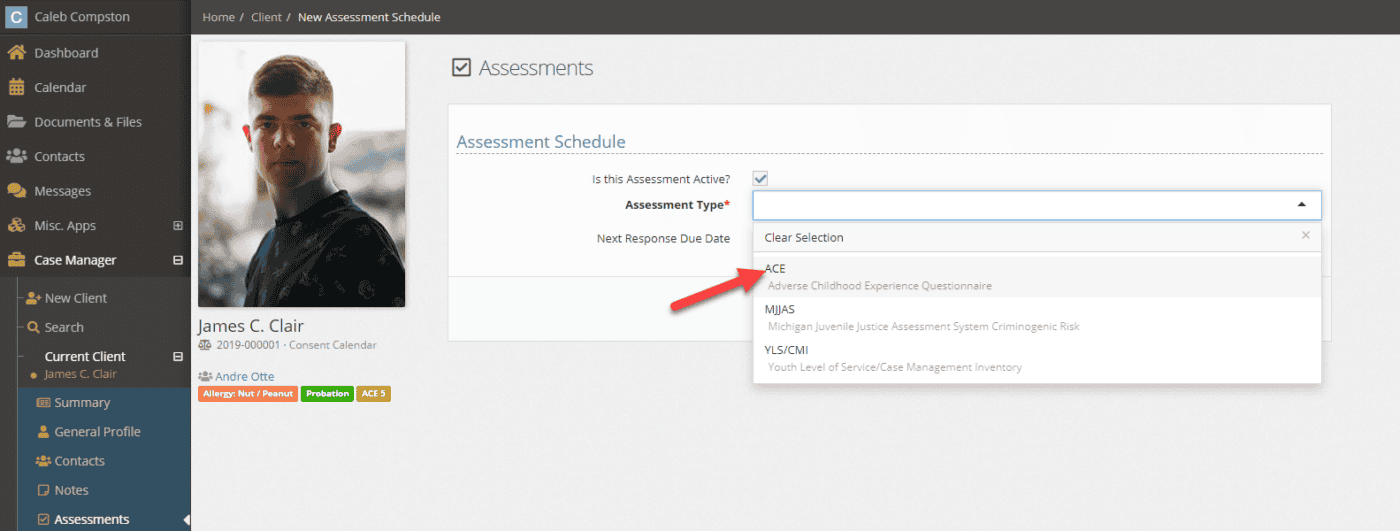
Select the ACEs assessment.
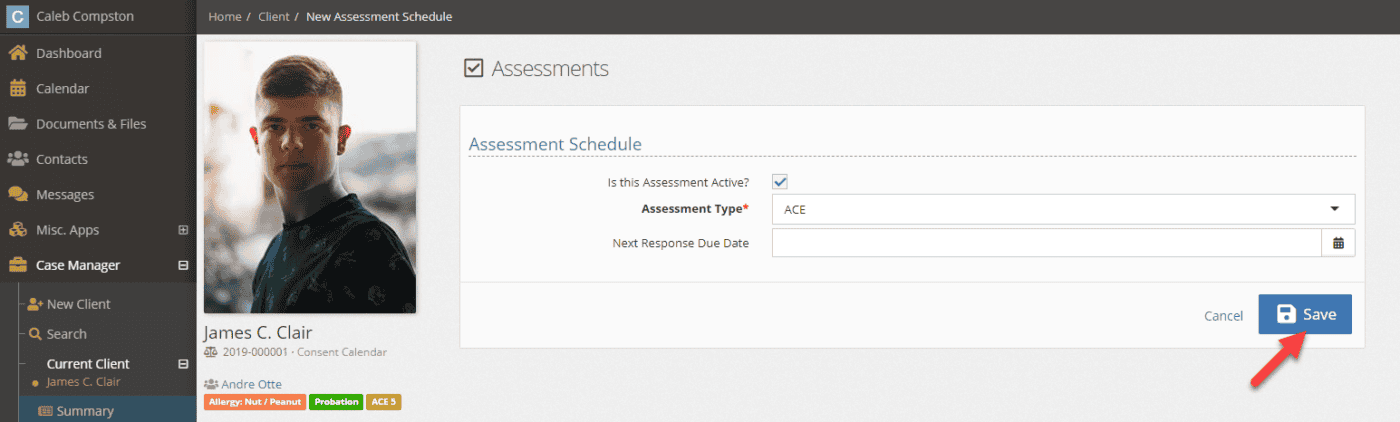
Confirm if the assessment is active and optionally set the next response due date before pressing save.
Now that an assessment has been created, you can record your first response. Select the New Response button
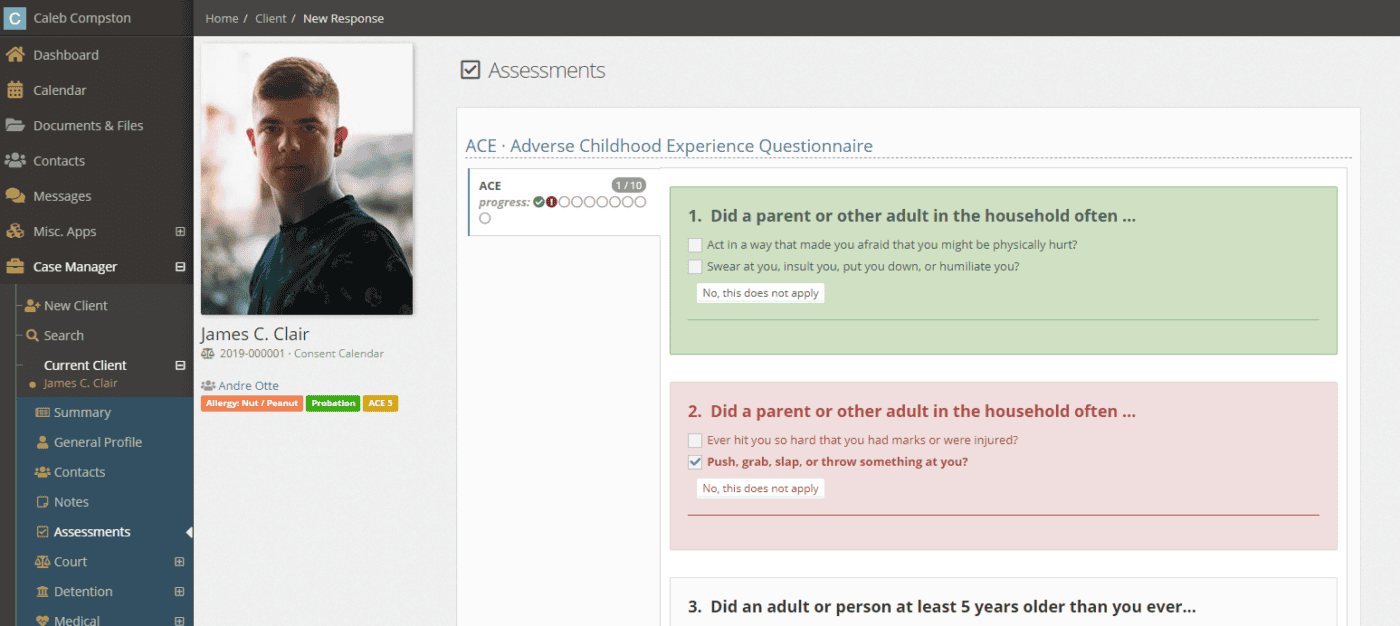
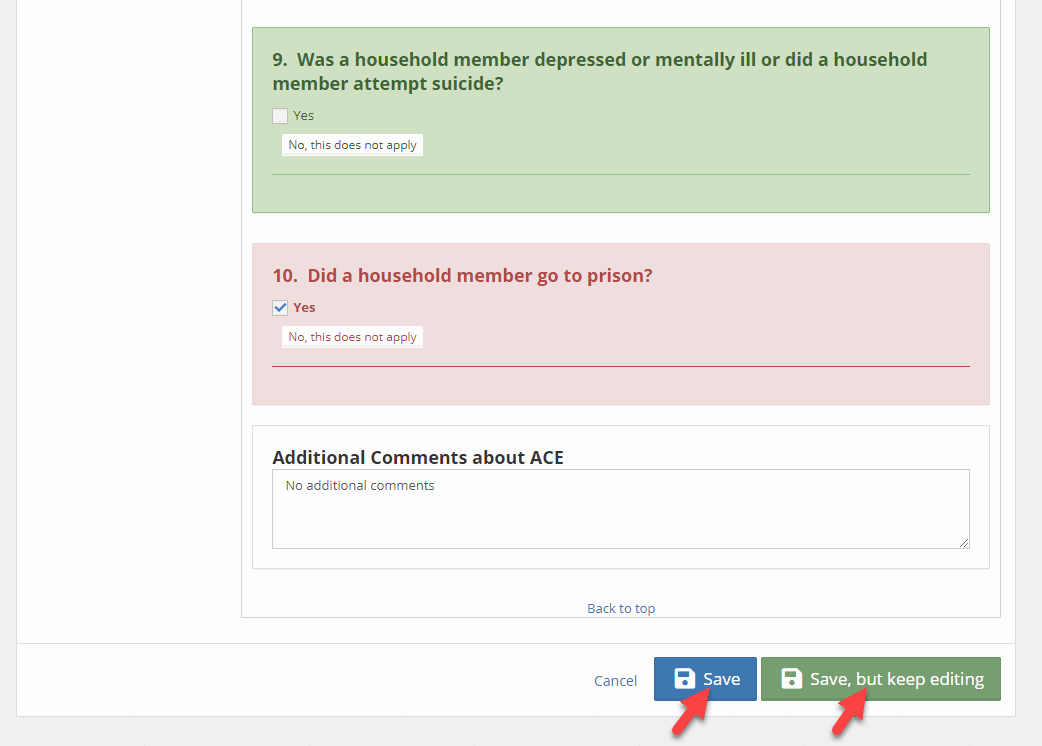
Fill out all relevant information on the assessment.
If the assessment is complete, you can press the blue save button. If you have further work to do on the assessment at a later point, you can press Save, but keep editing
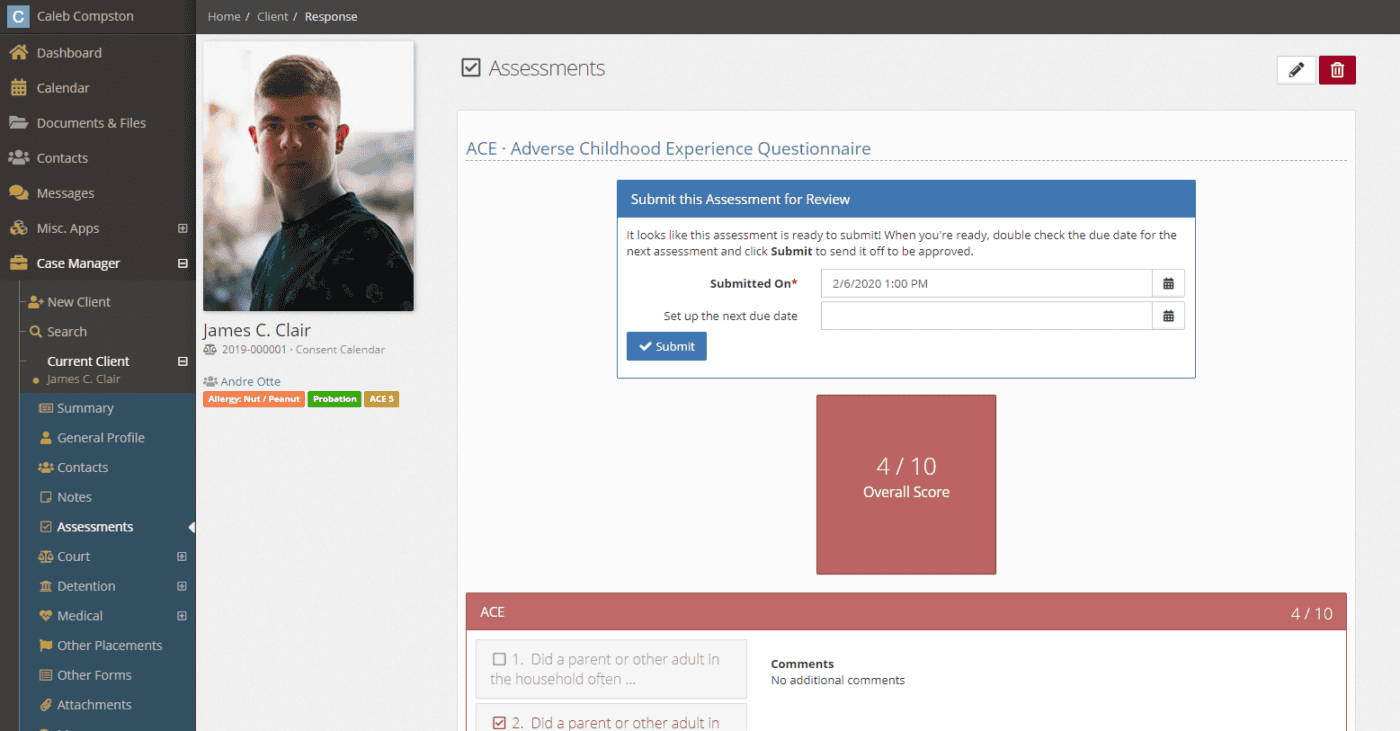
An overall score will show after saving, and a summary will be available on the client’s assessment application.
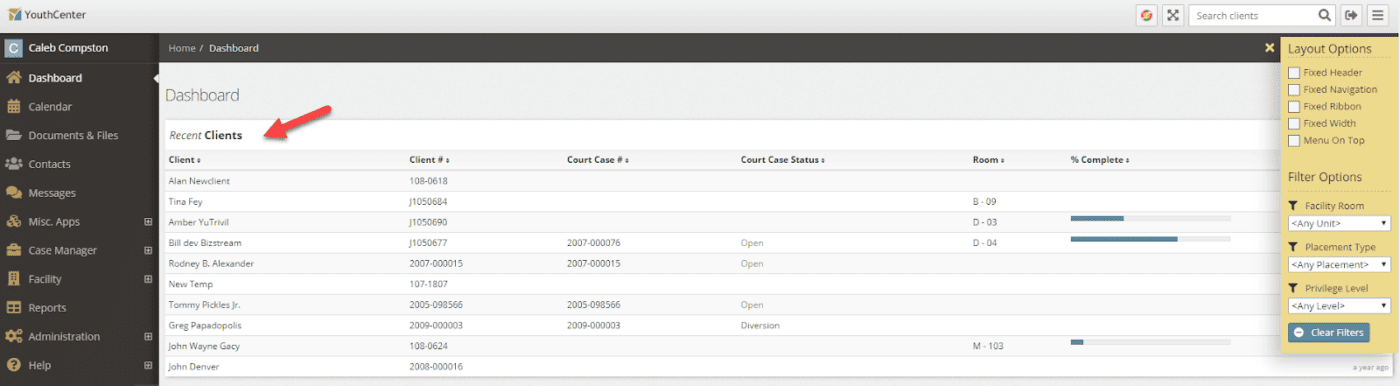
Global Filters
Global filters allow you to intelligently narrow down search results, logs, and other information sources for your user based on a few key categories setup by your administration.
Enabling a global filter
To enable a global filter, select the gold gear icon from the top right of your application.

Select a dropdown and choose a filter option dropdown
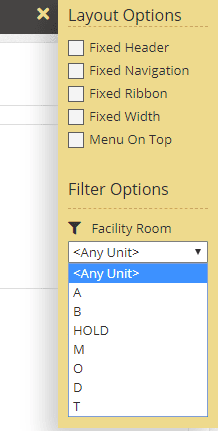
Select the subgroup of the filter option you wish to filter by. You will be able to confirm you have a global filter enabled by the filter icon and gold color placed on aggregated content.
Turning off global filtering
To clear one or all global filters, select the gold gear icon from the top right of your application.
Either change a specific filter to the default setting or press the Clear Filters button to revert all filters to their default state.
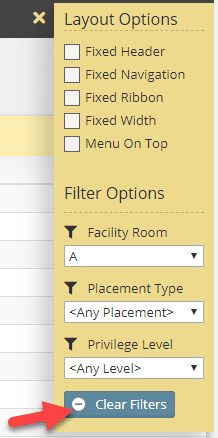
You can verify filters have been successfully cleared by visually looking at the header bar of aggregated content. If there is no filter icon, and the header bar is white, you have successfully cleared all global filters.
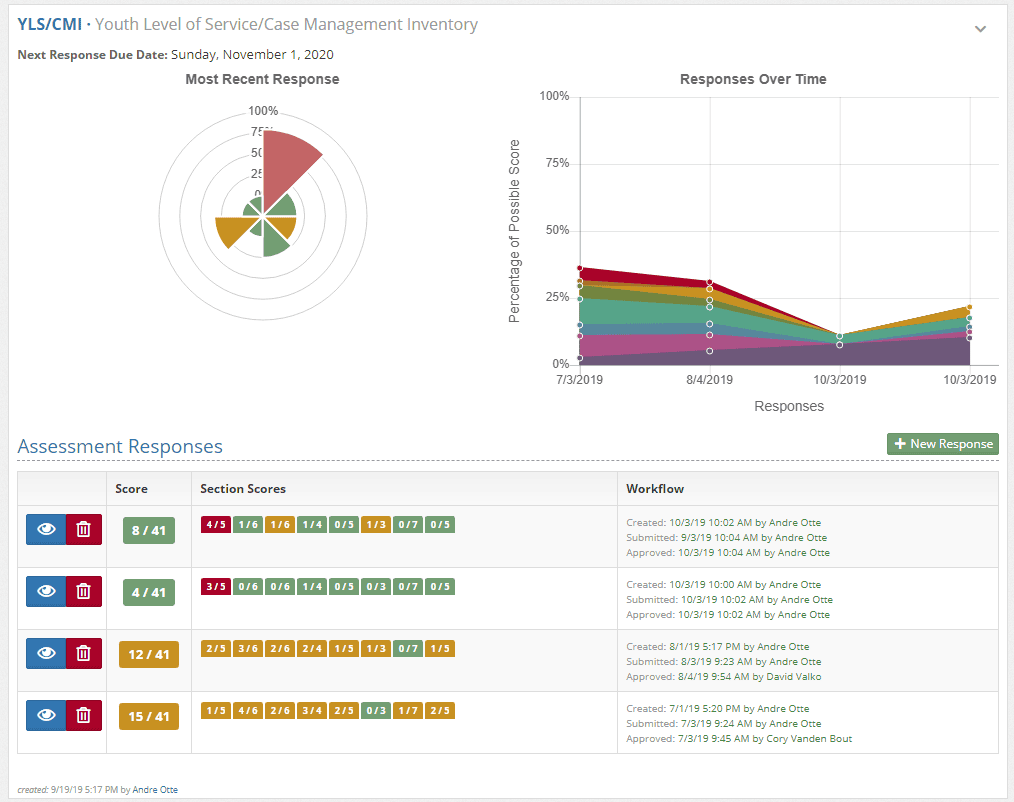
New Assessment Charts and Graphing
New visual charts have been added to assessments to help visually show positive and negative categories. Along with a visual representation of the latest assessment response categories, you may see a graph of the response over time.
Your input is valuable!
With a release, we look forward to your feedback. We’re always looking to make improvements to the software you use daily. Along with the above items, with your input, we’ve made some additional improvements around the speed of the application, general design, and usability. These improvements don’t come without your input.
If you need assistance on how to use any features you’ve seen here, please contact us and we’ll work with you.