The January 2022 YouthCenter release includes a major update to the programs and placements applications, an update to the placement requests, introduces the ability to duplicate assessment responses, and adds some new dashboard widget features. Of course, we’ve made some performance improvements, fixed some minor bugs, and have increased logging in the Audit Log application. Read on to learn more about the features available!
Other Placements
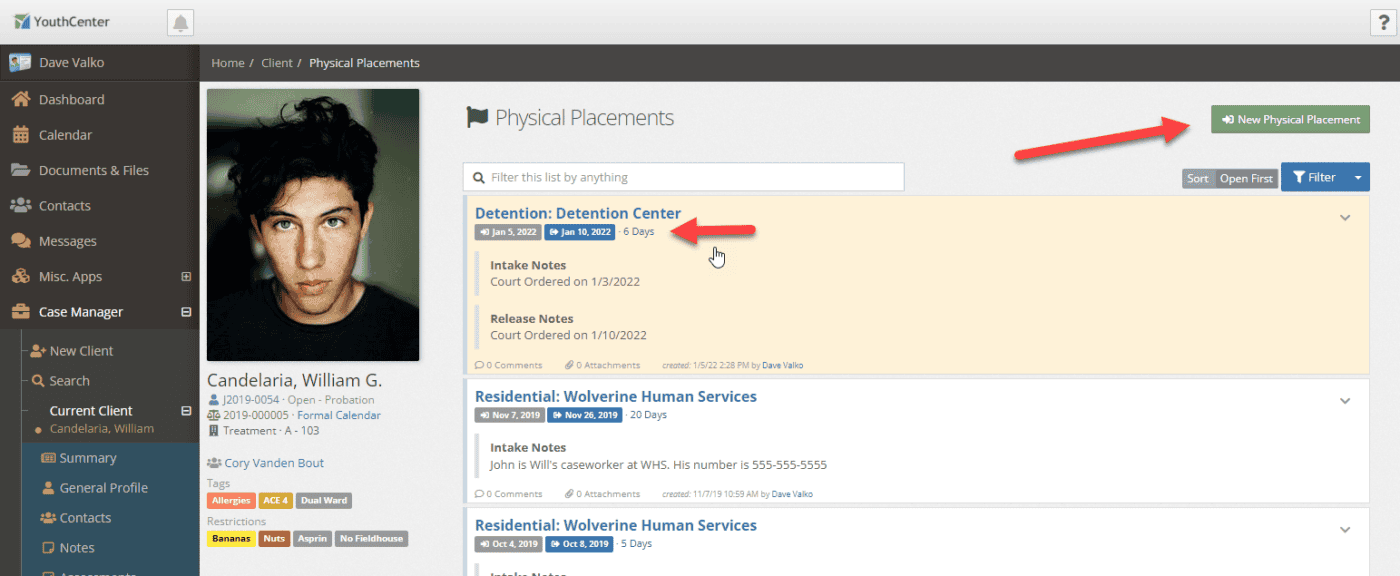
Other placements have been broken out into 2 separate applications: Physical Placements and Program Placements.
Physical Placements
Physical placements work exactly the same as they did before. Set the date of the physical placement, select a placement type, select a Care Provider, and add Intake Notes if necessary.
Additionally, you can select a Court Case Occurrence to associate the physical placement with.

When a client is released from a physical placement, simply edit the physical placement and add a release date.

Adding a release date will close out the physical placement. By recording this information administrators can run reports on the average length of stay for a physical placement for any of the care providers. Additionally closing a physical placement will allow the client to be placed in another physical placement as only one physical placement can be open at a time.
Program Placements
Programs have had a major upgrade to their functionality in this release. Previously, programs only had the ability to have intake and release dates, intake and release notes, and associate with the program placement with a Court Case Occurrence.
After discussions with jurisdictions across the country, we’ve had requests to add additional information to the programs including adding a measure of completion success and have transactional logs for things like community service hours, fines and fees, and class attendance.
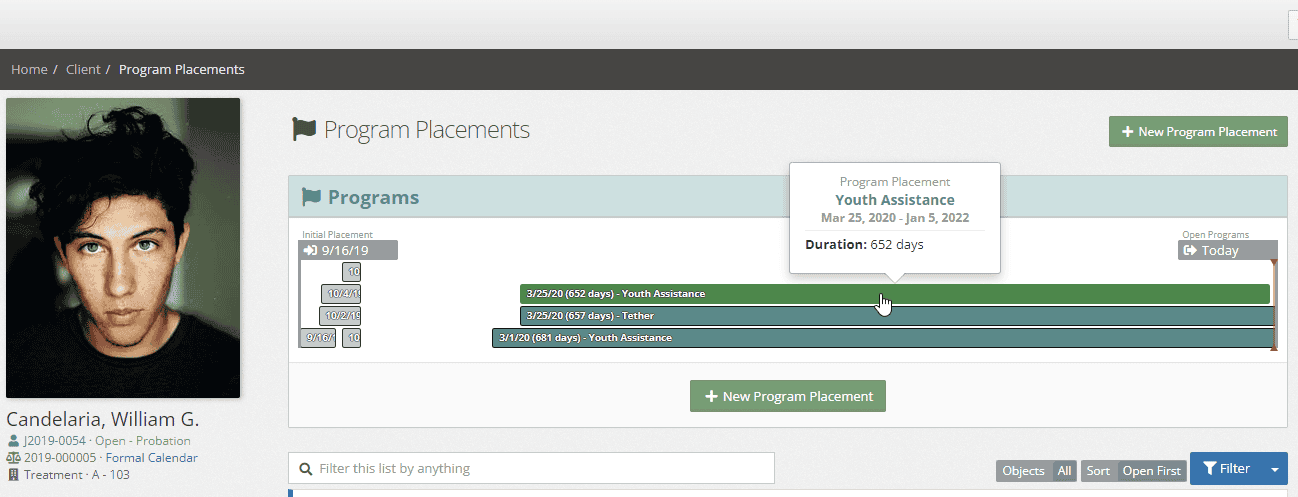
Additionally, a visual representation of open programs and the length of time the client has been in the program has been added as a panel in the program placements and client summary.
Adding or Editing Program
There are 2 parts to set up a new program or editing an existing program to utilize the new enhanced features of programs. You can edit an existing program or create a new program to handle outcomes and transactions.
1. Add Program Placement Outcomes
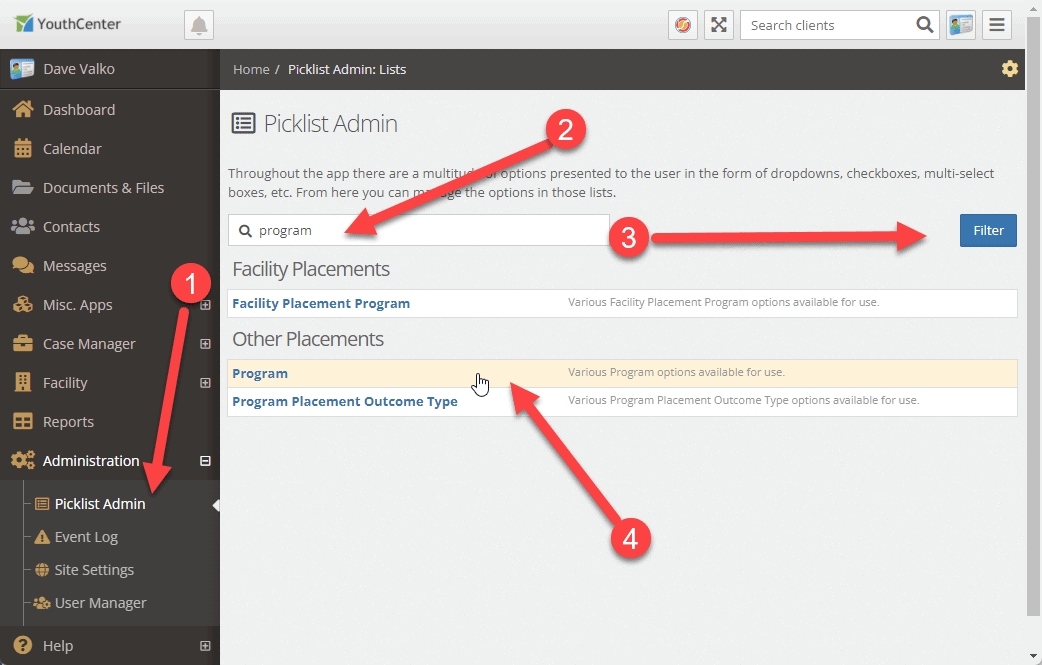
To add program outcomes, an administrator may use the Picklist Admin to search for “Program” and add a “Program Placement Outcome Type”.

Use the green + button to add a New Program Placement Outcome Type. Common outcomes are “Has Achieve Goals”, “Did Not Achieve Goals”, and sometimes “Dropped”.
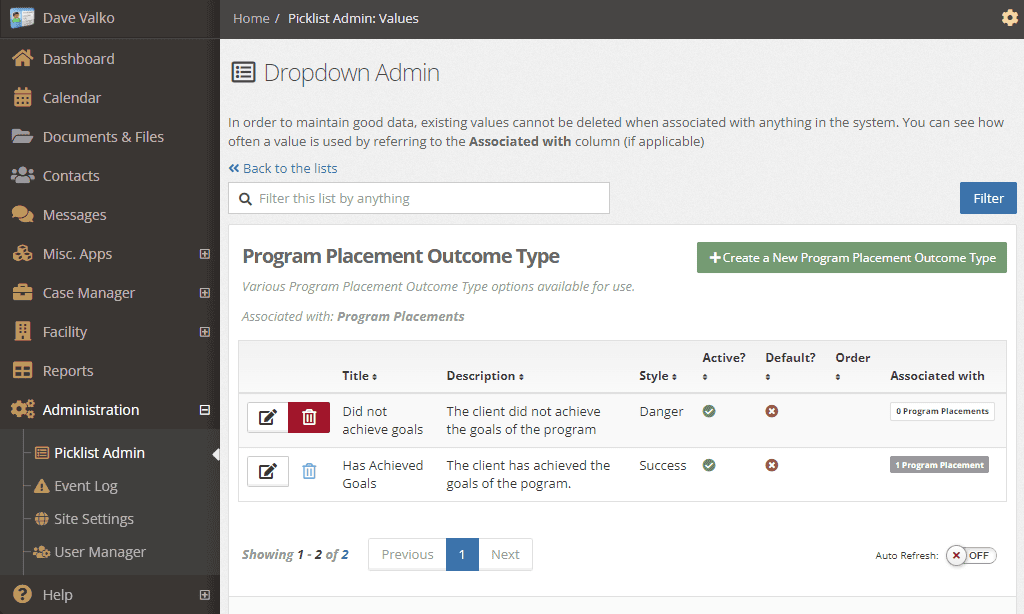
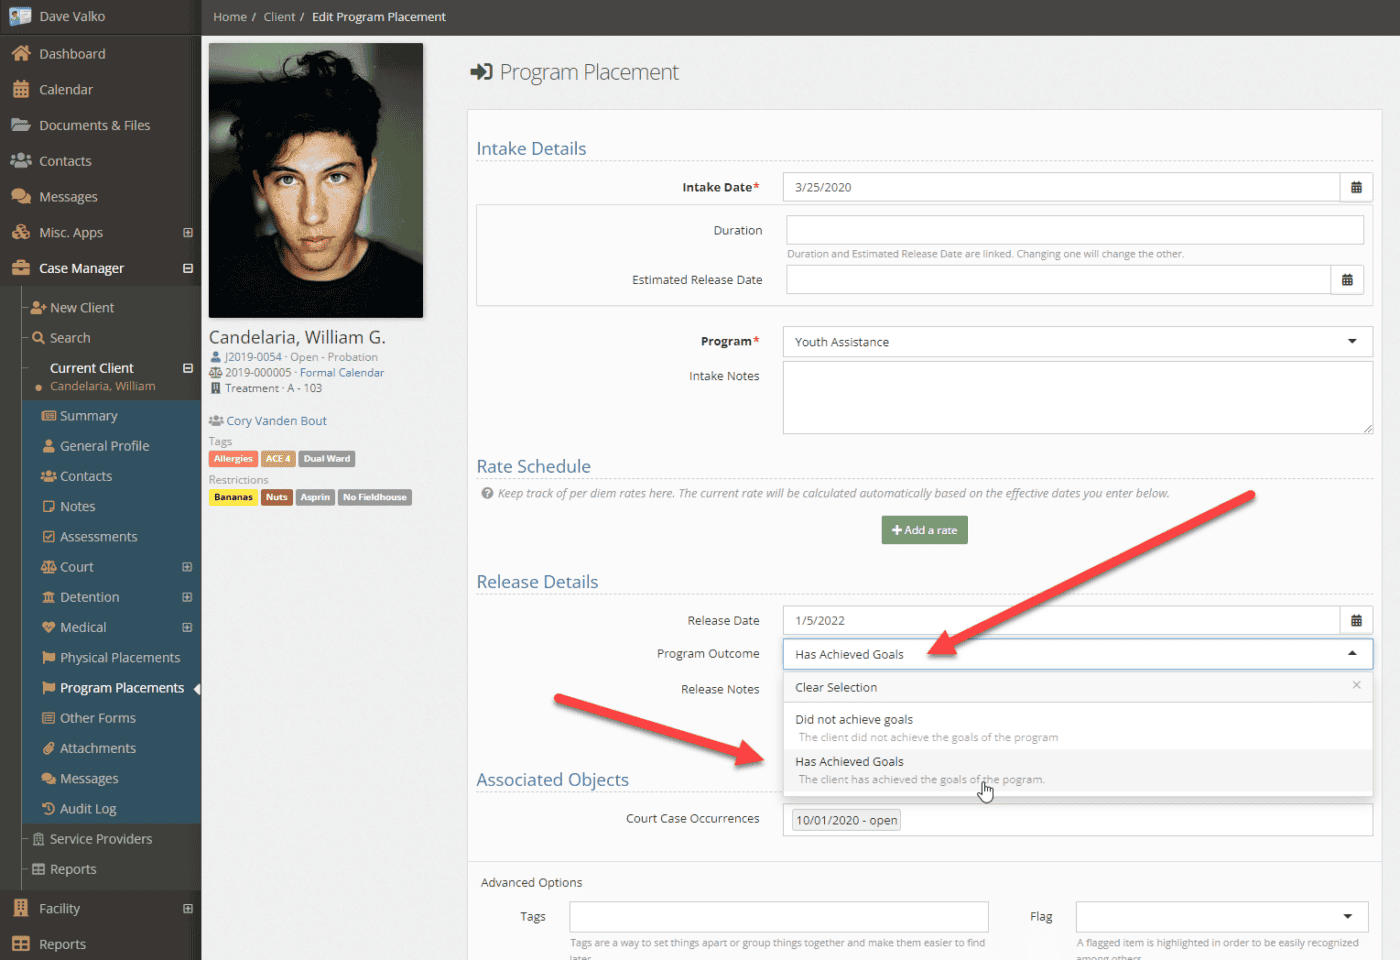
Once the placement outcome has been added, you will have the option to add those to programs upon client completion by editing a program placement and selecting the option in the Release Details.
The outcome type is shown in the listing of programs for the youth.

Additionally, reports may be built to gather insight into program success and dates in programs using the report builder and using the data source “Client: Program Placements”
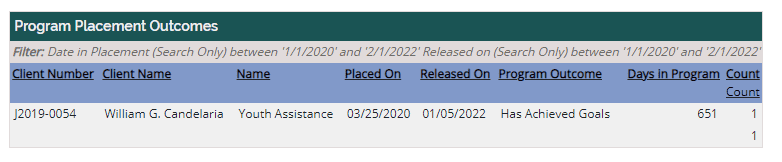
The data can be viewed on-screen or exported to Excel.
Add Transaction Types to Programs
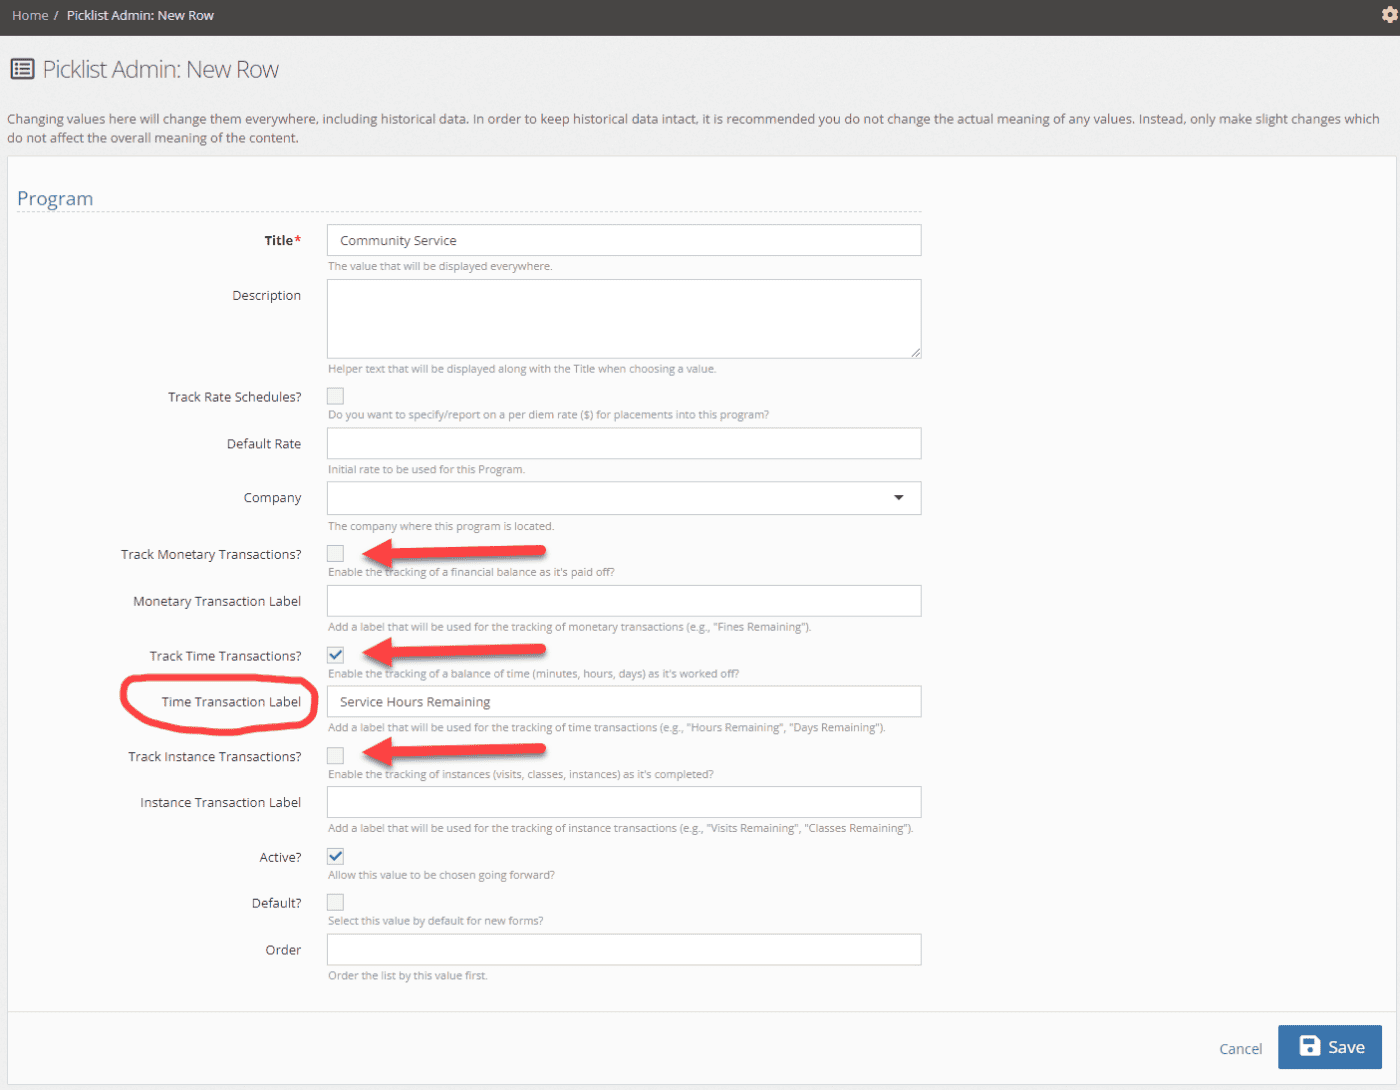
To add transactions to a program, an administrator may use the Picklist Admin to search for “Program” and select “Program”.
Use the green + button to add a New Program or edit an existing program using the pen and paper icon.
There are 3 types of transactions you can track in a program: Monetary, Time, and Instance.
Monetary can be used to track fines, fees or restitution. Time can be used to track community service/volunteer hours. Instance transactions can be used to track class attendance or session attendance.
To enable any of the transaction types, simply check one of the boxes (Track Monetary Transactions, Track Time Transactions, or Track Instance Transactions). Add a transaction label. In the example below, we’re tracking community service hours so we’ve added “Service Hours Remaining”. Save your Program and the transactions are ready to be used with a client in that program.
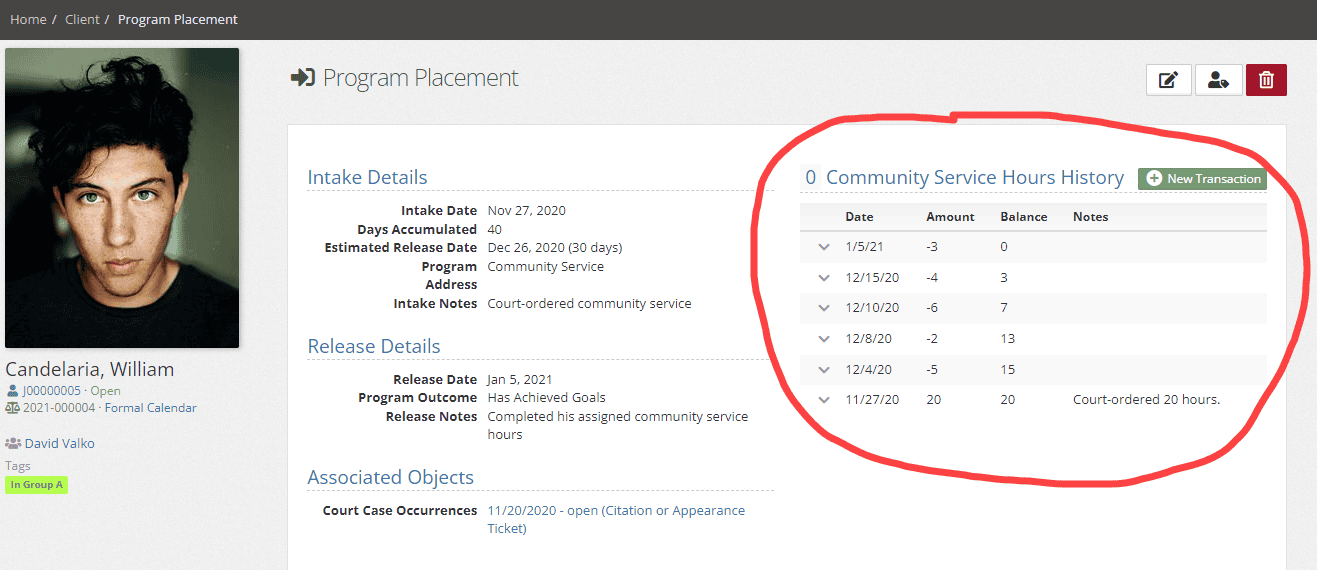
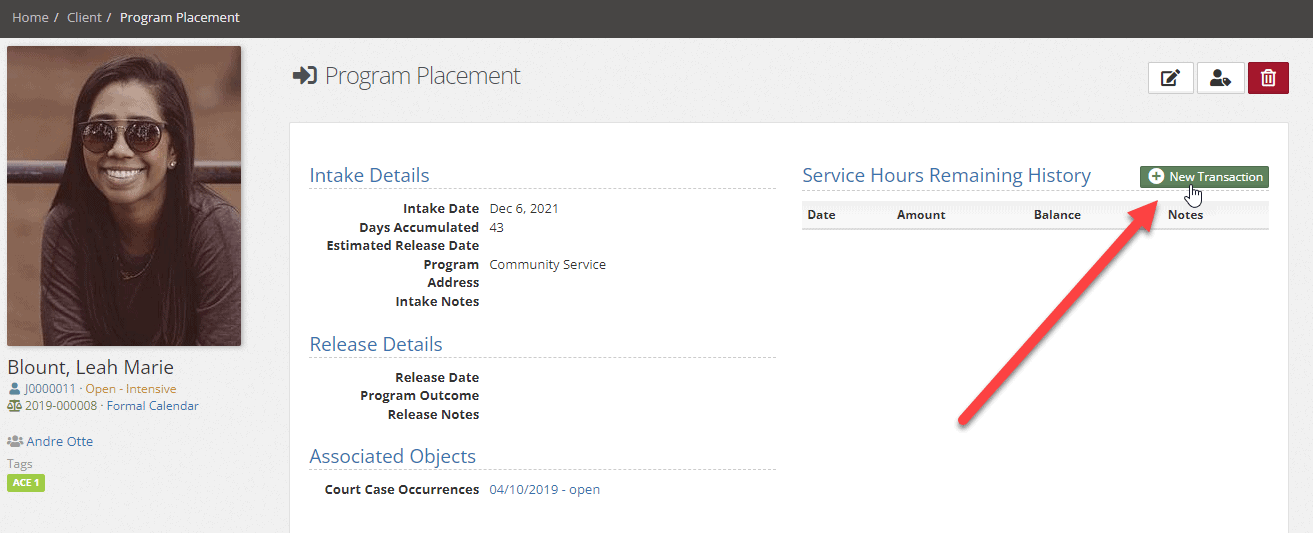
Once a program has a transaction added to it, you can add transactions to the program. After adding a youth to a program, click the green + button labeled new transaction to add transactions.
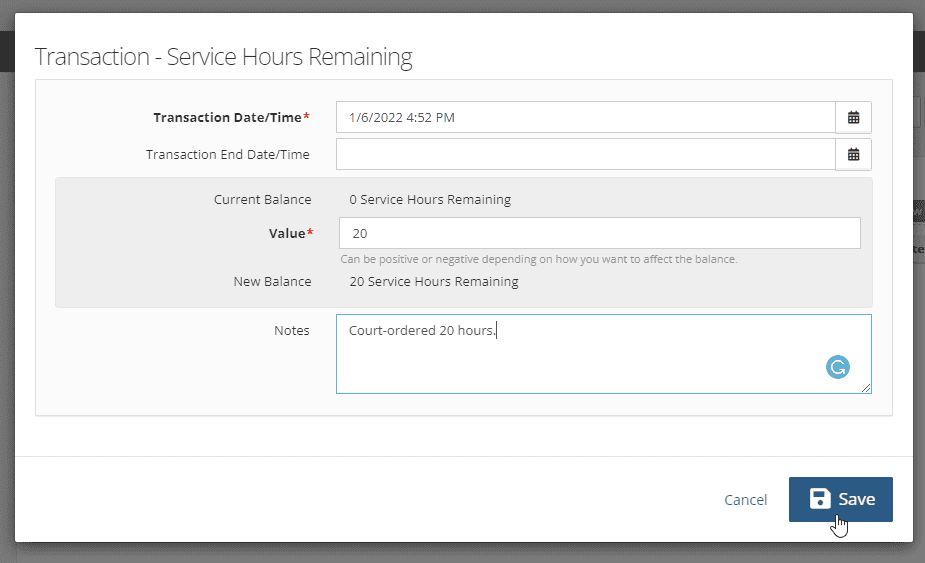
The transaction dialogue will open up. To start, you will add the initial balance. In this case, we’re adding 20 hours of community service to the client. Click the save button to add the transaction and see the new balance.
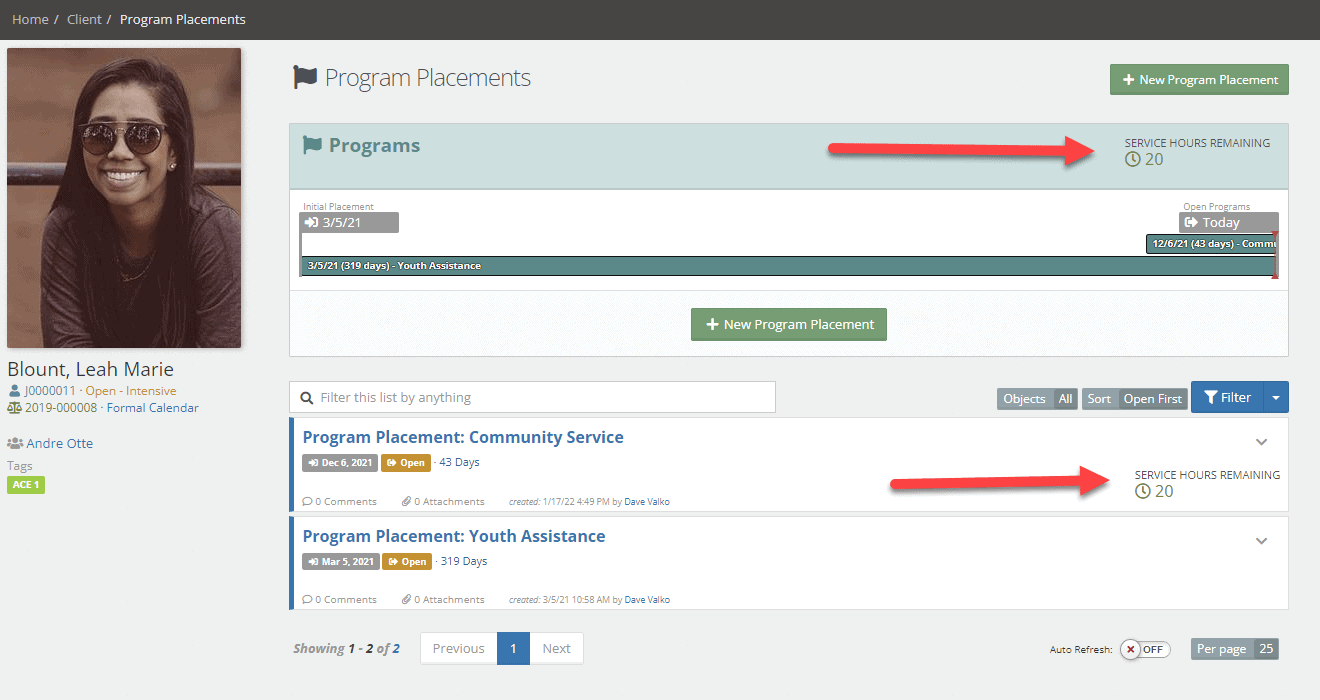
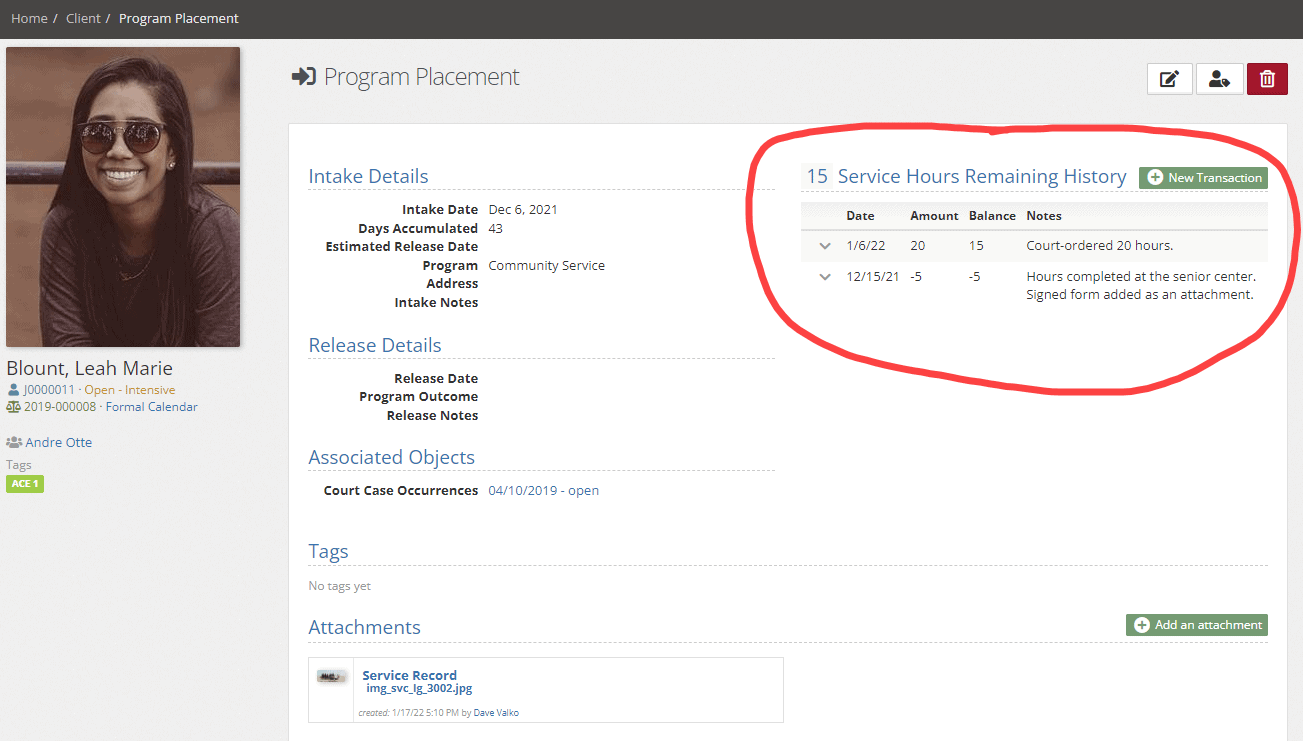
Once you’ve added the initial transaction the remaining amount will be shown on the programs panel, program detail, program listing, and optionally to the “Clients in Programs” widget on the dashboard (which will need to be set up).

To add a transaction click the add green + button labeled New Transaction on the open program. Add a negative number to reduce the value. In our example, the youth did 5 hours of community service.
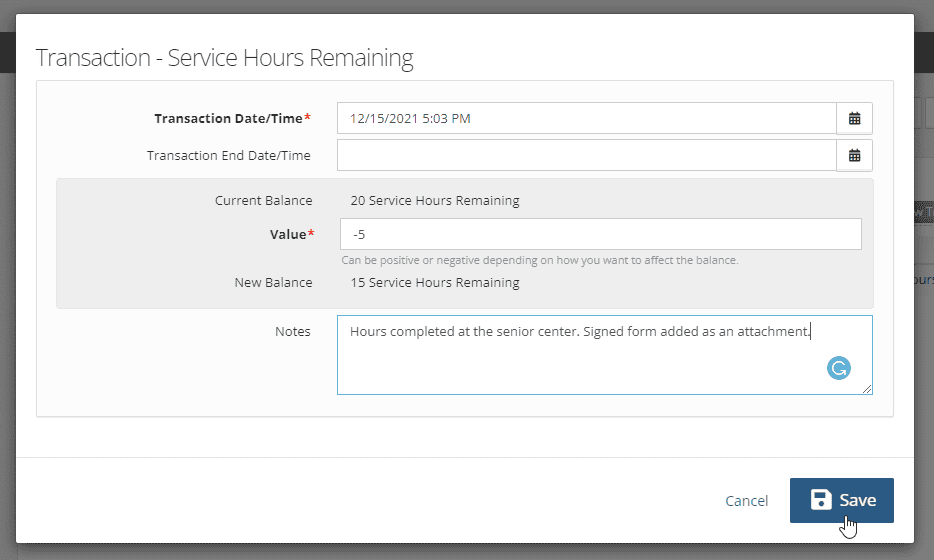
Once the transaction has been added, the log will be updated along with the balance remaining. The remaining balance will also be updated in all other locations within YouthCenter.
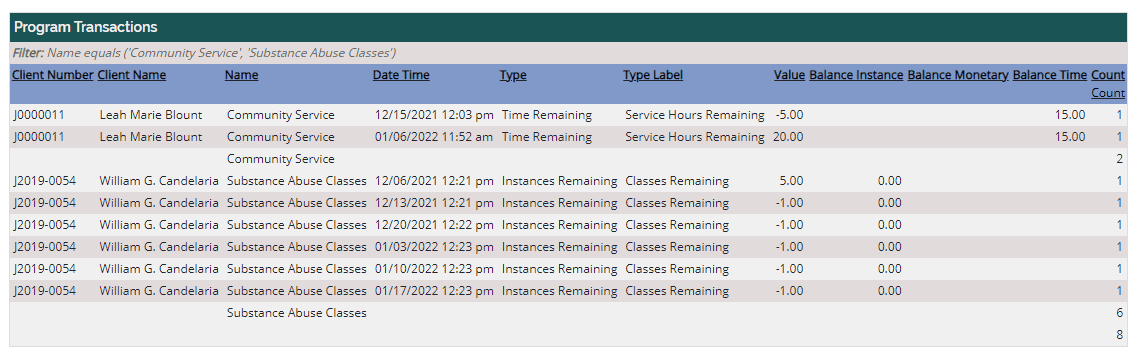
Like program outcomes, you may also build reports on transactions using the data source “Client: Program Placement Transactions”. Building reports on transactions can make it easy to generate logs for documentation or to generate a listing of clients that still need to complete their assigned work.
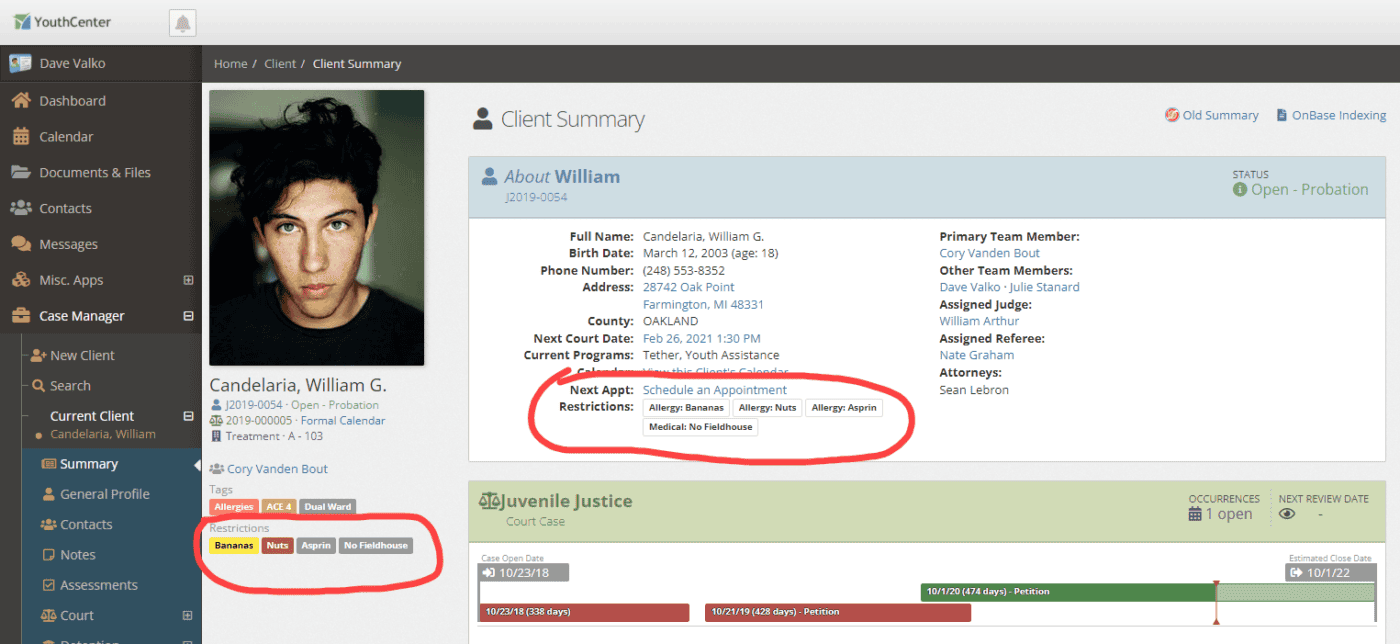
Restrictions
After working with a number of detention centers and probation officers, we’ve seen Tags being used to denote a number of allergies and physical restrictions. Based on user input, we’ve broken out restrictions into 4 different types: Allergy, Food, Medical, and Other. This breakout makes it easy to run reports on restrictions for detention center kitchens, administrators looking for funding based on types of allergies, etc.
Restrictions can be added to widgets on the dashboard.
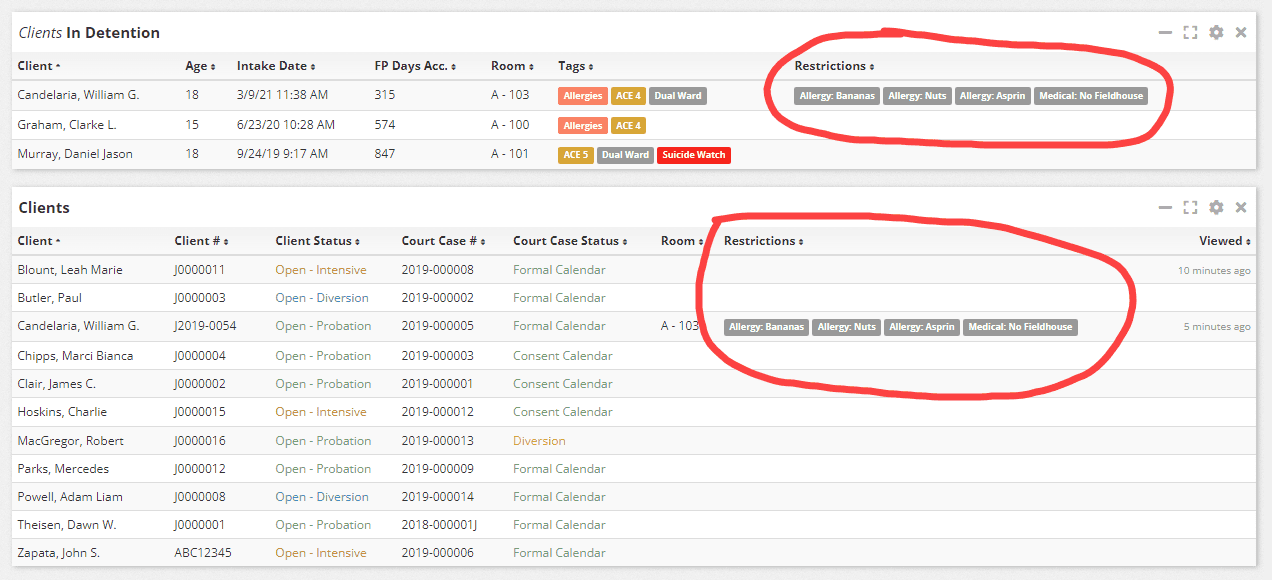
Restrictions will also be shown on the youth summary and under their existing tags.
Adding Restrictions
Administrators can add restrictions for use in YouthCenter by using the Picklist Admin, filtering by restriction, then selecting “client restriction”
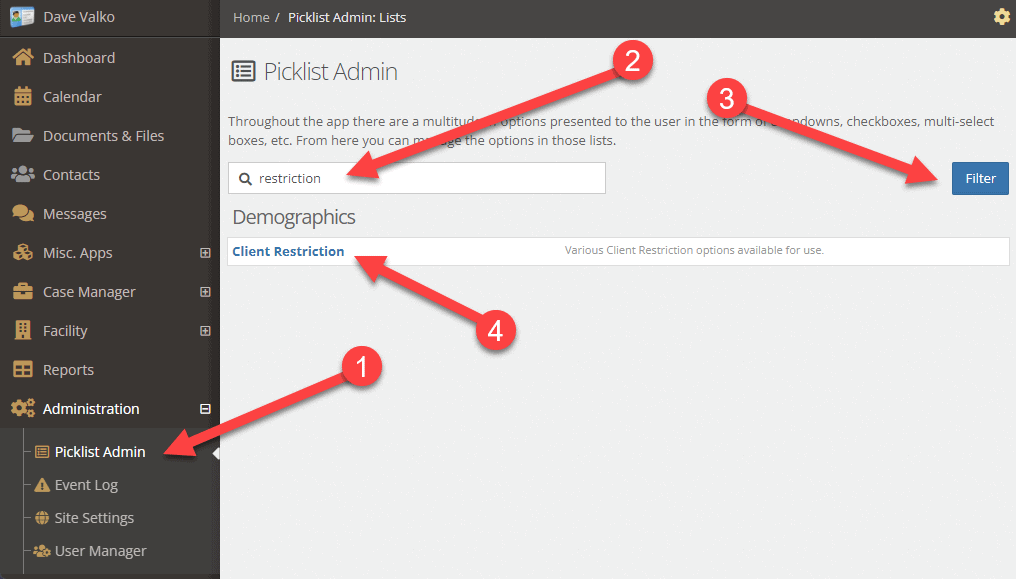
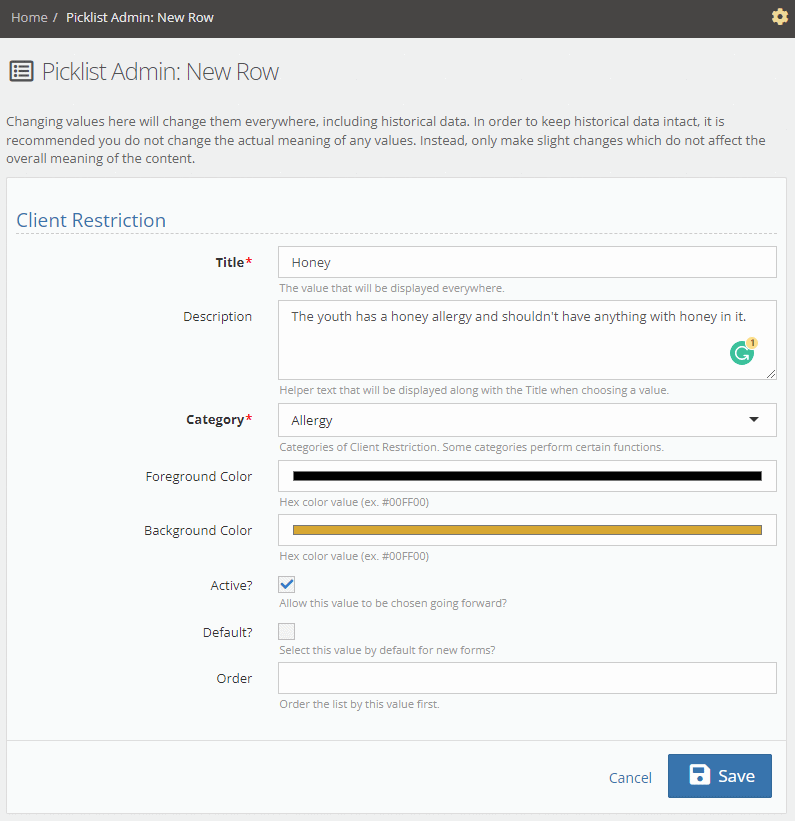
Add a client restriction by clicking the green + button labeled “Create a New Client Restriction”.
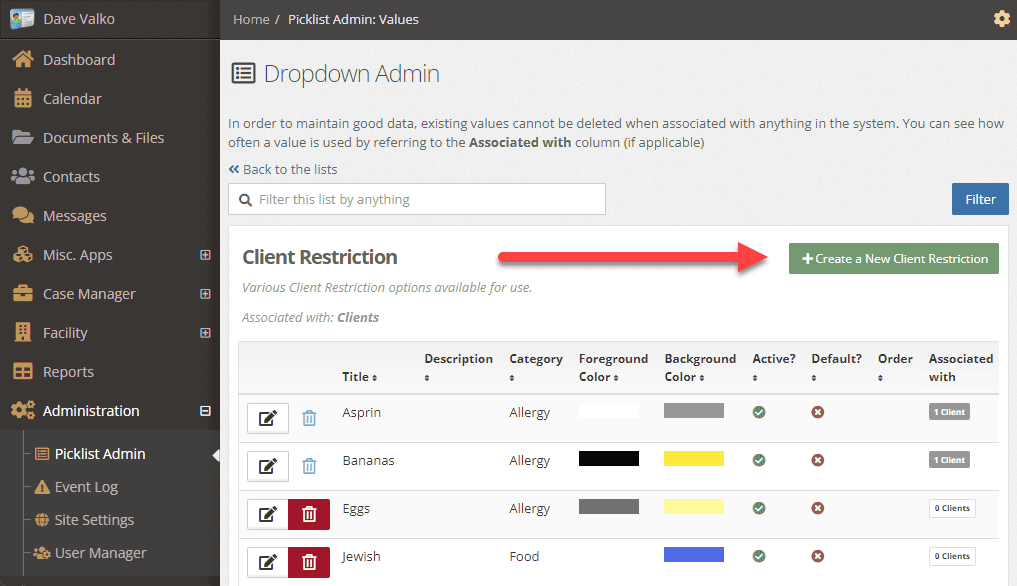
Give the restriction a name, and if you would like, add a description, select a category, and similar to tags, you can color the restriction appearance (Background color is the button, Foreground color is the text).
Once restrictions have been added, you can add them to a youth.
Adding restrictions to a youth
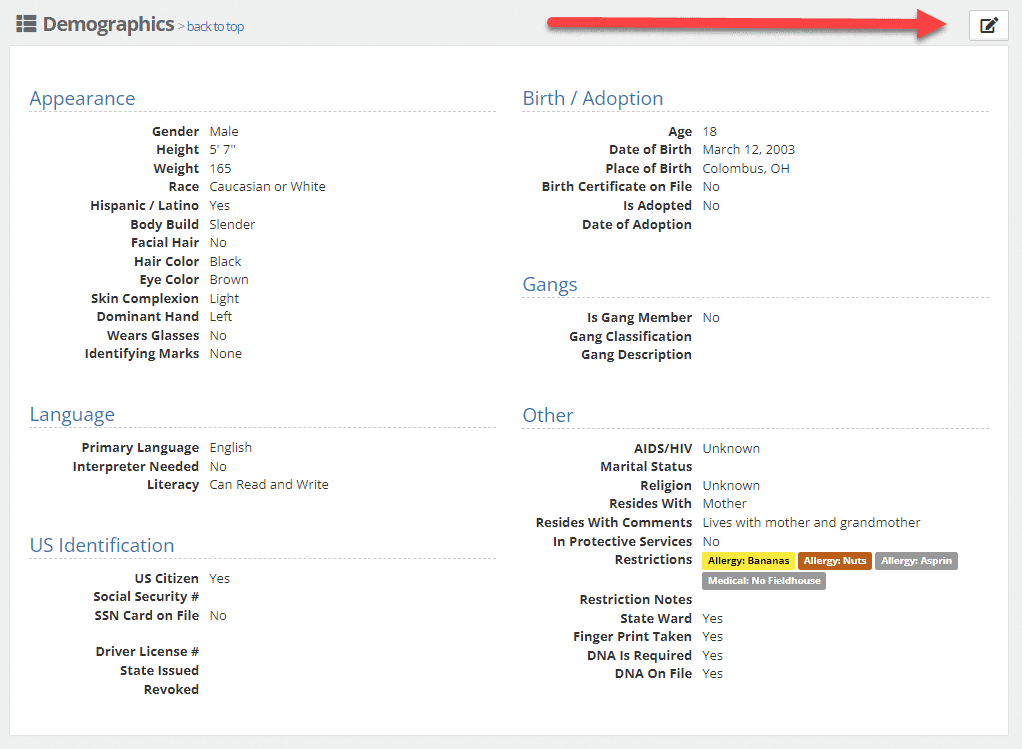
To add restrictions to a youth, select a youth, view the General Profile of the youth, then scroll down to Demographics. Use the Pen and Paper icon to edit the demographics.
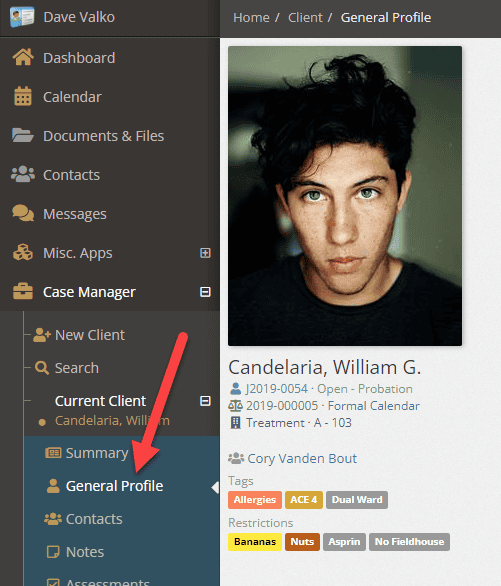
Scroll down to the Client Restrictions and click in the box to choose the restrictions that apply to the youth. Restrictions in the listing are grouped into Allergy, Food, Medical, and Other as shown.
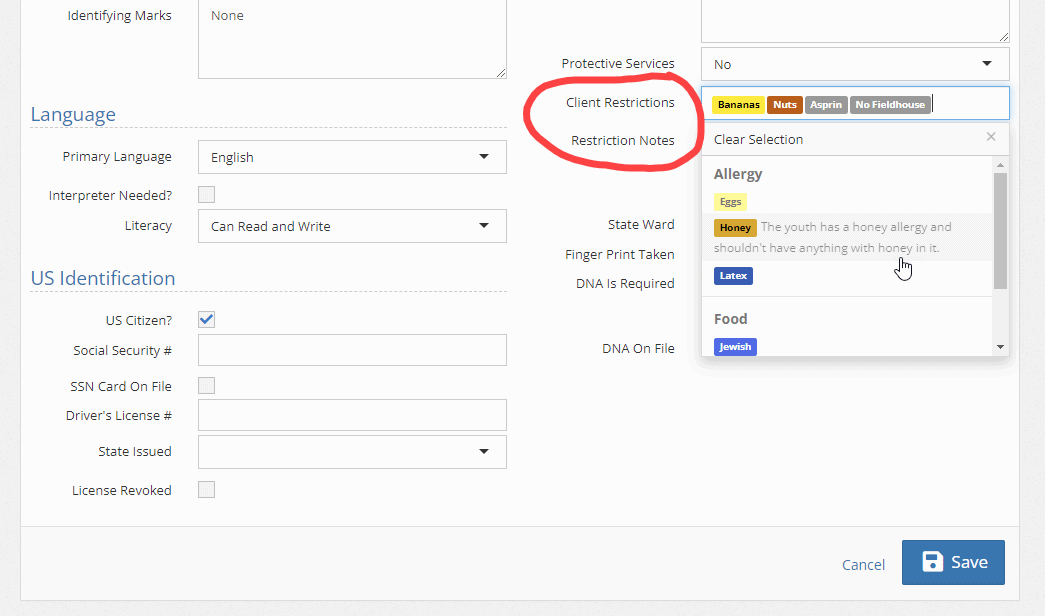
Once you’ve added restrictions, you may add notes to clarify any information on the restriction(s). Once you’ve saved the demographics, the restrictions will be shown in widgets, the youth’s summary, and can be reported through reports.
Placement Requests
Detention centers and residential facilities have asked for updates to the Facility Placement Requests to allow for viewing pending requests and include an estimated intake date.
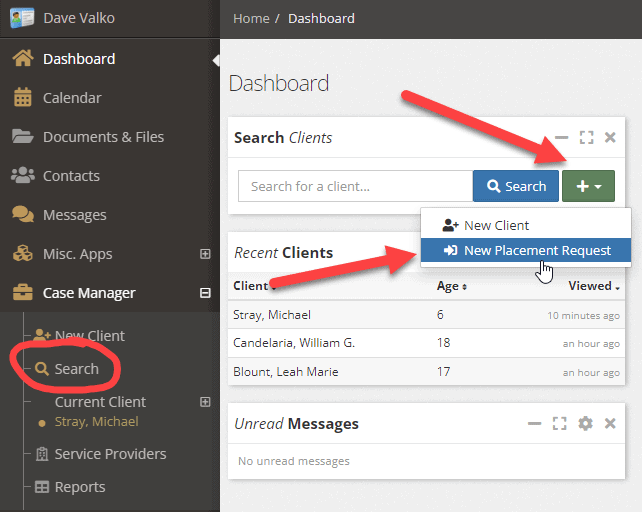
To add a new placement request, from the dashboard or the Search under Case Manager, select “New Placement Request”.
You’ll be asked to search for a client in the system before adding a new client, just as you would if you were adding a new client. Once you’ve searched, you can either select a client from the listing or add the new client.
Once a client has been selected, the placement request form will show up.
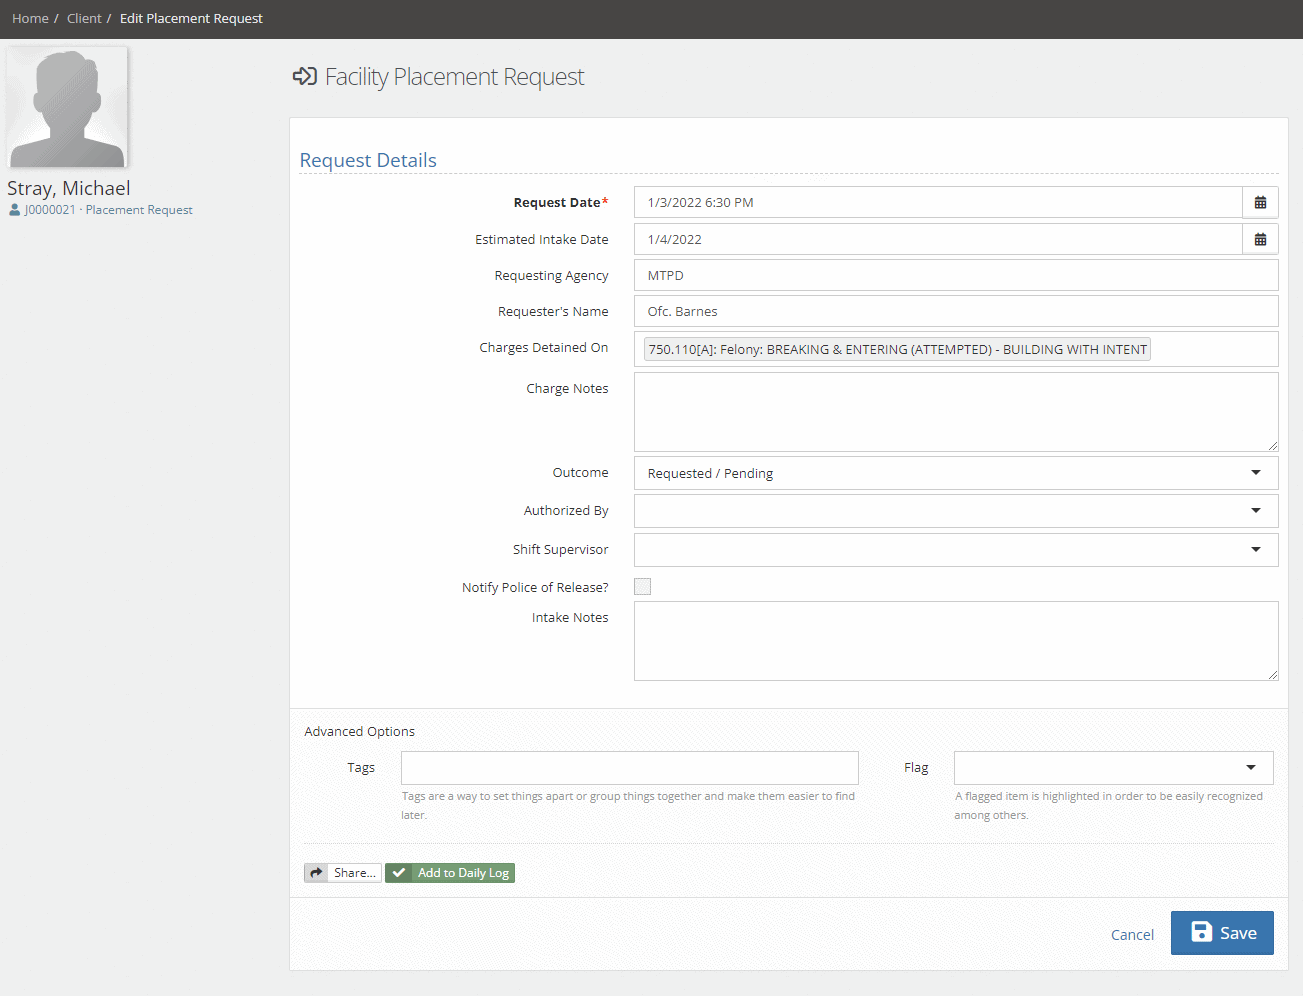
Fill out the form as needed. You may need to add an Outcome in the Picklist Editor called “Requested / Pending” for placements that are being requested, but not granted yet. Once the request details have been added, save the request.
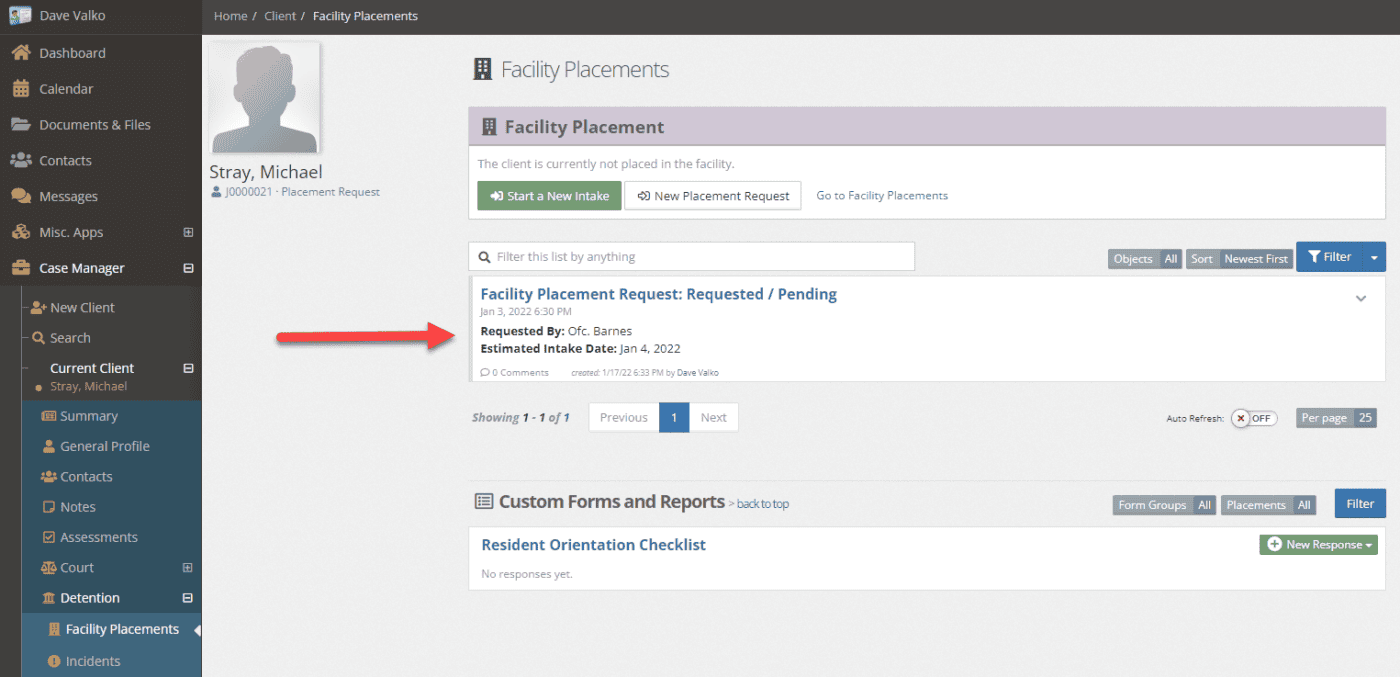
The status of the request will be shown in the client’s Facility Placement application.
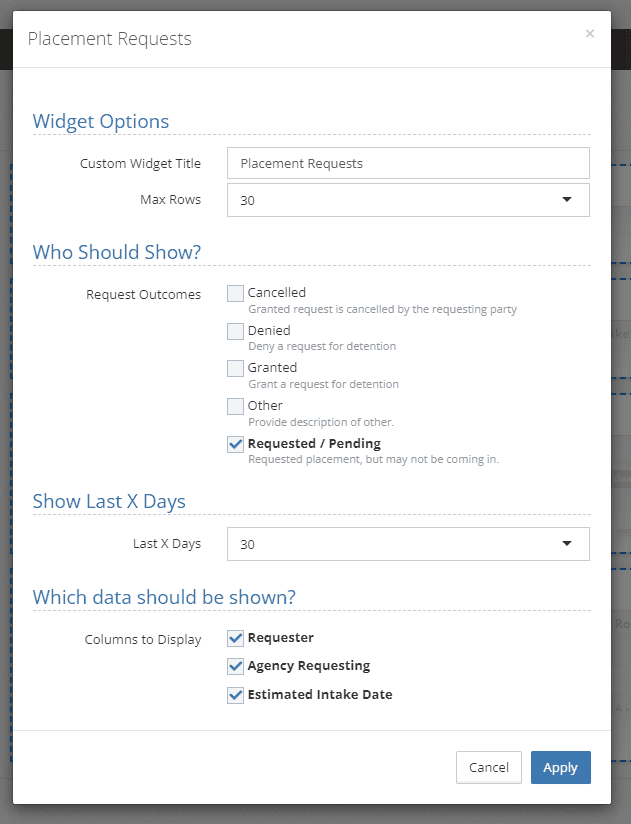
You may add a placement request widget to your dashboard by clicking on the gear icon near Manage Dashboard, selecting the green + button labeled “Add Widgets” and selecting the widget “Placement Requests”.
Use the gear icon on the widget to set the options for the widget. Below, we’ve renamed the widget to be Placement Requests, chose to only show request outcomes of “Requested / Pending” and to show the last 30 days of requests.
Once you’ve saved the widget and arranged it on your dashboard, you’ll be able to see upcoming placement requests.

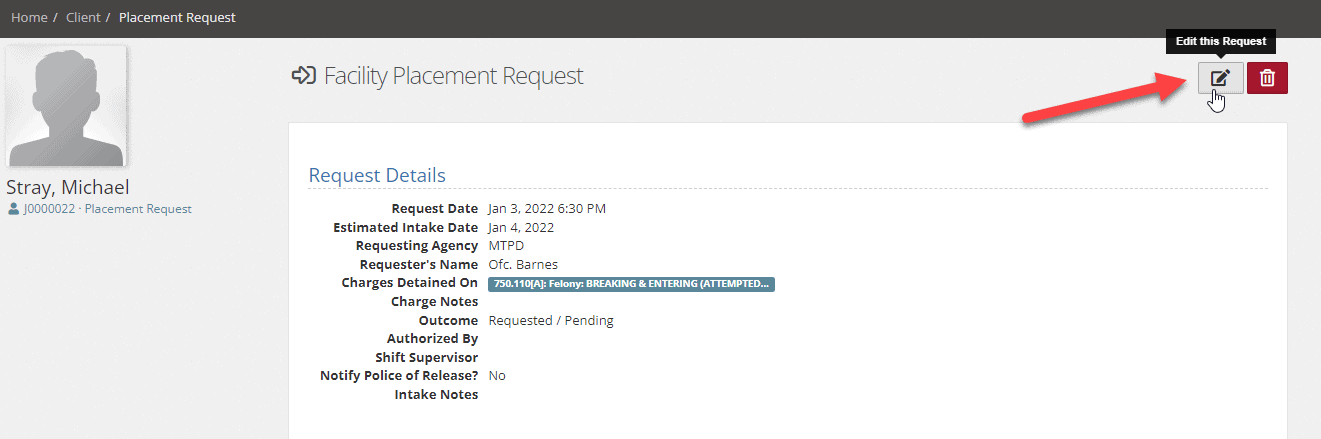
To edit a placement request (approve or deny), click on the placement request and use the pen and paper icon to edit the request, change the outcome, authorization, and other details.
Assessments
Jurisdictions have been asking for the ability to duplicate assessment responses as many of the client assessment answers are the same with only a few changes since the last assessment. In this release, we’ve added the option for duplicating an assessment response once an assessment response has been submitted and approved.
To duplicate a response, simply use the “Copy This Response” button as shown below.
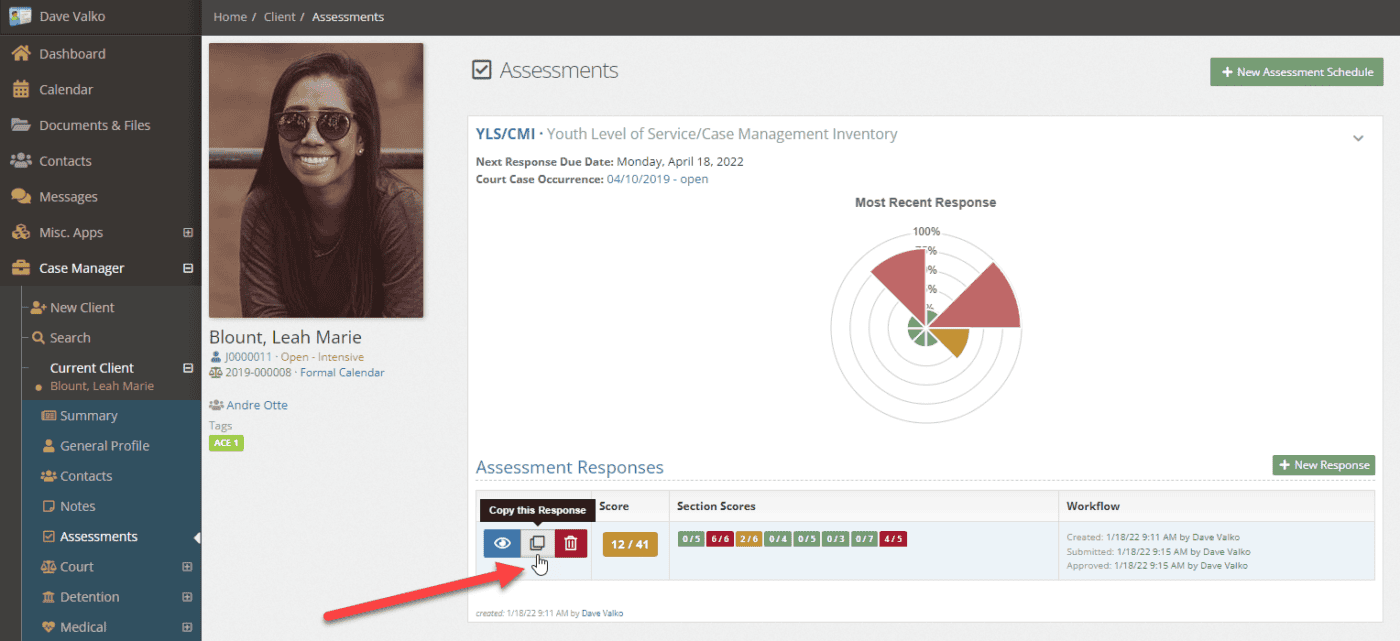
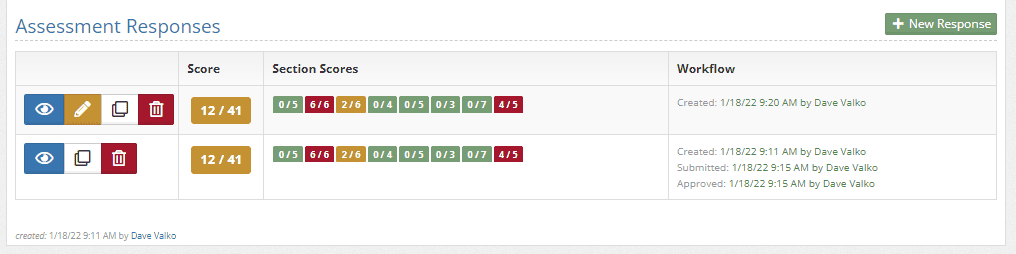
Once an assessment response has been duplicated, you have the ability to edit it and then re-submit the new assessment response as shown below.
Widget updates
Clients in Programs Widget
We’ve had a number of requests to see what clients are in which programs, so we’ve added a Clients in Programs widget.
Users can add the widget to their dashboard using the Manage Dashboard gears on their dashboard and using the green + button labeled “Add Widgets”.
Once the widget has been added, use the gear icon in the upper right corner of the widget to bring up the widget filtering and options as shown below.
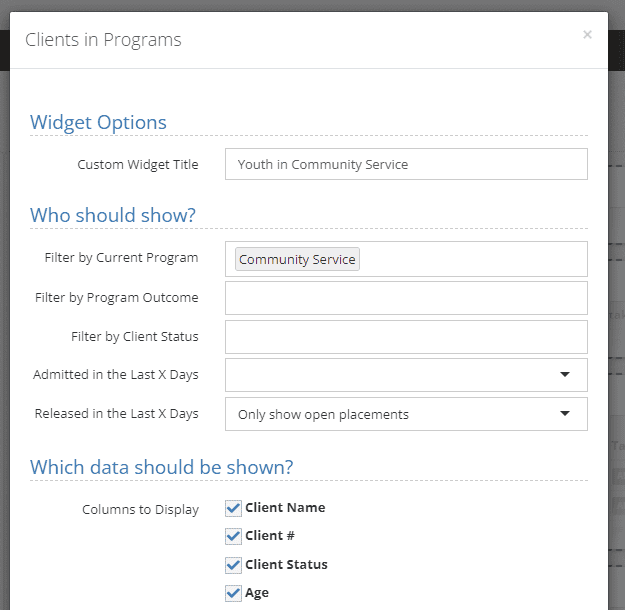
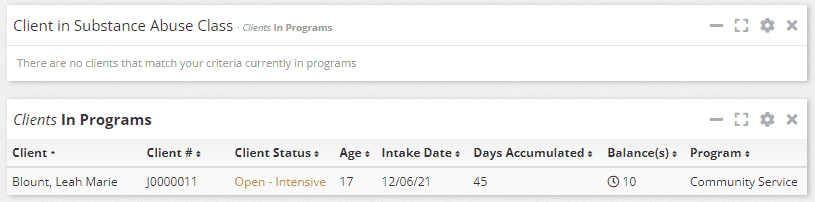
You can add multiple widgets to your dashboard, filtered by program if you’d like or have all under one widget. The in the example above, we’re only showing clients in the Community Service program.
Options for what to show in the widget are below the filtering options and now include balances for transactions (monetary, hourly, or instances) within programs.
Clients in Detention Widget – Facility Placement Program Days Accumulated
Detention administrators have asked for some additional insight into a youth’s placement. While the total duration in the detention or residential placement is important, how many days they are in the current facility placement program has been requested. The “Client’s in Detention” widget now has the option to show Facility Placement days accumulated, but also the number of days in their current facility placement program. Ths can be helpful to see if youth have goals to move from one program to another while in placement.
To add to a “Clients in Detention” widget, simply select the gear icon to configure it, then add the “Facility Placement Program Days Accumulated” as shown below:
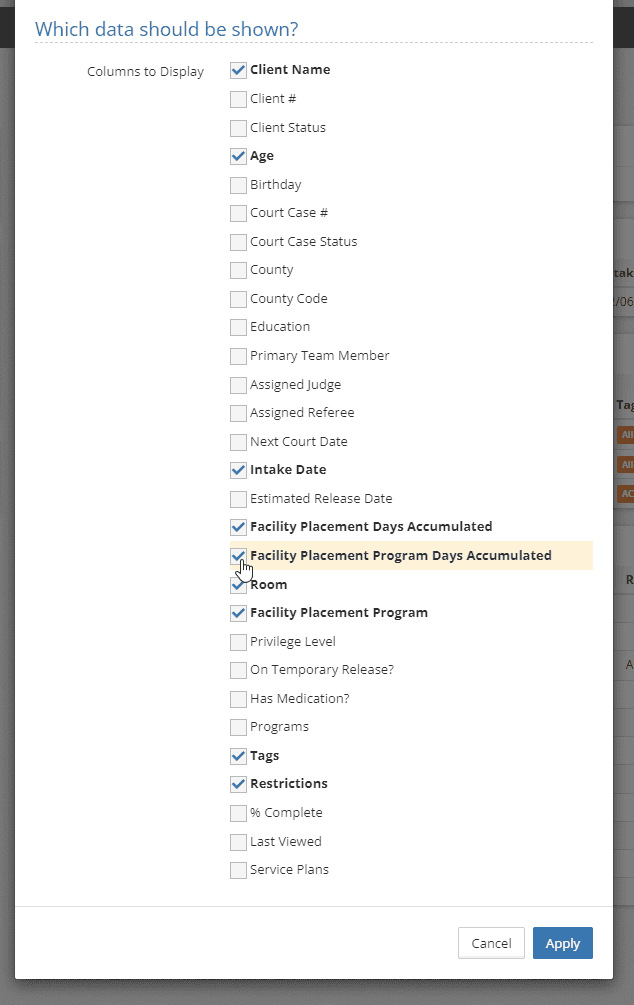
Once added the column will display the days accumulated in the program:

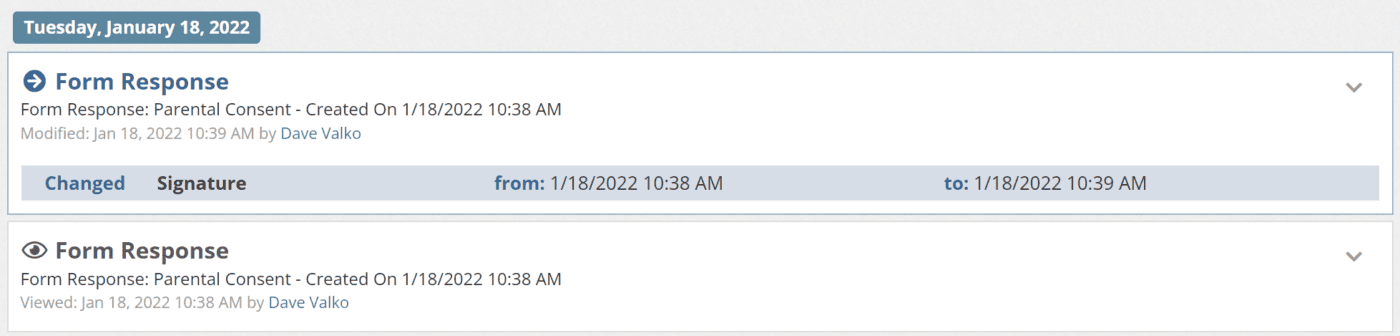
Audit Log
To enhance YouthCenter’s compliance with regulations like HIPAA, we’ve added application view logging in the youth’s audit log.
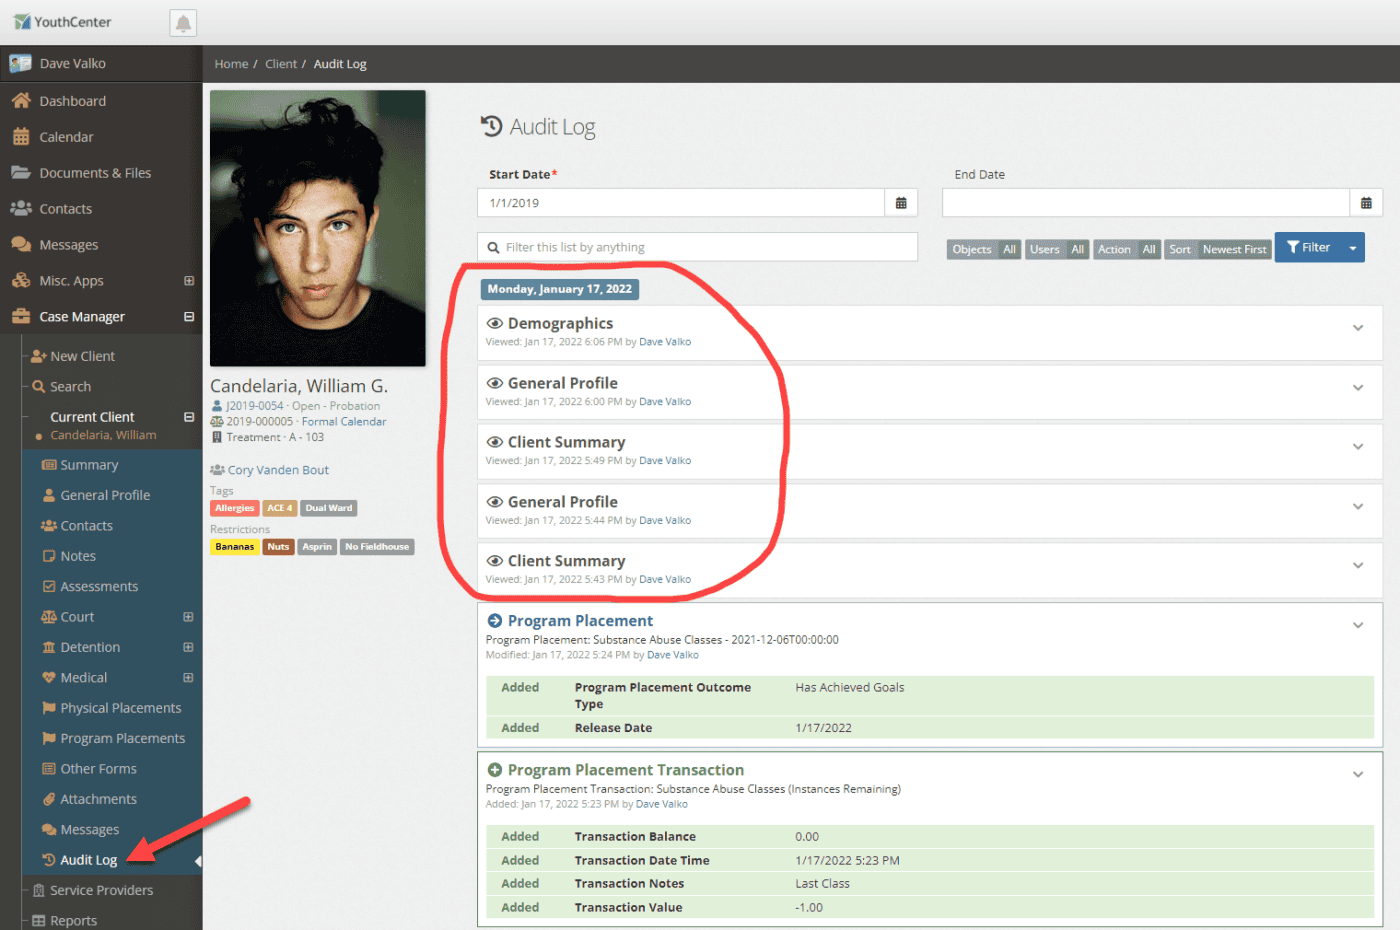
Along with the view logging, custom form responses (adding, editing, and deleting) are now added to the audit log as well.
TLS 1.0 to 1.2 Upgrade
In an ongoing effort to improve the security of our case management applications, we will be upgrading the end-to-end security protocol on the servers that power YouthCenter. We are moving from TLS 1.0 to 1.2. TLS 1.2 is significantly more secure and fixes vulnerabilities in TLS 1.0. While TLS 1.2 has been out since 2018, we have waited until now to complete the upgrade to account for older government systems that may not be compatible with the improved encryption system. Based upon our usage statistics, we are at a point where it makes sense to upgrade.
If you or your users have any issues after the upgrade accessing YouthCenter, please upgrade your browser to a modern browser like Google Chrome. Additionally, some operating systems may need to be upgraded. You would need to contact your IT department for assistance in that upgrade.
Your input is greatly appreciated!
With all our releases, we look forward to your feedback. We’re always looking to make improvements to the software you use daily. Along with the above items, with your input, we’ve made some additional improvements around the speed of the application, general design, and usability. These improvements don’t come without your continued input.
If you need assistance on how to use any features you’ve seen here or have suggestions on other improvements, please contact us and we’ll work with you.
More to come in 2022
2022 promises to have additional improvements for YouthCenter, we’ve got some exciting new features and improvements to show you later this year.
Along with new features and improvements, we’ll be offering up webinars on how to use features within YouthCenter and adding more documentation on the system at https://docs.youthcenter.net