In the March 2021 beta release, we are continuing to port applications from the old interface to the new. The majority of the administrative applications have been moved to the new interface. Additionaly, Court cases have been moved to the new interface, and some additional visuals have been added to illustrate how clients have interacted with the court. These updates will be released to your live sites in April 2021. Read on to learn about the new features available to test today in your beta site!
Application Update Notifications
The YouthCenter team is releasing updates to the system on a regular basis. These releases include minor bug fixes or enhancements users like you have requested. From time to time, the users browser doesn’t update to the latest version of YouthCenter or the user was logged in when the update occured. If/When this occurs, your users may see a dialog box notifying them that the page needs refreshed.

If your users see this, they can simply press the refresh button as shown above or press F5 or Ctrl+R on their keyboard to refresh the application or press the refresh button in the browser to update.

Once the browser has been refreshed, the notification will go away, and your users will be on the latest version. Again, this should only be seen in rare occastions.
Court Case Occurrences
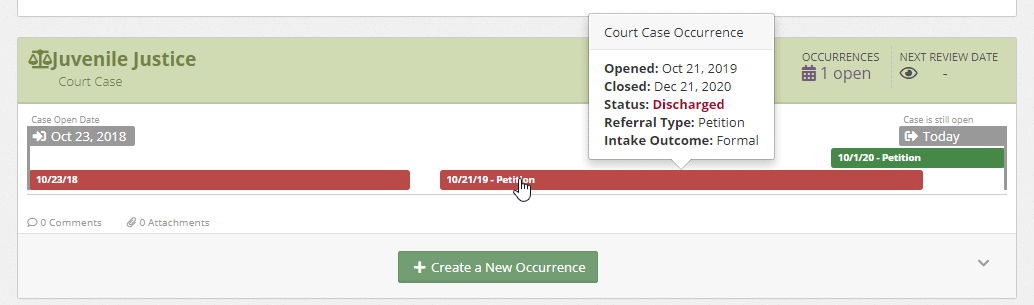
YouthCenter users and administrators have been asking for a better way to see when and how often a juvenile has been in contact with the court or probation. With input from users like yourself, we’ve implemented a better way to show how often a client has been involved with your organization through Court Case Occurences. When you view a client’s summary in YouthCenter, you will find the Court Case Occurences below the client’s information in the Juvenile Justice section as seen below:

Previously, a court case would have a status of opened or closed, and seeing the interaction of a client with the court over time was difficult. Because of the open and closed status, other objects associated with a client couldn’t be associated to that case time frame. With this update, we are getting closer to being able to associate Programs, Placements, Drug Tests, etc. with specific interactions with the court.
In the example below, you will see that this client has had 3 interactions with the court, 2 that are closed (indicated in red) and one occurence that is open. In our example, we’ve hovered over the 2nd interaction timeline that shows some details on that particular occurence including the date the occurence was opened, closed, it’s status, referral type, and intake outcome. You will also notice that court case occurences may overlap as the 3rd occurence does in the example below shown in green with a start date of 10/1/2020. Overlapping occurences could illustrate a parole violation or another interaction with law enforcement and then the court.
Clicking on an occurence timeline will bring you to the detail of that timeline and allow you to edit (if you have security permissions to do so) the occurence details as shown below. All options in the drop down’s shown and checkboxes are administrator configurable in the picklist administration system of YouthCenter.

The timeline listing of the court case and occurrences can also be find under the Court application in Court Cases using the YouthCenter menu as shown below:

New clients in YouthCenter will not have a court case or any court case occurences open.

To open a court case and the client’s first occurence, simply click on the green + Open a Court Case button as shown above to start the Court Case wizard which will walk you through the process of opening a case, then an occurence.

Adminstration Updates
We’ve moved some major administrative features from the old interface to the new interface and included some updates along the way.
Administration: Picklist
As an administrator for your organization, one of the key advantages of YouthCenter is being able to modify the dropdowns to fit your organization’s structure and needs. These dropdown choices previously lived in the administrative interface of YouthCenter. With this beta release, the Picklist dropdown options have been moved to the new interface. You can find it under the administration menu.

Let’s say you wanted to add a new contact type to the Contacts app. Simply open up the Picklist Admin, scroll down to the Contacts app section, and select the Contact Type link. Alternatively, you can use the filter by anything box and type Contact Type and the list will filter down.

Once inside Contact Type, simply press the green + Create a New Contact Type and enter a title and description, then press save.

That new option is now available in the contact app. You can follow these steps to add to any of the available dropdowns in the system.
Administration: Site Settings
Site settings has been moved to the new interface of YouthCenter. If you are an administrator of your organization, you can access your site settings (both General Settings and YouthCenter Settings) via the navigation menu. Expand the administration menu and select site settings.

Both the General Settings and YouthCenter Settings are found under the Site Settings

Site settings, if modified, must be saved before they will take effect.
Site Settings > General Settings: Auto lock account after a number of failed login attempts
As an administrator in YouthCenter you can now customize the number of failed login attempts before a user is locked out, and also set the duration of the lockout. This feature strengthens YouthCenter’s security by blocking unauthorized attempts to login.
To adjust the lockout settings, expand the administration menu and select site settings

Then scroll down to the security section to find the lockout options. Until modified, it will use default values.

Site Settings > General Settings: IP Address Restrictions
Like the Account Lockout settings, the IP Address Restrictions provide an added layer of security to YouthCenter by preventing unauthorized access.

You may see IP addresses by viewing logins and login attempts in the Event Log.

Site Settings > User Manager
User management has also been moved to the new interface for YouthCenter. In addition to the standard options previously available, several new quality of life additions has been added. To access the User Manager app, simply expand the administration menu item and select User Manager.

Managing Users
You may find users in the listing by using the search box and filter tools at the top of the user listing. Once you’ve found the user you want to manage, simply click the down caret and selection the action you want to perform from the items available.

Adding Users
The create user button can be found in the right side of the application.

Setting up new users has never been easier. We’ve added the ability to setup multiple users at the same time including setting their initial password, user groups, and dashboards from another user’s dashboard settings in the system.

Additionally, you can now clone the main dashboard and case manager dashboard of another user to make a default dashboard for the new user or users. A clone of the user dashboard is not linked, so both the original user and the new users can make changes to their dashboards without affecting the other users.
Contacts
We’ve added some requested features to the Contacts associated with a juvenile in YouthCenter.
Tags on Contacts & Relationships
Tags can now be added to client contacts to visually show information about a client contact that is valuable to your organization. This can be extrememly helpful for tagging clients as family, or “No Contact”.

Tags need to be added to “Relationships” in the Picklist Admin to be added to a relationship.

Once a Tag has been added to the relationship object, you can add a tag to a relationship by editing or creating a new relationship. The Tags field will be available at the bottom of the relationship.

Similar to other tags, Client Contact Tags may be added to reports. Using the Client: Relationships data source, you can add Client Relationships: Tags data source.

Use the new reporting to quickly find or report on information within your client contact tags.
Misc Updates
Event Log: Client Searches now appear
In an effort to improve our compliance with various rules, client searches are now logged in the Event Log.

Youth Name Format
The youth’s name in listings have been updated so they may be viewed either “First Last” or “Last, First” format in listings througout YouthCenter. The below My Client’s widge shows the youth’s name listed in “Last, First” format.

To change the format of how youth names are listed, administrators of your YouthCenter instance can find the setting under Administration > Site Settings > YouthCenter Settings > Client Name Format.

Your input is greatly appreciated!
With any release, we look forward to your feedback. We’re always looking to make improvements to the software you use daily. Along with the above items, with your input, we’ve made some additional improvements around the speed of the application, general design, and usability. These improvements don’t come without your input.
If you need assistance on how to use any features you’ve seen here, please contact us and we’ll work with you.