With the March 2019 release to your beta sites, we are continuing to port applications from the old interface to the new. Included in this release are the Medical, Medications, Service Plans, and User Profile applications. These will be released to your live sites in April 2019. Read on to learn about the new features available to test today in your beta site!
Medical
The Medical application is where you may store medical insurance information, attachments, and custom forms related to the medical care of your client.
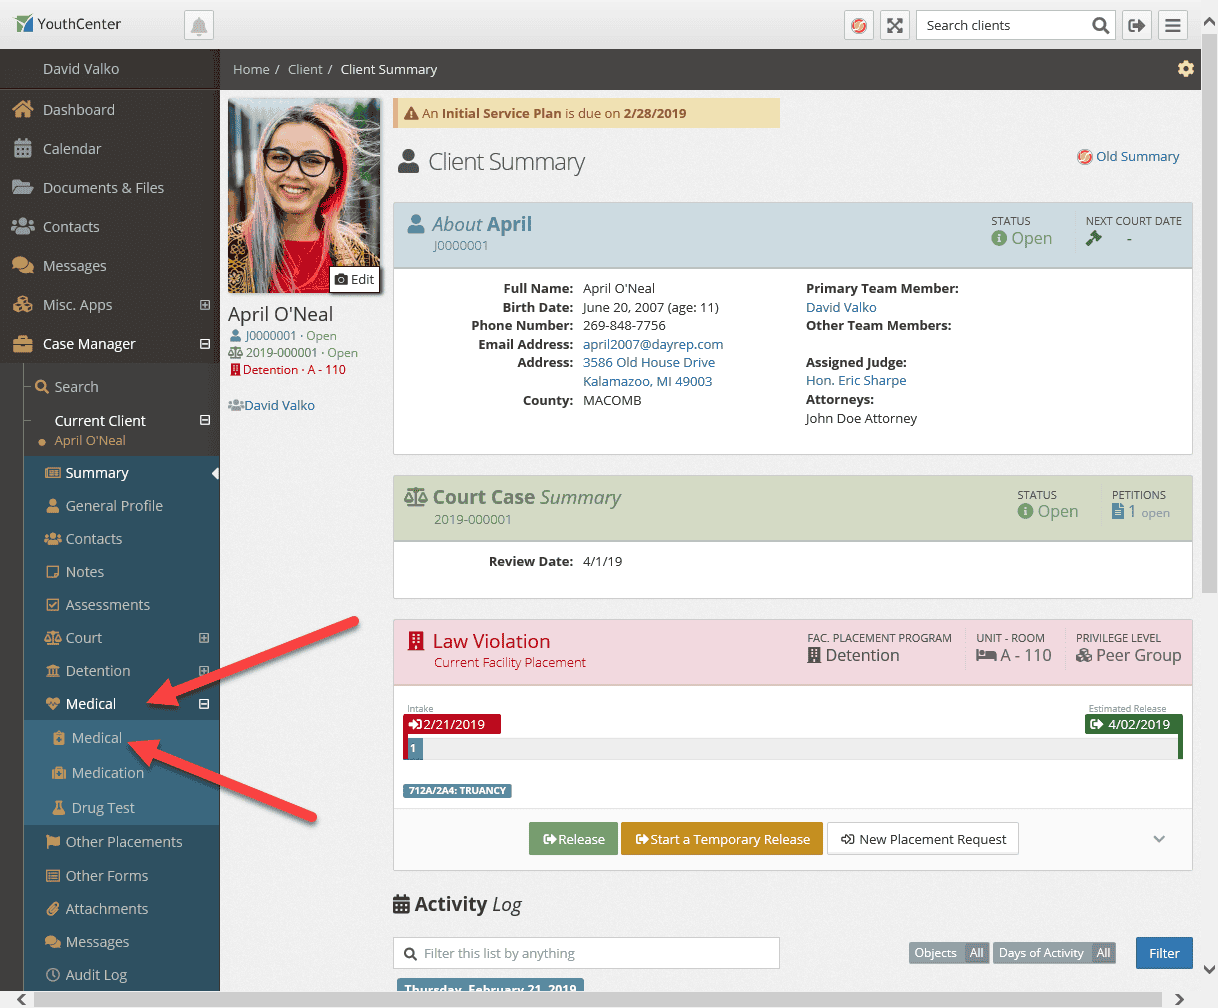
The medical application can be found when you have selected a client and opened the Medical menu item as shown.
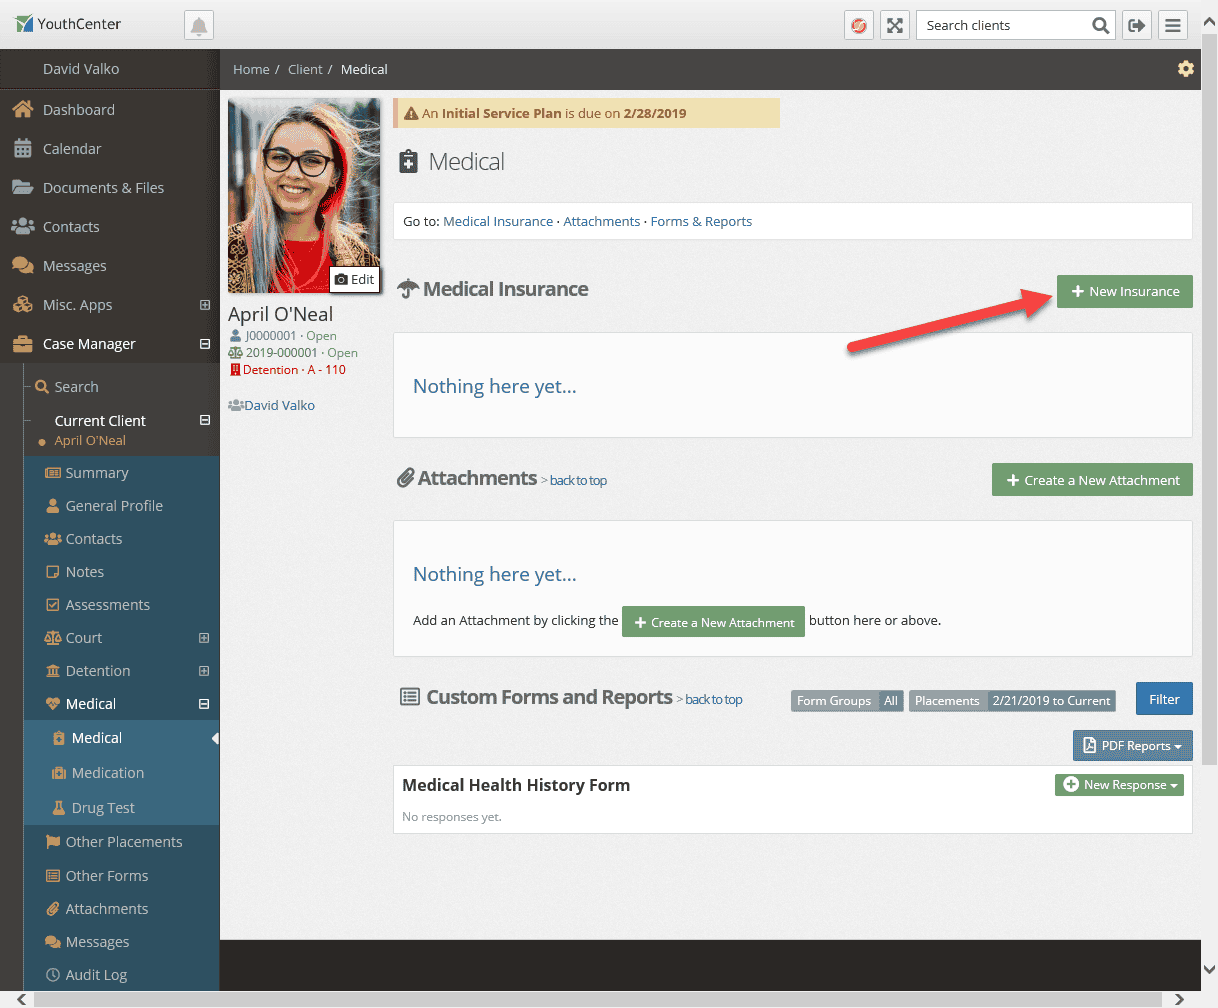
The Medical application is broken up into 3 sections:
1. Medical Insurance
To add an insurance provider and associated cards to the client select the New Insurance button.
This will bring up the Insurance Editor as shown:
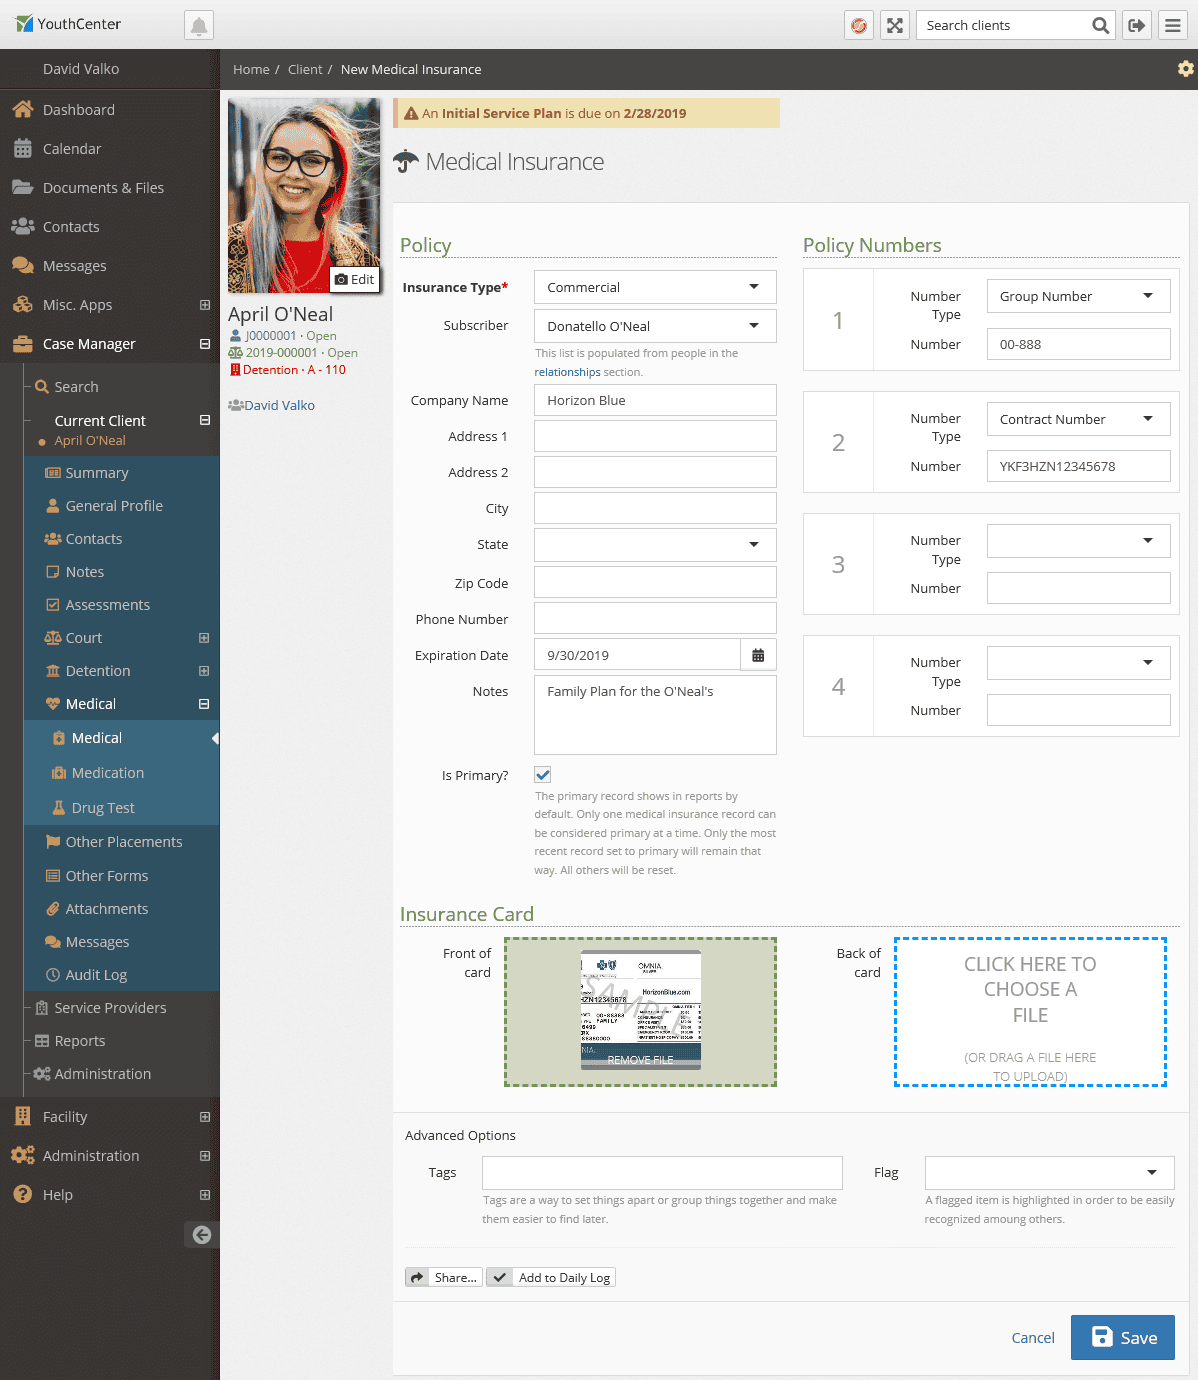
Add insurance information as required by your organization to the fields provided. You may add a scan or photograph of the insurance card front and back for reference as well.Administrators may customize “Insurance Types” and “Number Types” in Detention > Administration > Medical.
The Advanced Options allow you to tag the Medical Insurance object if you need to, as well as flag its importance. Administrators may setup custom tags for the Medical object in Detention > Administration > Objects. The Share and Add to Daily Log options are also available with the Medical Object to allow for notifications to others of the Medical activity.
When complete, save the Insurance Object using the save button at the bottom of the form. Once saved, you will see the detail of the Medical Insurance as shown below.
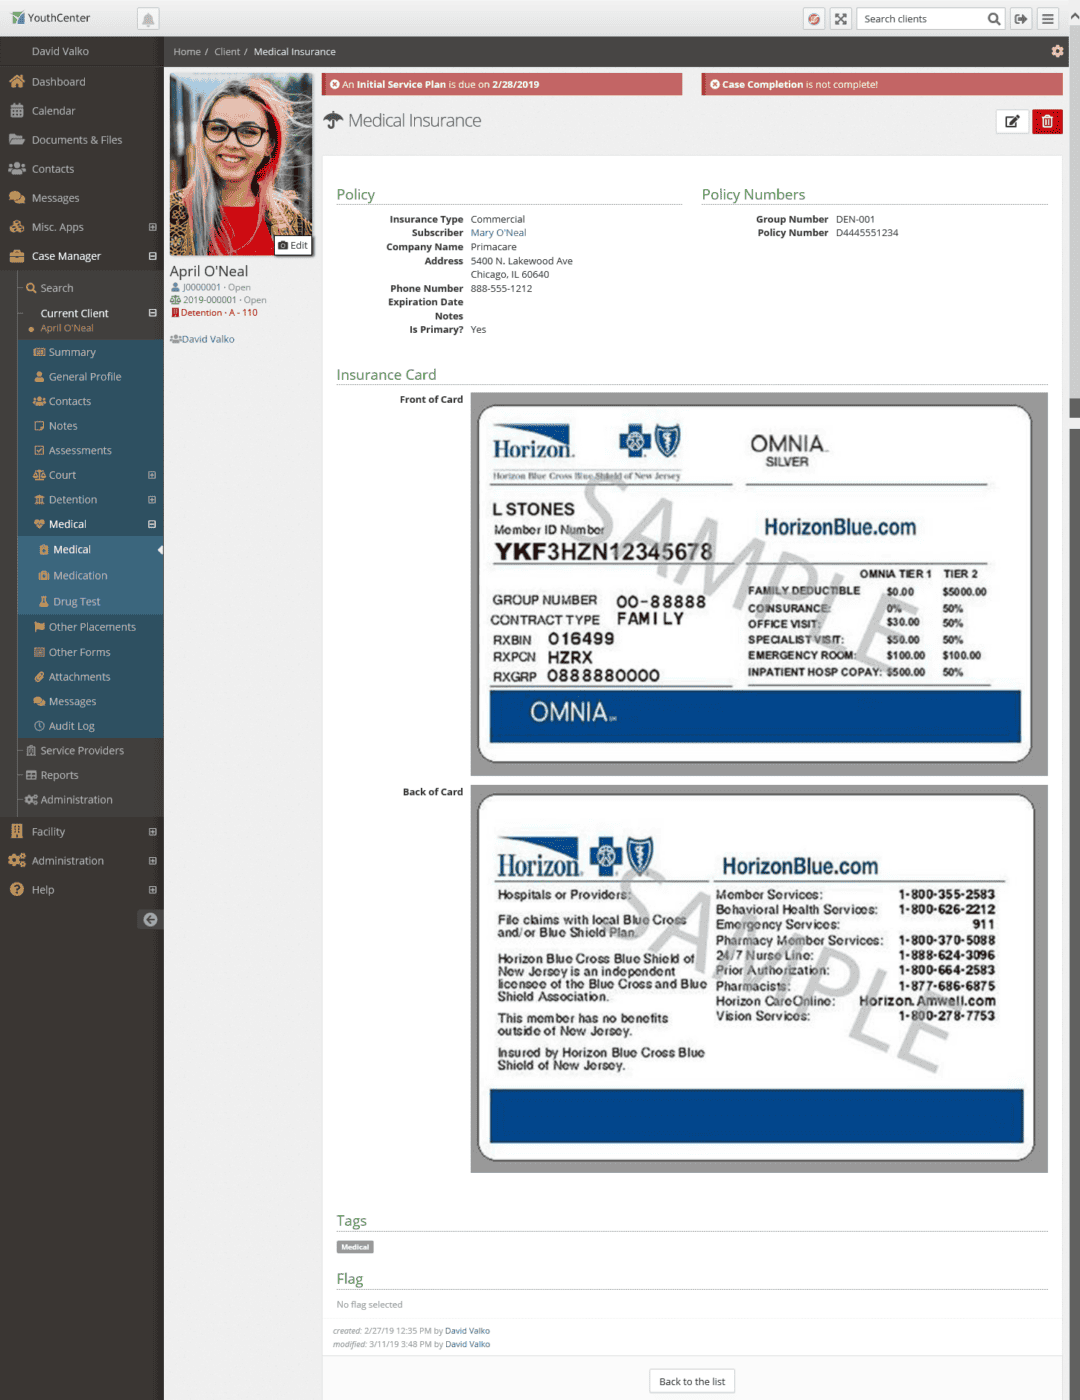
You may add more than one insurance if needed. The insurance selected as primary will be shown at the top of the list and include a flag.
2. Attachments
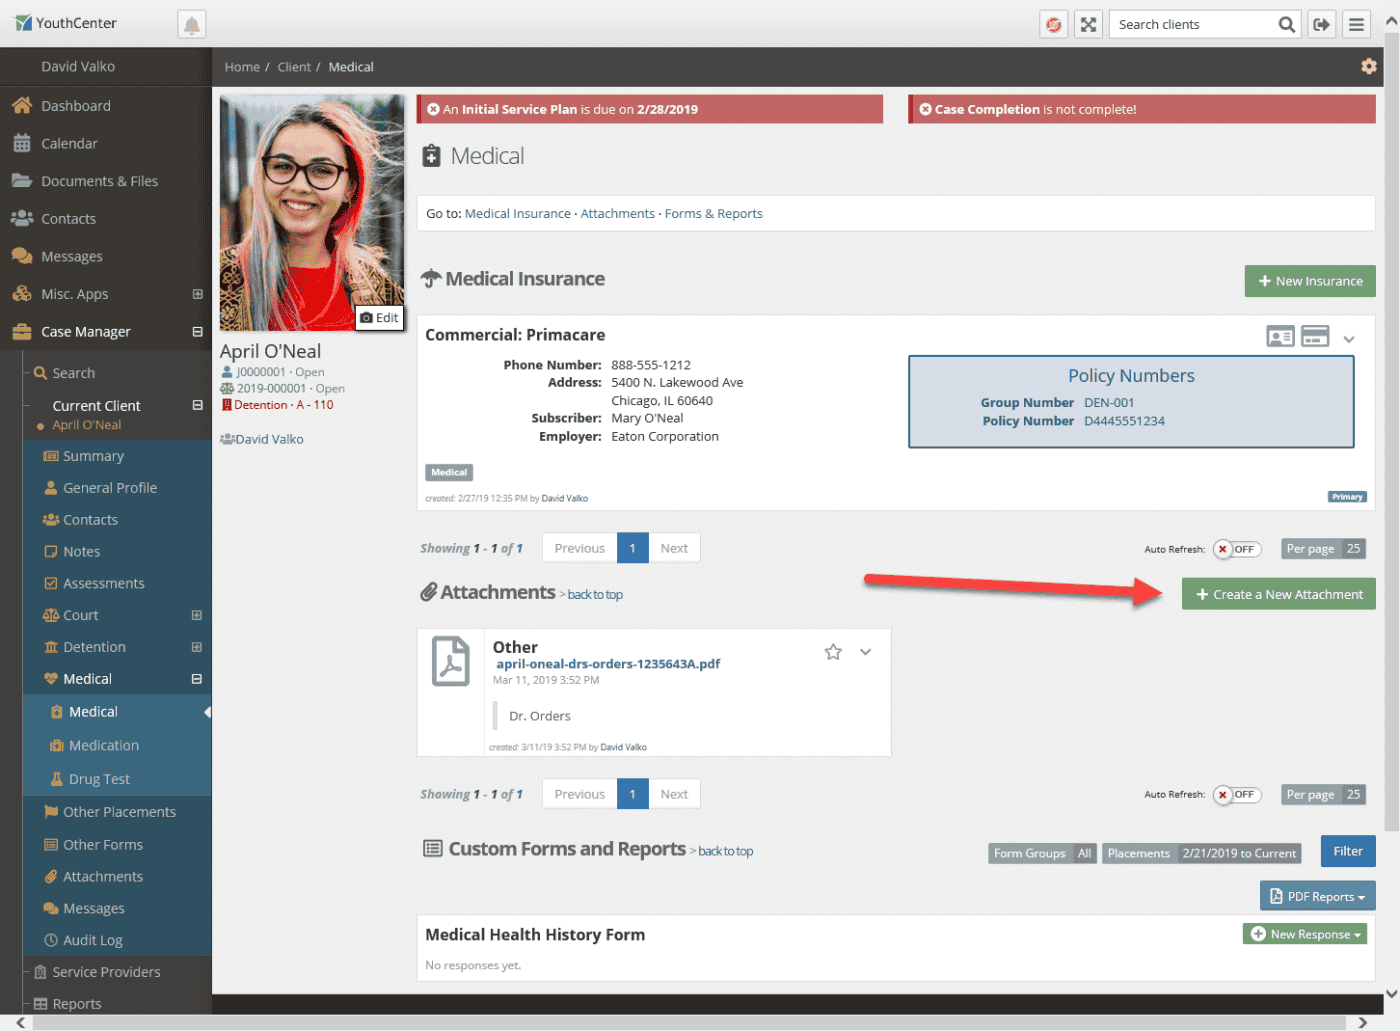
Medical Attachments are intended to be associated medical related items as in prescriptions, medical order, etc. related to the client. These could be scans in PDF, JPG’s, or Word Documents. To add a medical attachment, use the + Create a New Attachment button as shown:
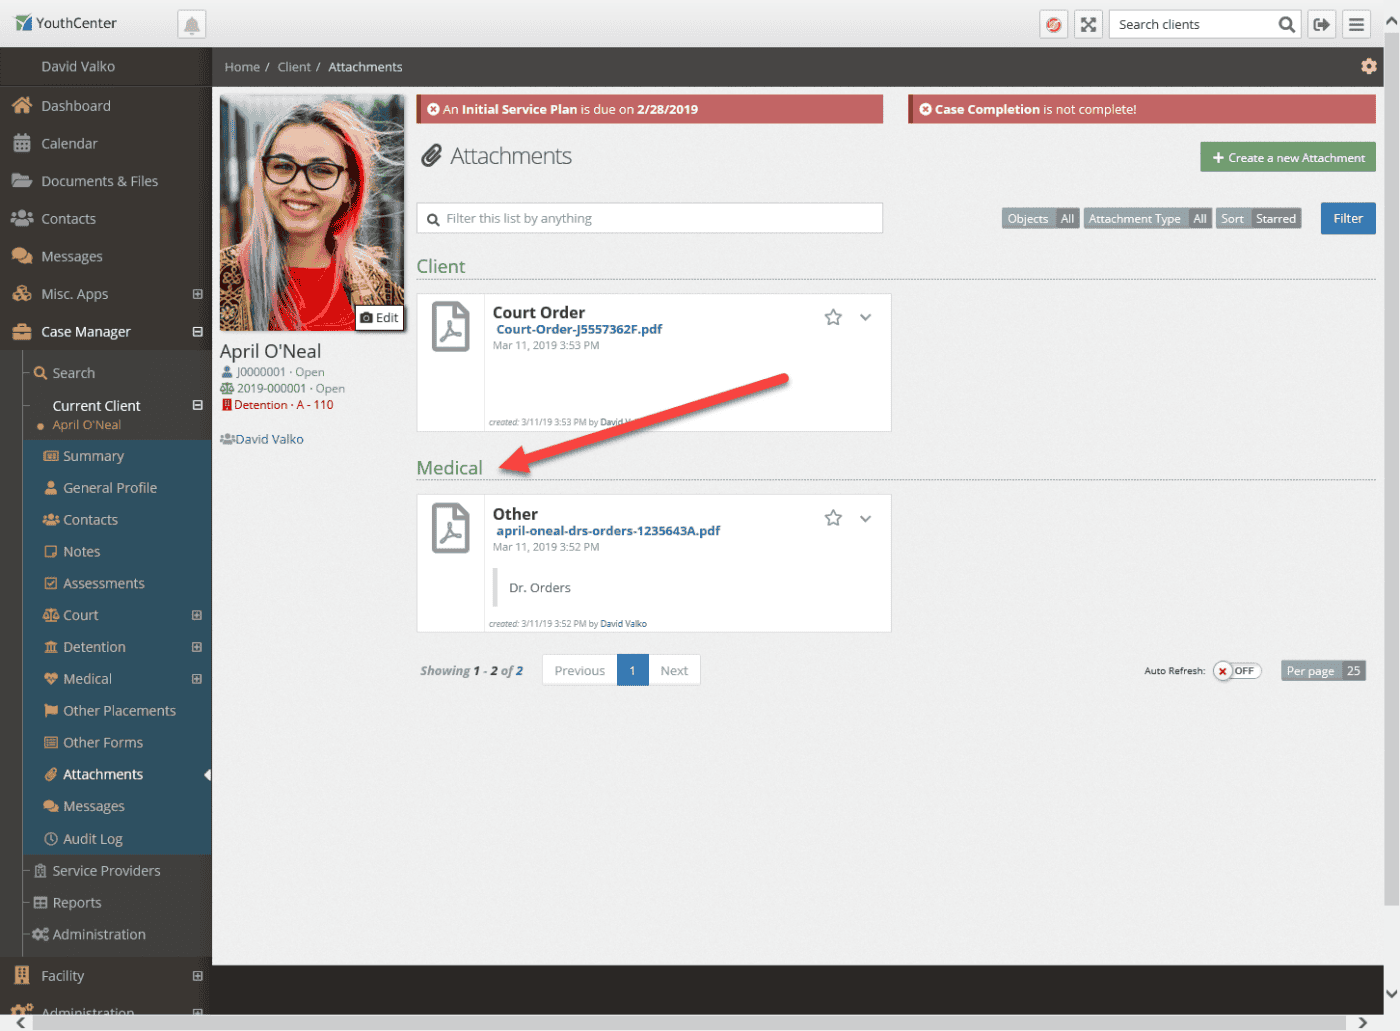
Once added, Medical attachments will also show in the Attachments application under the medical grouping:
3. Custom Forms & Reports
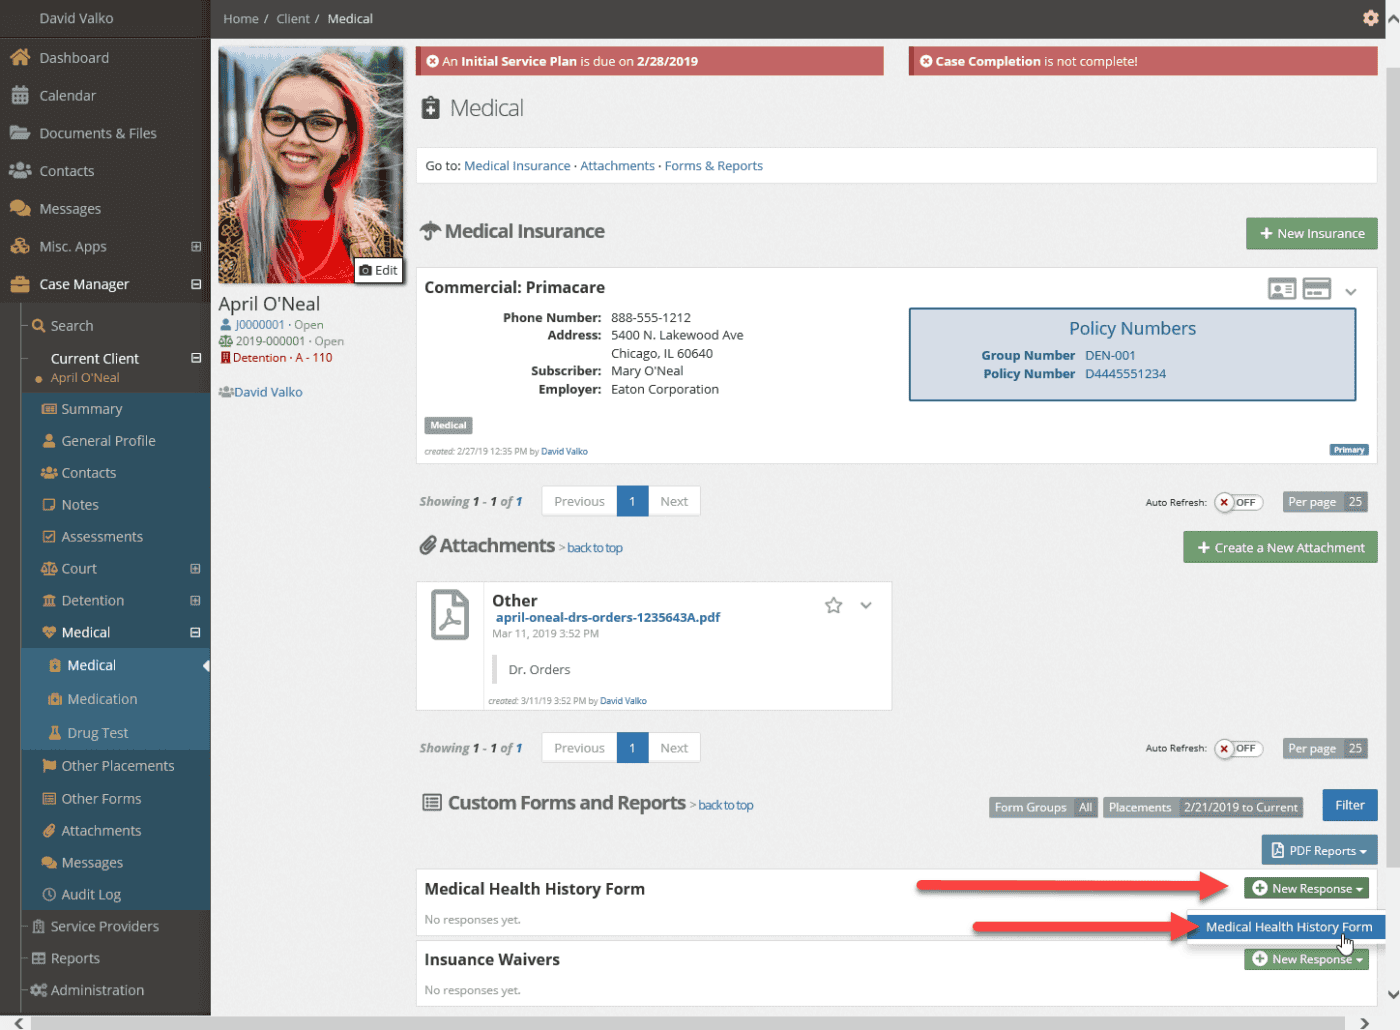
Form builder forms that are associated with the Client Tab: Medical will appear Below the attachments on the Medical Page. To add a response to a Medical Form, use the + New Response dropdown to show the available forms and select the form you want to fill out:
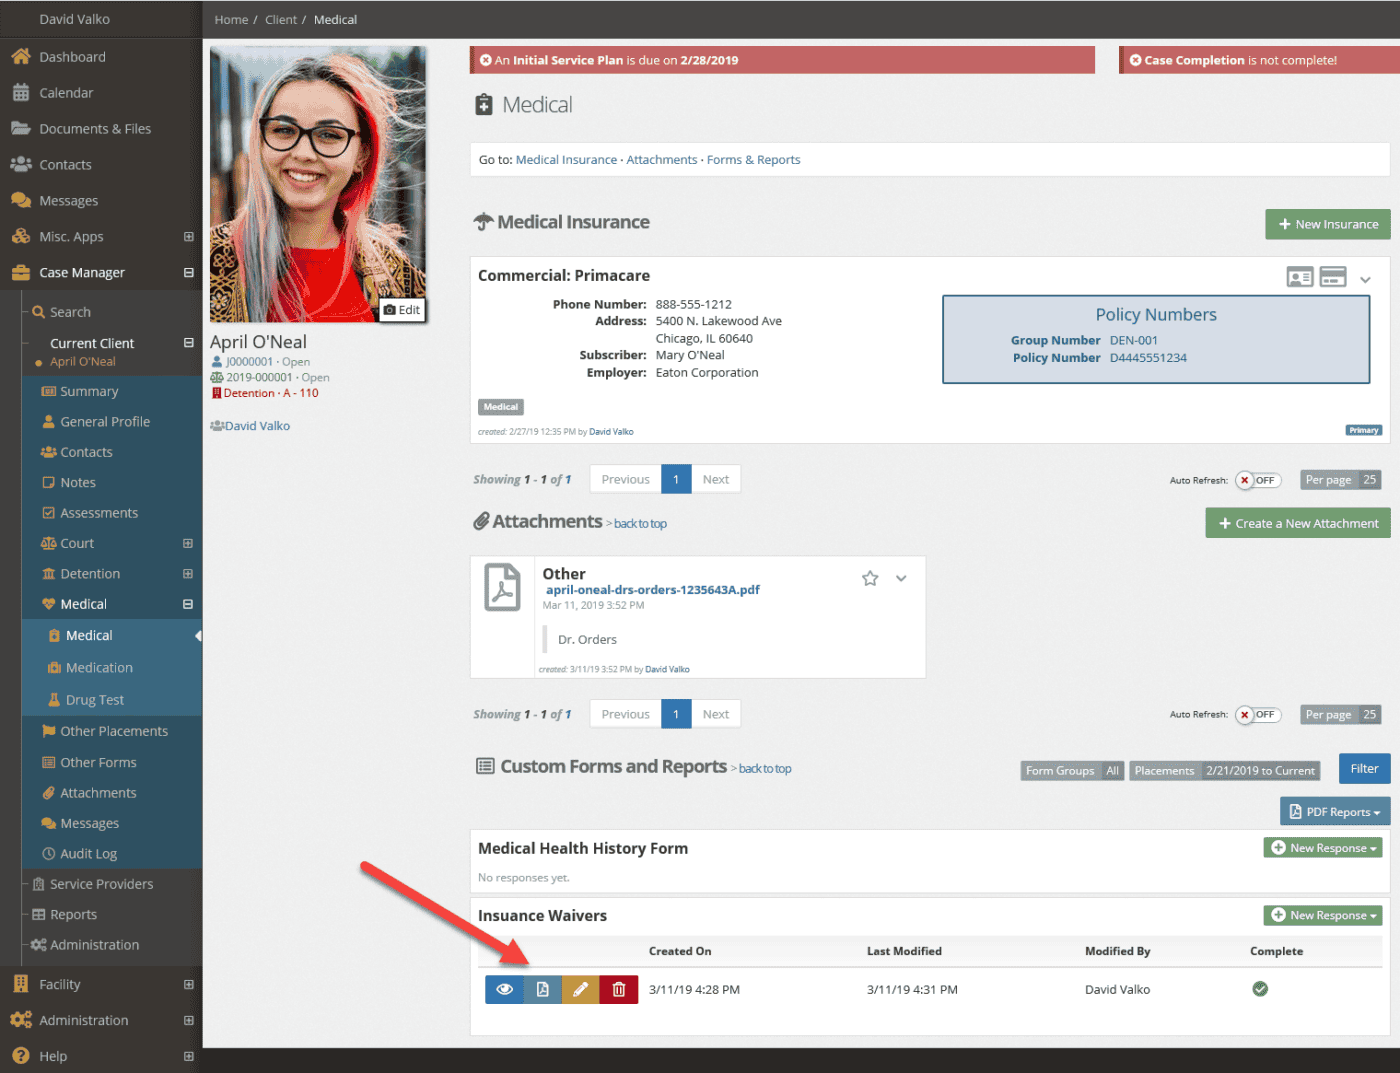
Once you’ve filled out a form, the response will show up in the listing under the form group as shown below. Depending on the setup of the form and your permissions, you will have options to view, create PDF, edit, or delete the form response using the buttons shown:
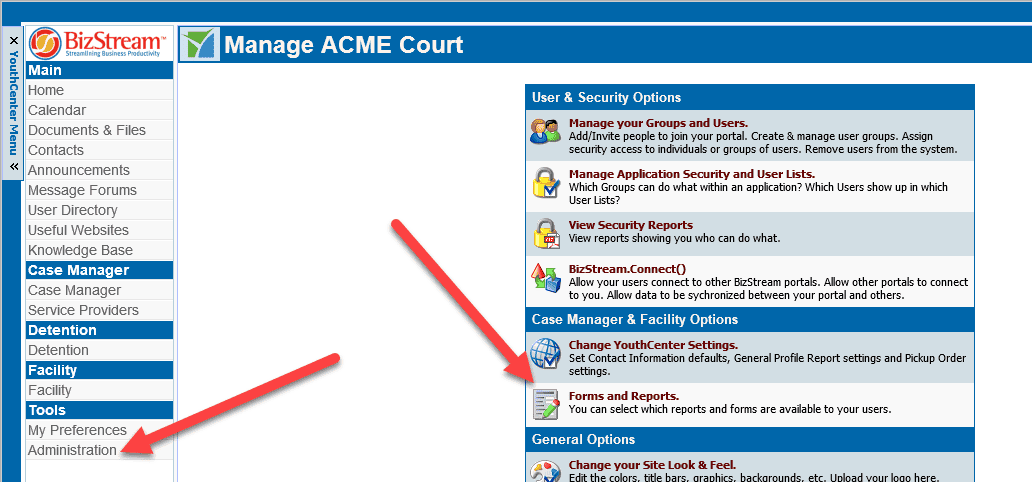
Administrators can add and edit forms in the old interface by going to Tools > Administration > Forms and Reports.
Medications
Medications are primarily used by detention facilities to track over the counter (OTC) and prescribed medications for clients.
Facility Medications
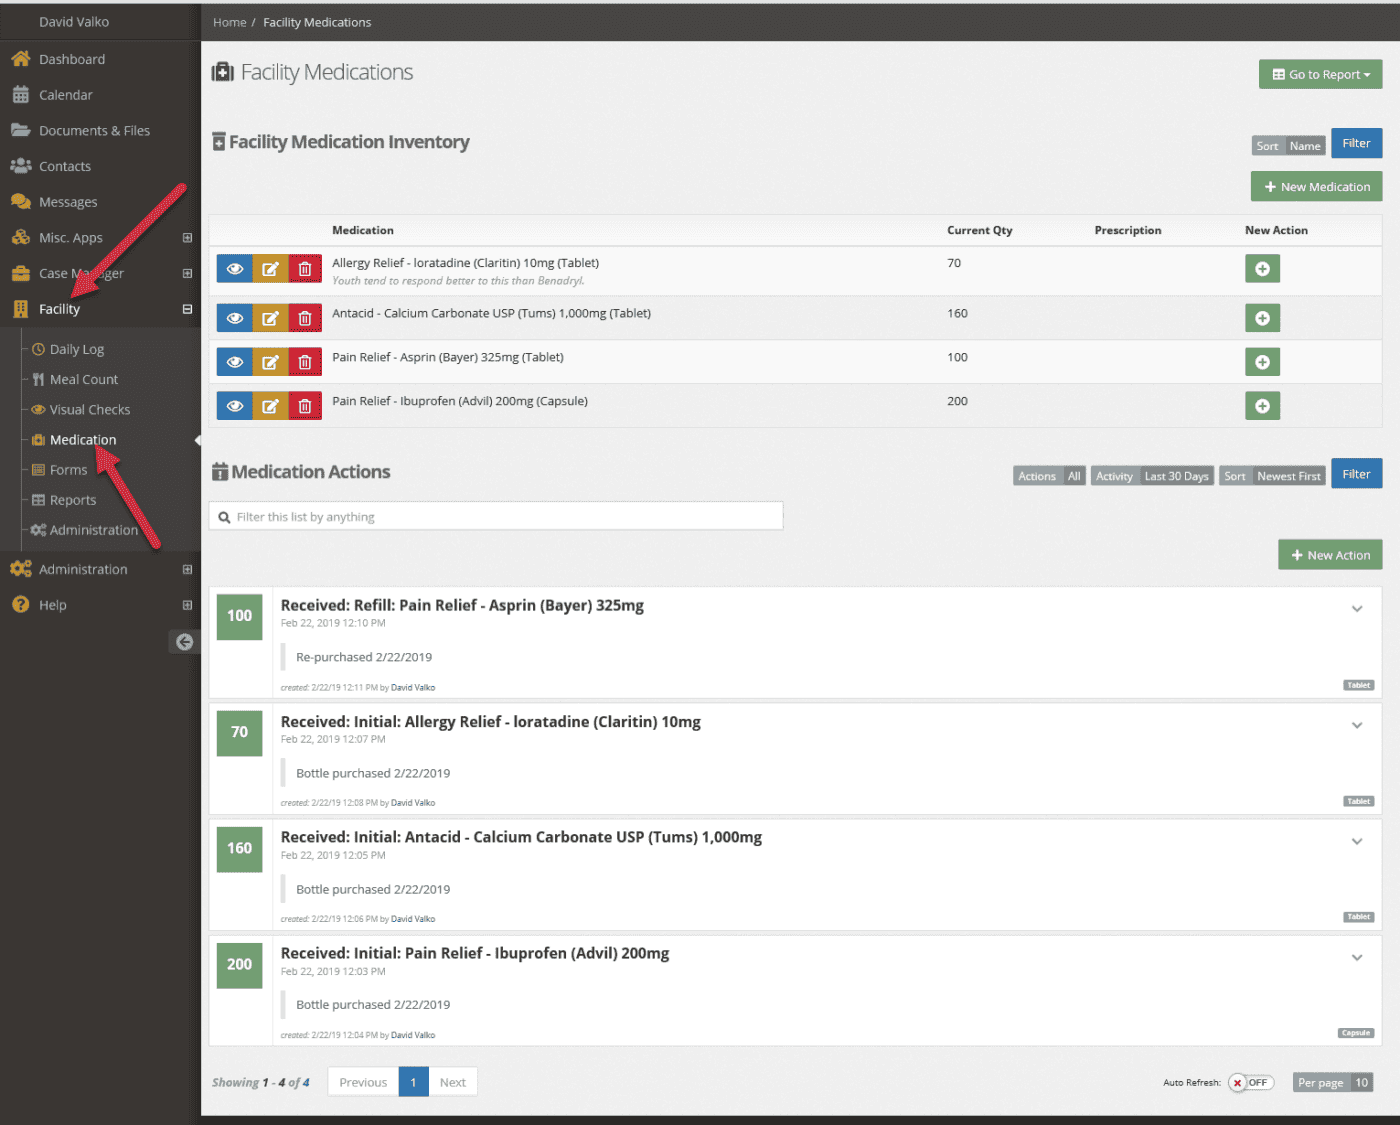
To add or edit facility medications, open the facility application group and click on the medication application in the menu as shown. This will open the Facility Medication application.
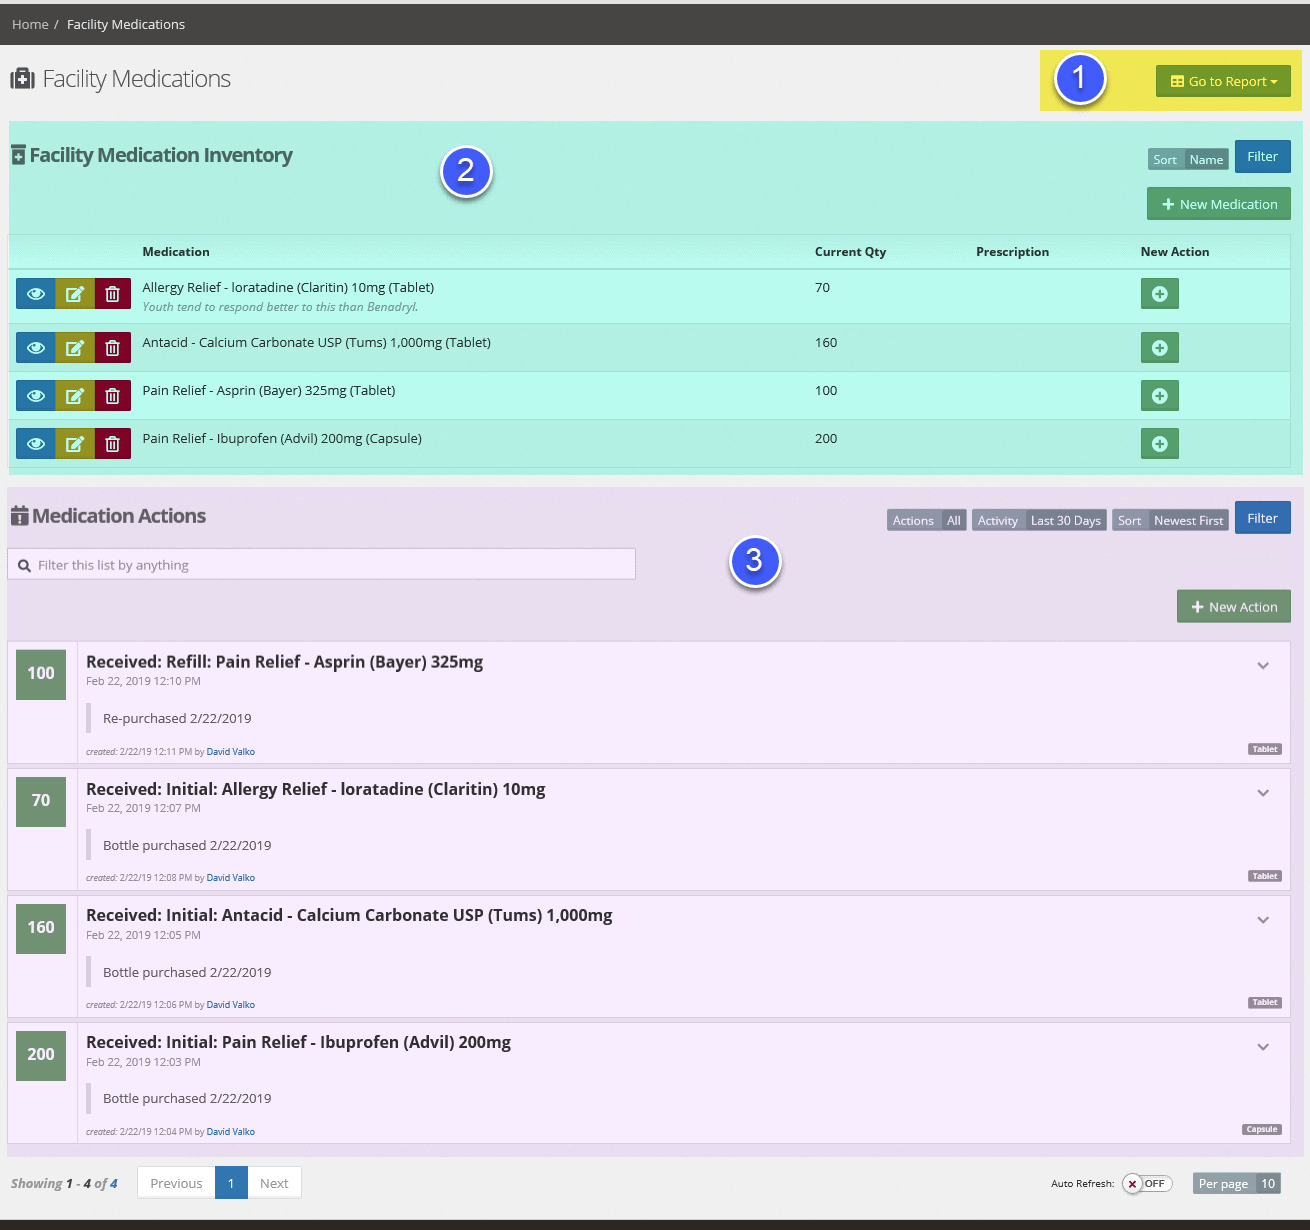
The Facility Medications application is broken up into 3 parts:
- Reports
- Facility Medication Inventory
- Medication Actions
Reports
Reports are a quick way to jump to the reporting application from the Facility Medications application. If a report has been “hooked” to the Detention: Client Medication application, the report will show in the dropdown.
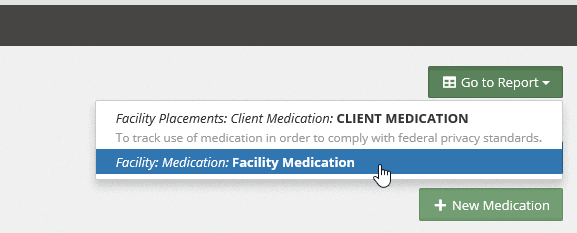
Clicking the report will take you to the corresponding report in the reporting application.
Facility Medication Inventory
The Facility Medication Inventory will show a listing of all medications currently available in the facility, their name, if they require a prescription, and current quantity (if tracking quantities).
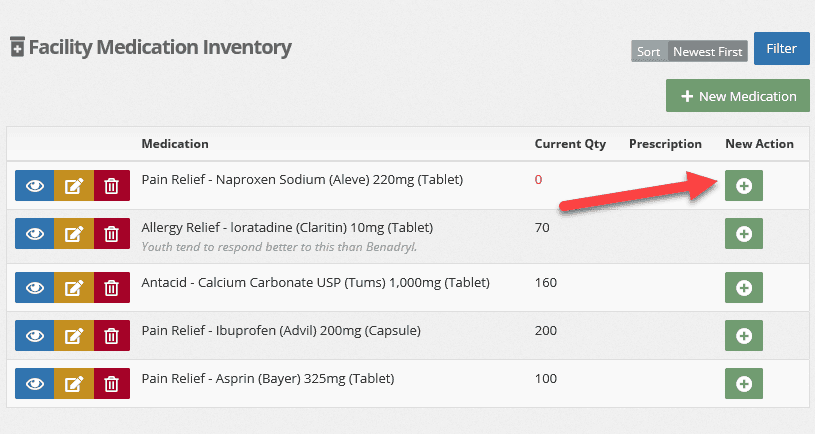
If a medication does not exist in the inventory, you may use the green + New Medication button to add a medication to the inventory.
You may also perform a Medication Action like verify count, or receive a refill by using the green + button in the New Action column. Using the Action button on a specific medication will open the action editor with the medication already selected.
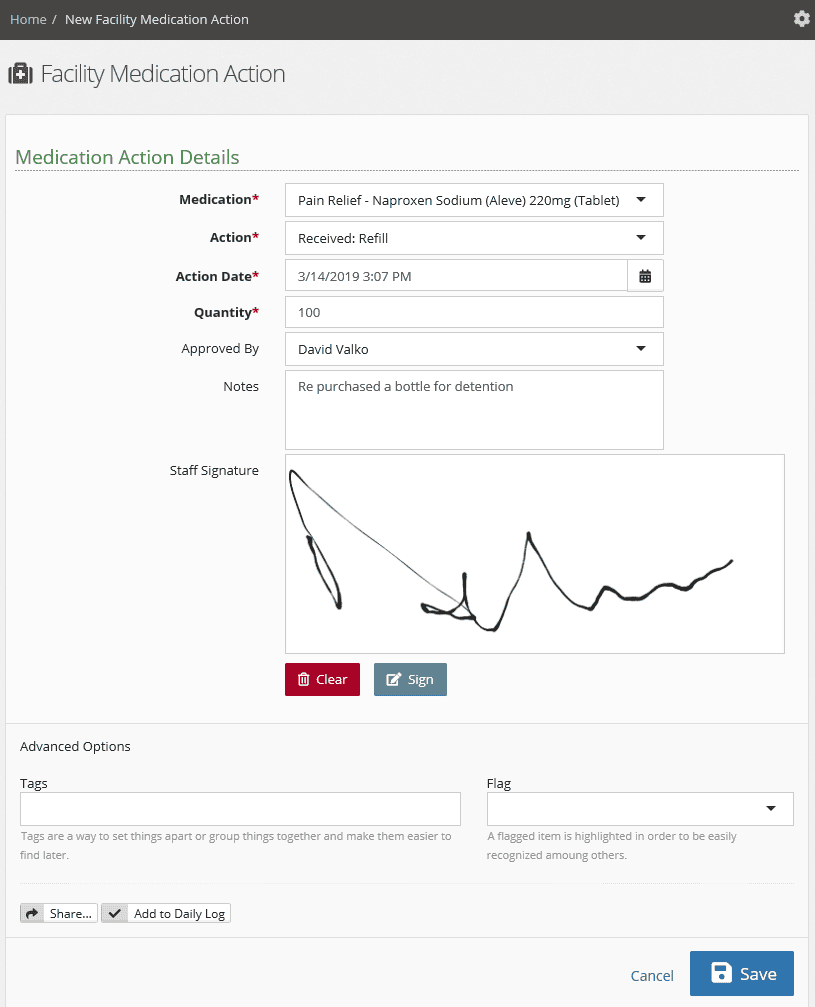
Once the action has been saved, and you return to the listing, you will see your medication with an updated quantity. In our example, Aleve has gone from 0 to 100 tablets.
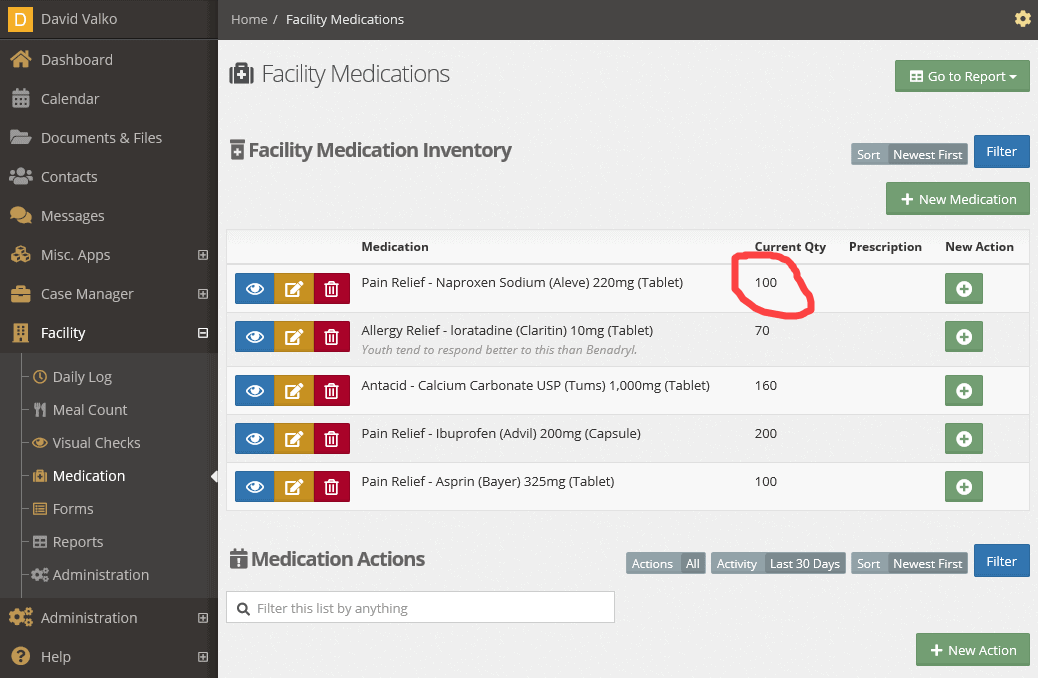
Medication Actions
The Medication Actions will show a listing of all medication actions that have occurred in the past. In the example below, our Aleve refill can be seen in the top of the listing with a quantity of 100.
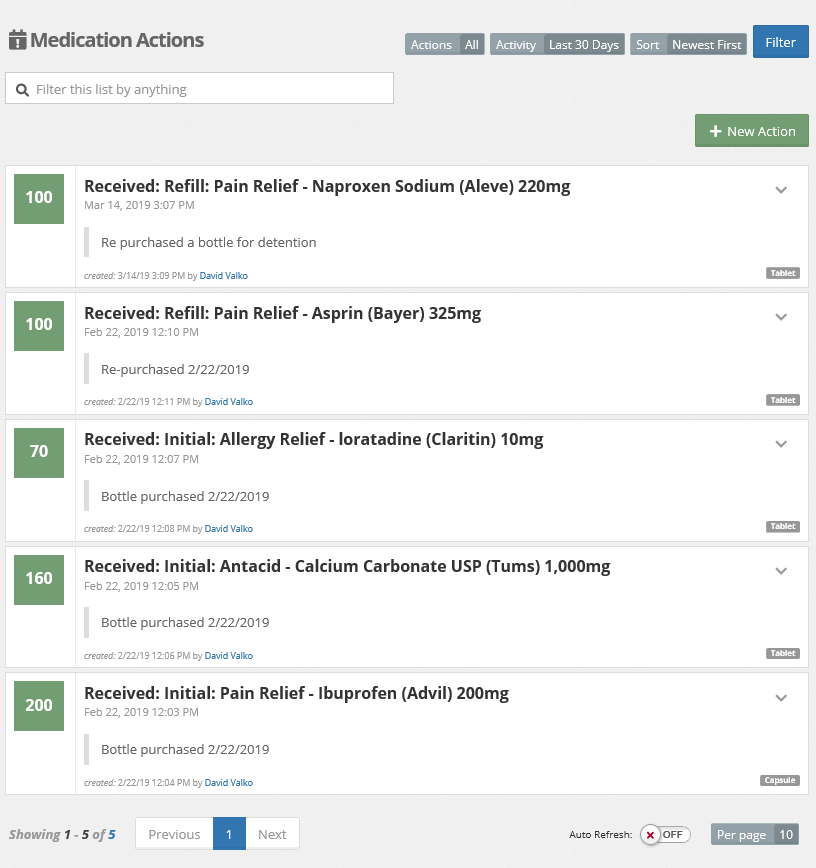
You may click on an action row to see the detail or use the down caret (v) icon to reveal more options.

Client Medical > Medication
Under the Medical application group for clients is the client Medication application. This is where you will enter in client owned medications, set up a medication schedule for a client, and distribute medications (both client or facility owned).
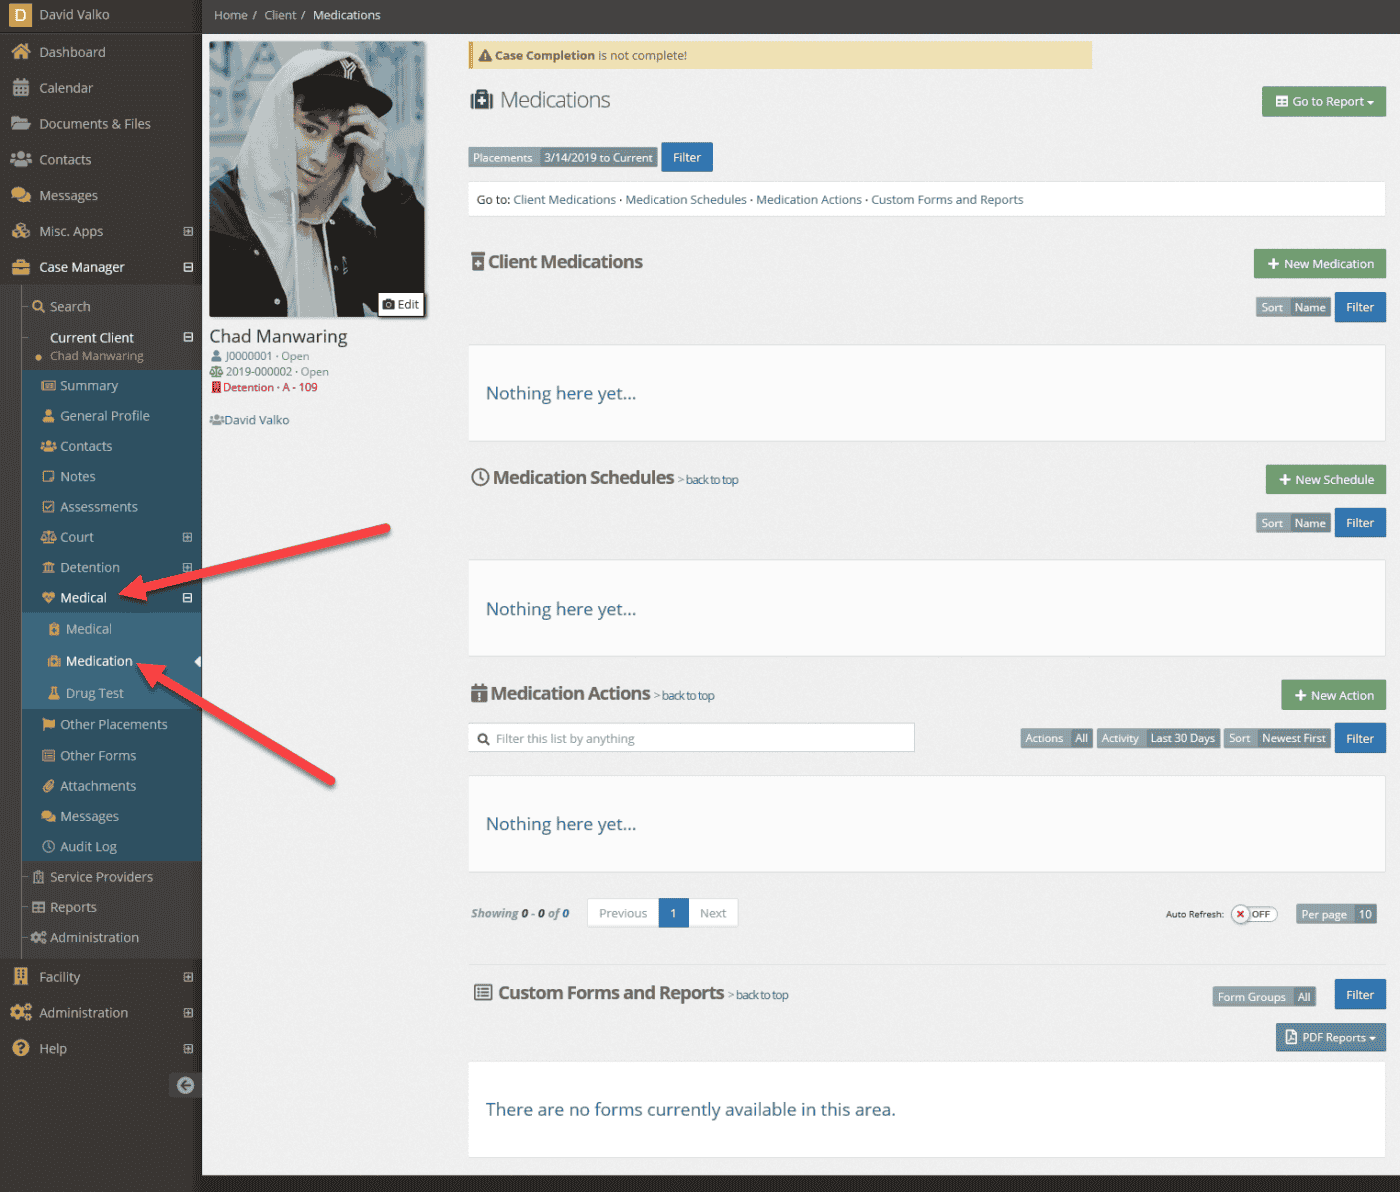
Client Medications
To add a client owned medication, use the green + New Medication button next to the Client Medications. This will bring up the Client Medication Details form.
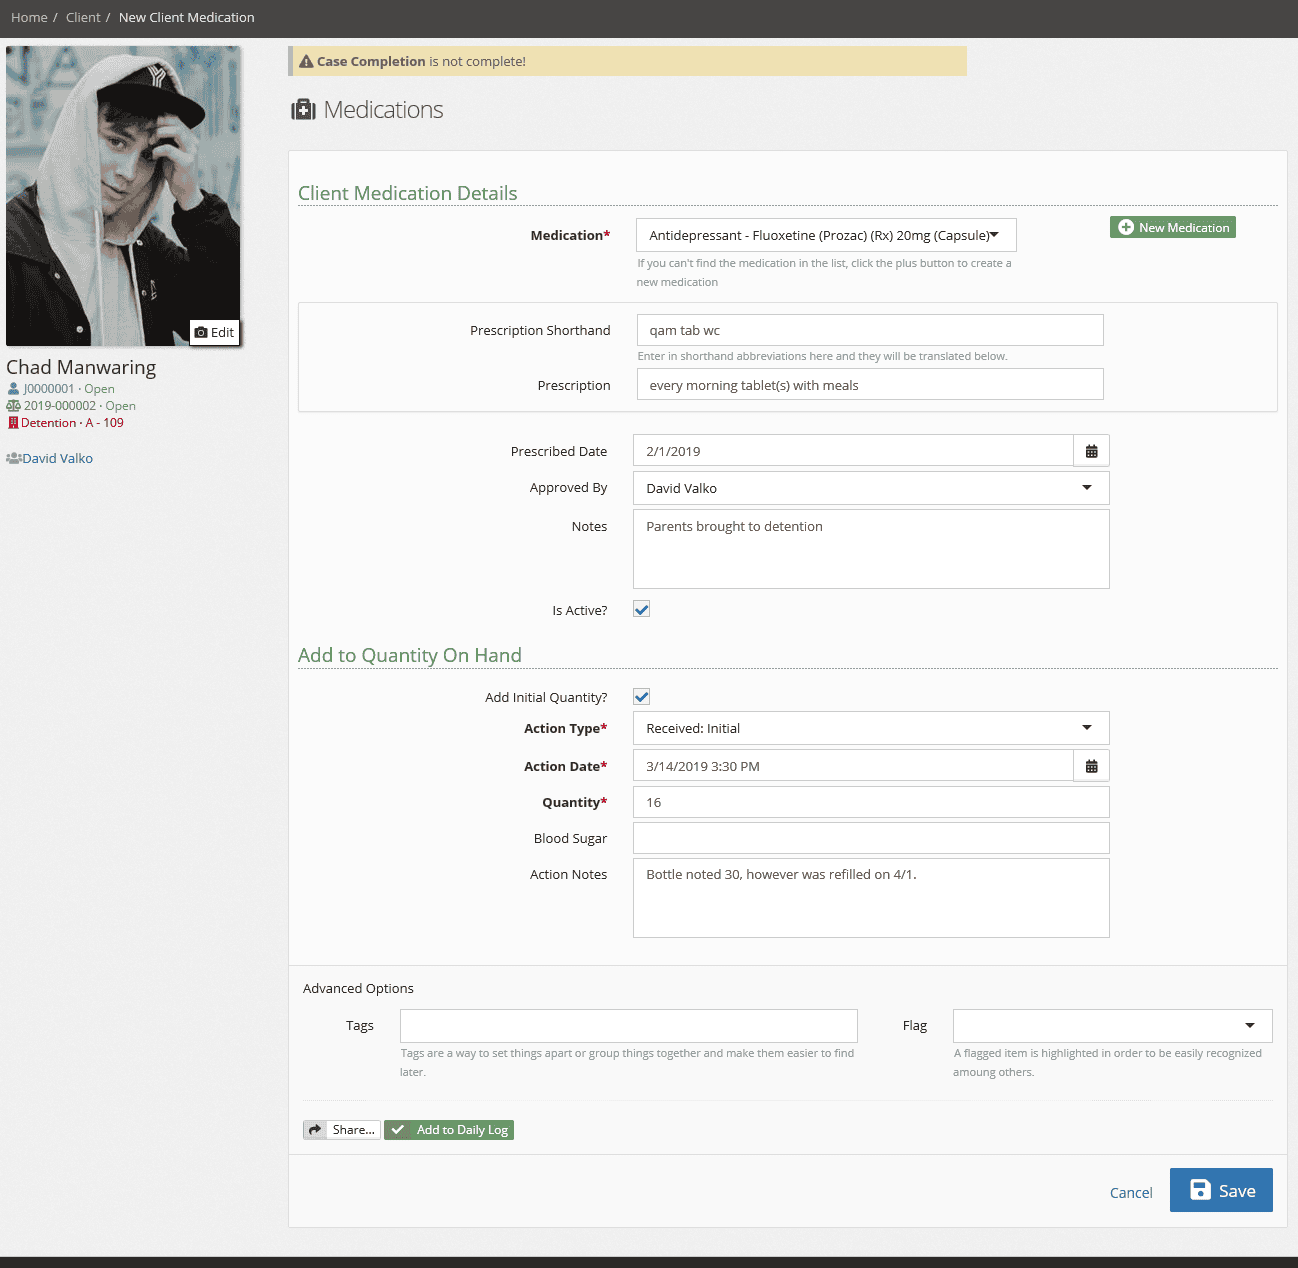
Select the medication from the dropdown listing and fill out the rest of the details in the form. If the medication you are looking for in the listing does not appear in the dropdown, use the green + New Medication button to add the medication to the inventory.
Once you’ve saved the client medication and returned to the list, you will see the client medication you added with it’s quantity.
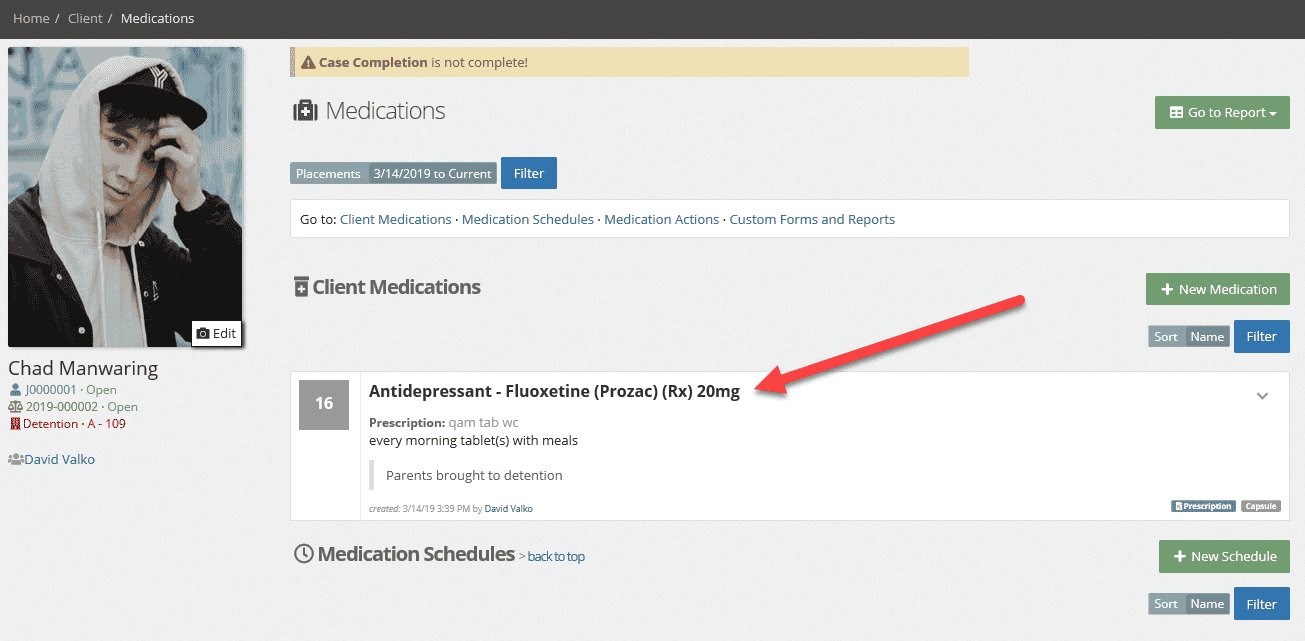
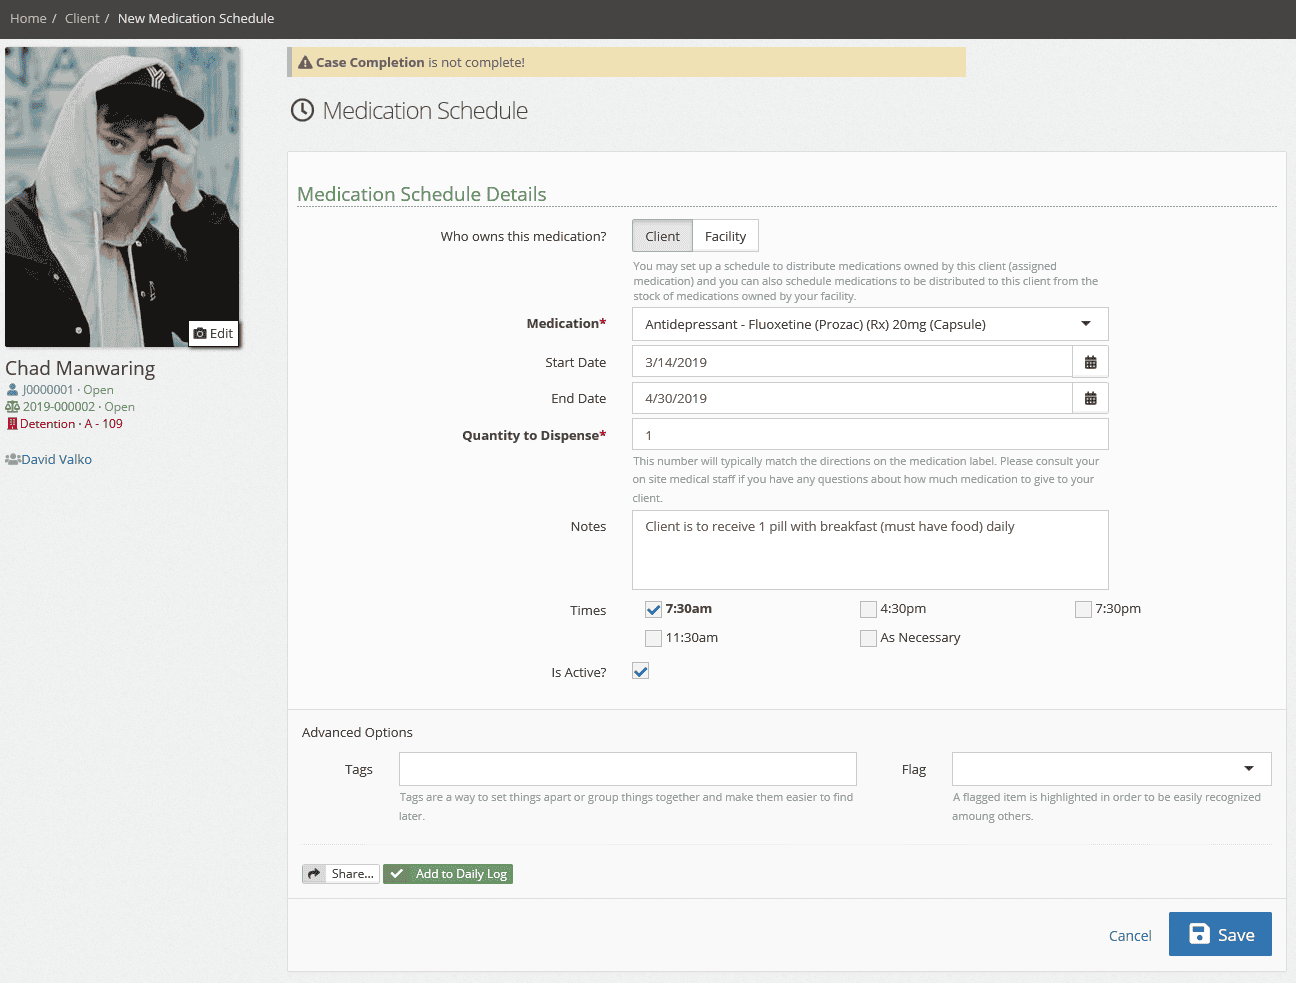
If the medication is to be dispensed on a schedule, you will need to setup a medication schedule by using the green + New Schedule button next to the Medication Schedules section.
The medication schedule editor will be displayed. You may distribute both client or facility owned medications on a schedule. For our example we will be sure to select the client button at the top next to “Who owns this medication?” Fill out the rest of the form as required by your organization. Times check boxes may be different for your organization as they are managed by your organizations administrators.
Save the form when you are complete.
Once you’ve saved and returned to the list, you will see the new medication schedule and a reminder flag at the top of the clients page with the medication to be distributed.
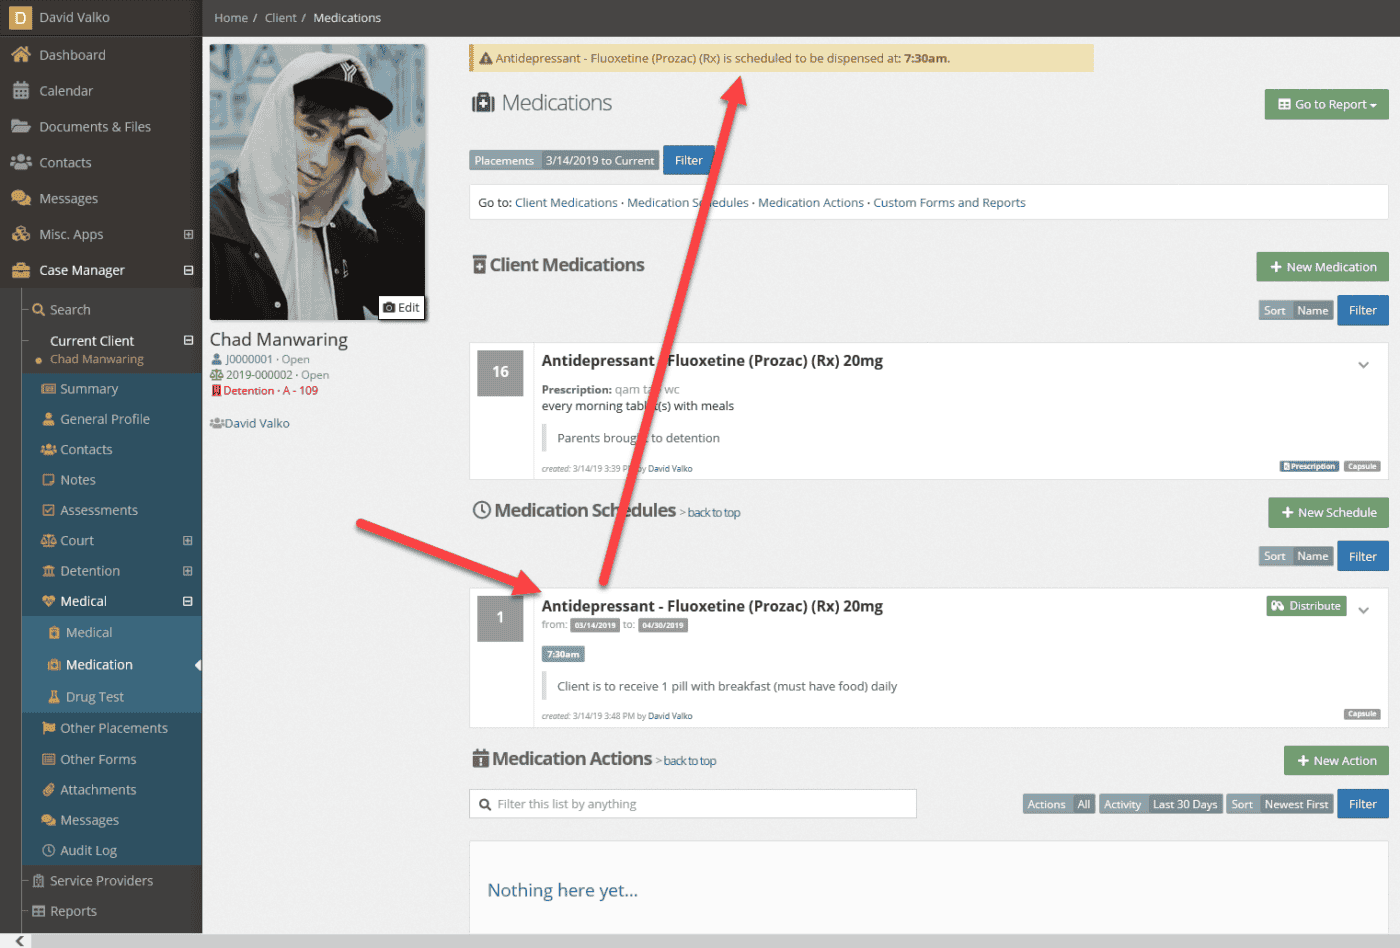
To distribute the client medication, use the green Distribute button on the medication schedule to bring up the Medication Action form.
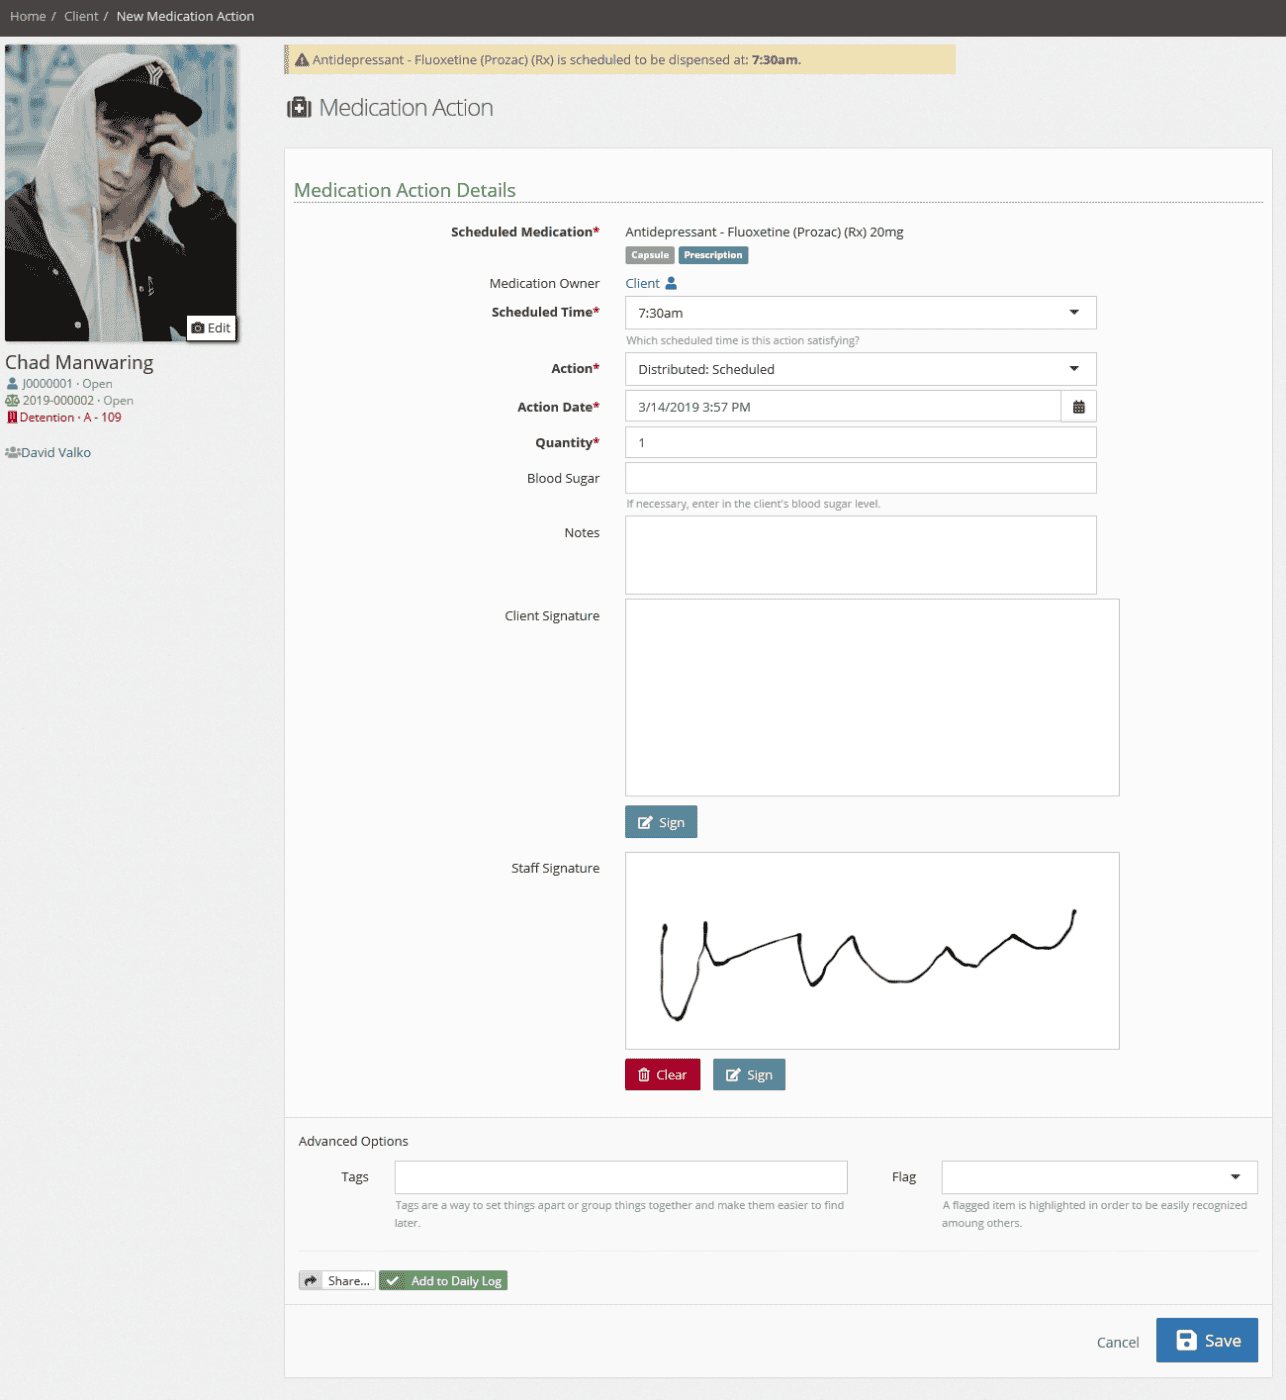
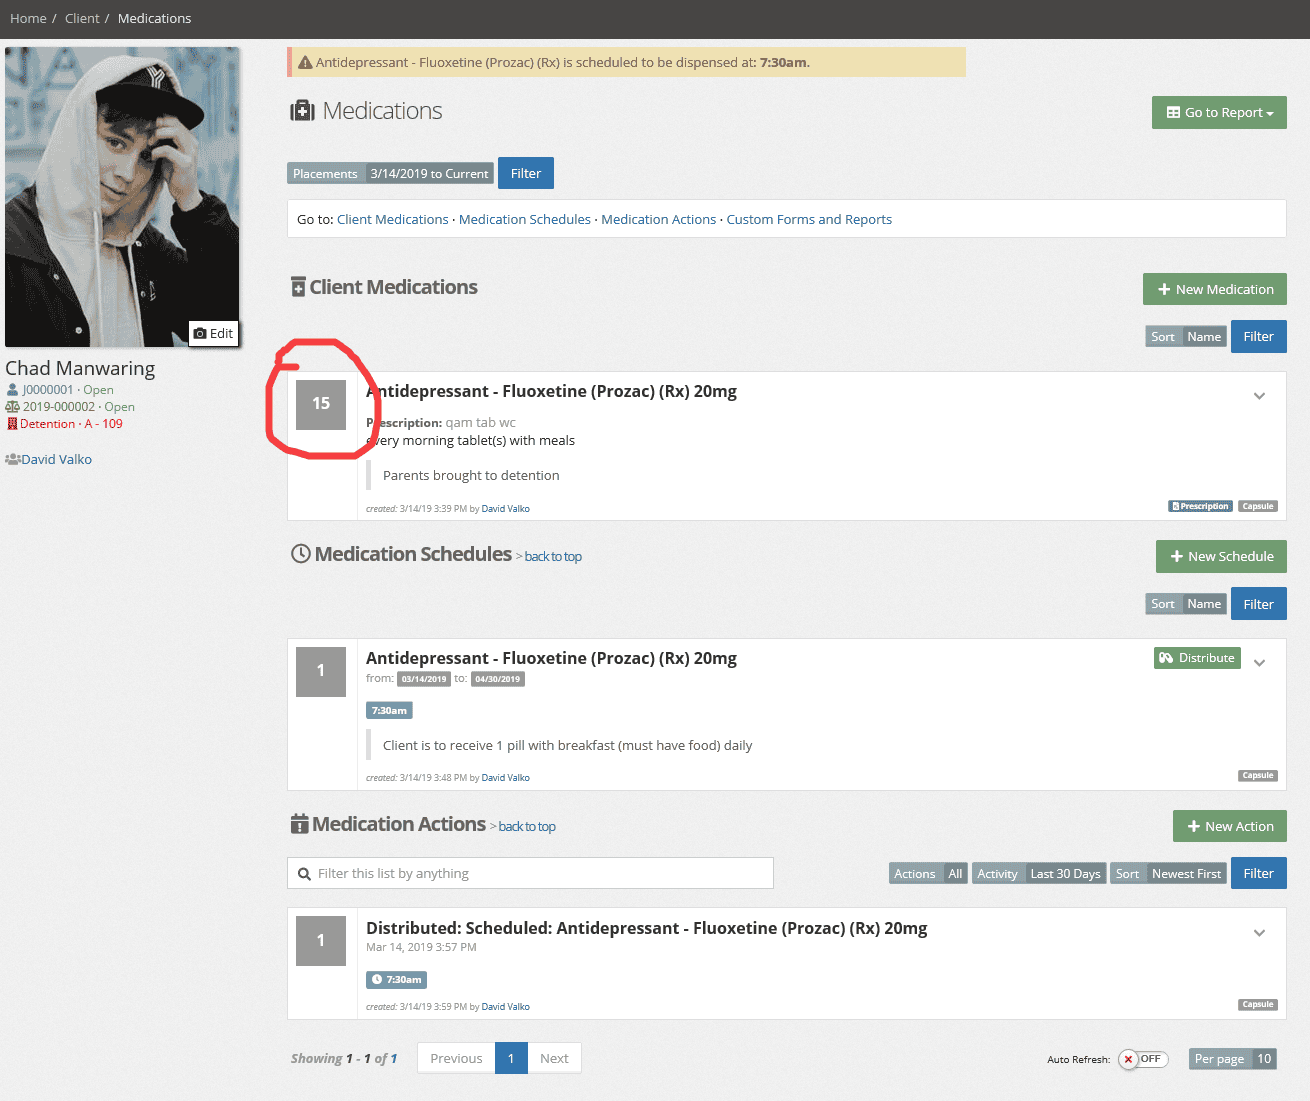
Save the form and return to the list. You will see the medication action of Distributed and the quantity of the Client Medications will be reduced – in our case, from 16 to 15.
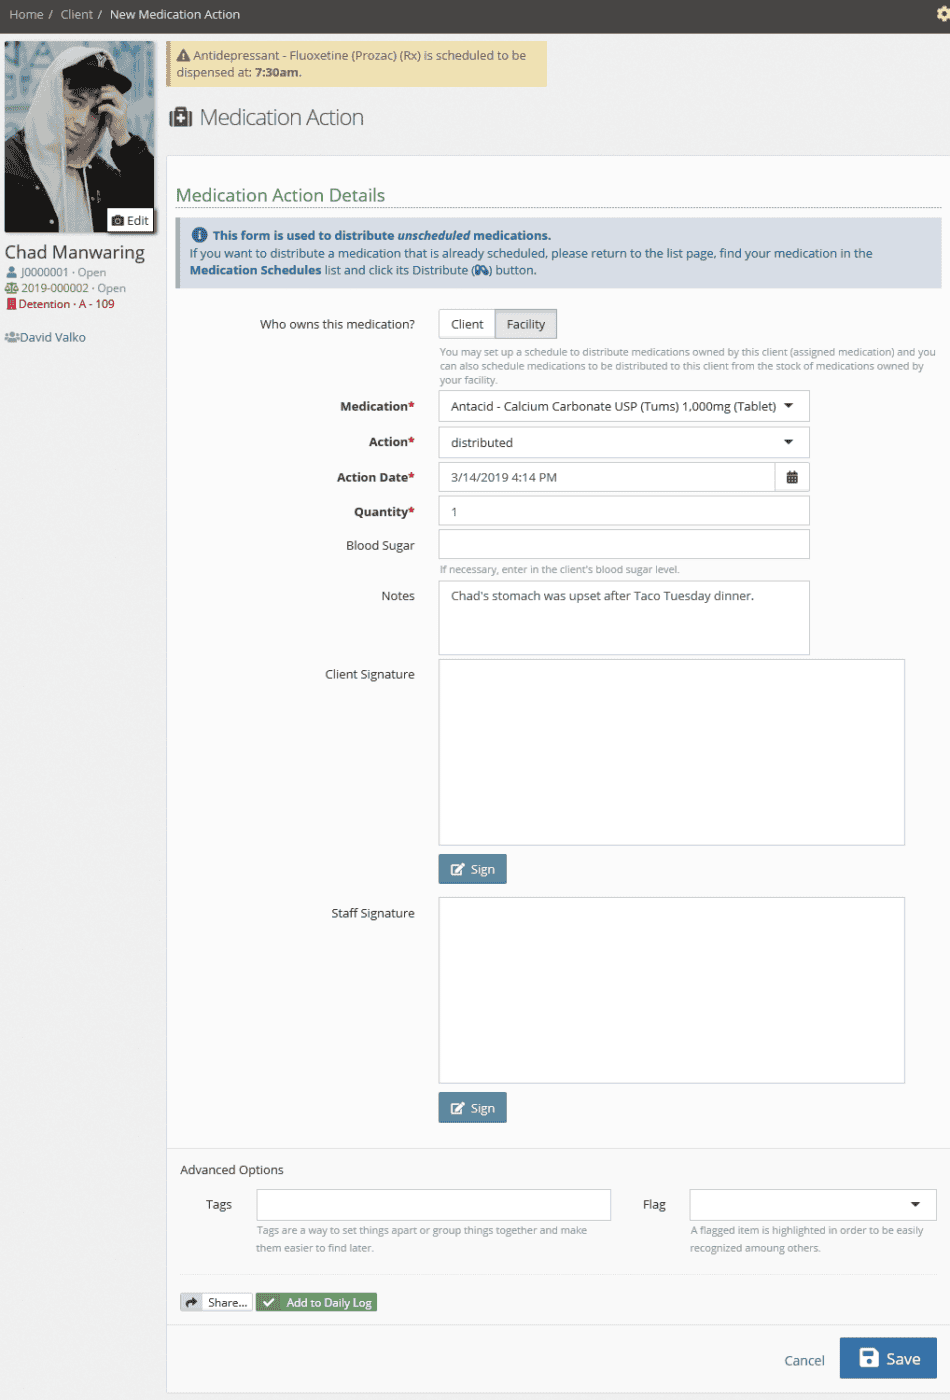
To distribute a facility owned medication to a client, for example an antacid, from the client medication application, select the green + New Action in the Medication Actions row.

This brings up the Unscheduled Medication Action form. Select Facility next to “Who owns this medication?” to choose from the facility medications on hand. Fill out the form and save it.
When you return to the list, you will see the medication distributed in the Medication Actions section and the action will have a building icon to denote it was a facility owned medication.
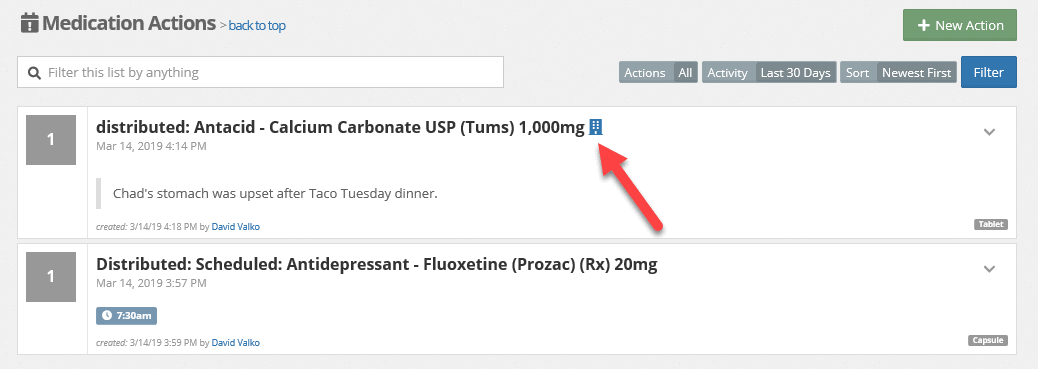
If you go to Facility > Medications, you will see in the Facility Medication Inventory that the distributed medication inventory has dropped as shown below – our example went from 160 to 159 tablets.

Service Plans
Service plans are an add on to YouthCenter designed to allow you to setup a schedule of how often a plan for service is required for a given client. The system will prompt users to create a service plan and add updates to that plan on a scheduled basis. YouthCenter reporting can export out the data for a particular service or client.
Service plans can be used when a client is in detention or out of detention.
During an initial intake for detention you will be asked to choose a service plan on the Intake form.
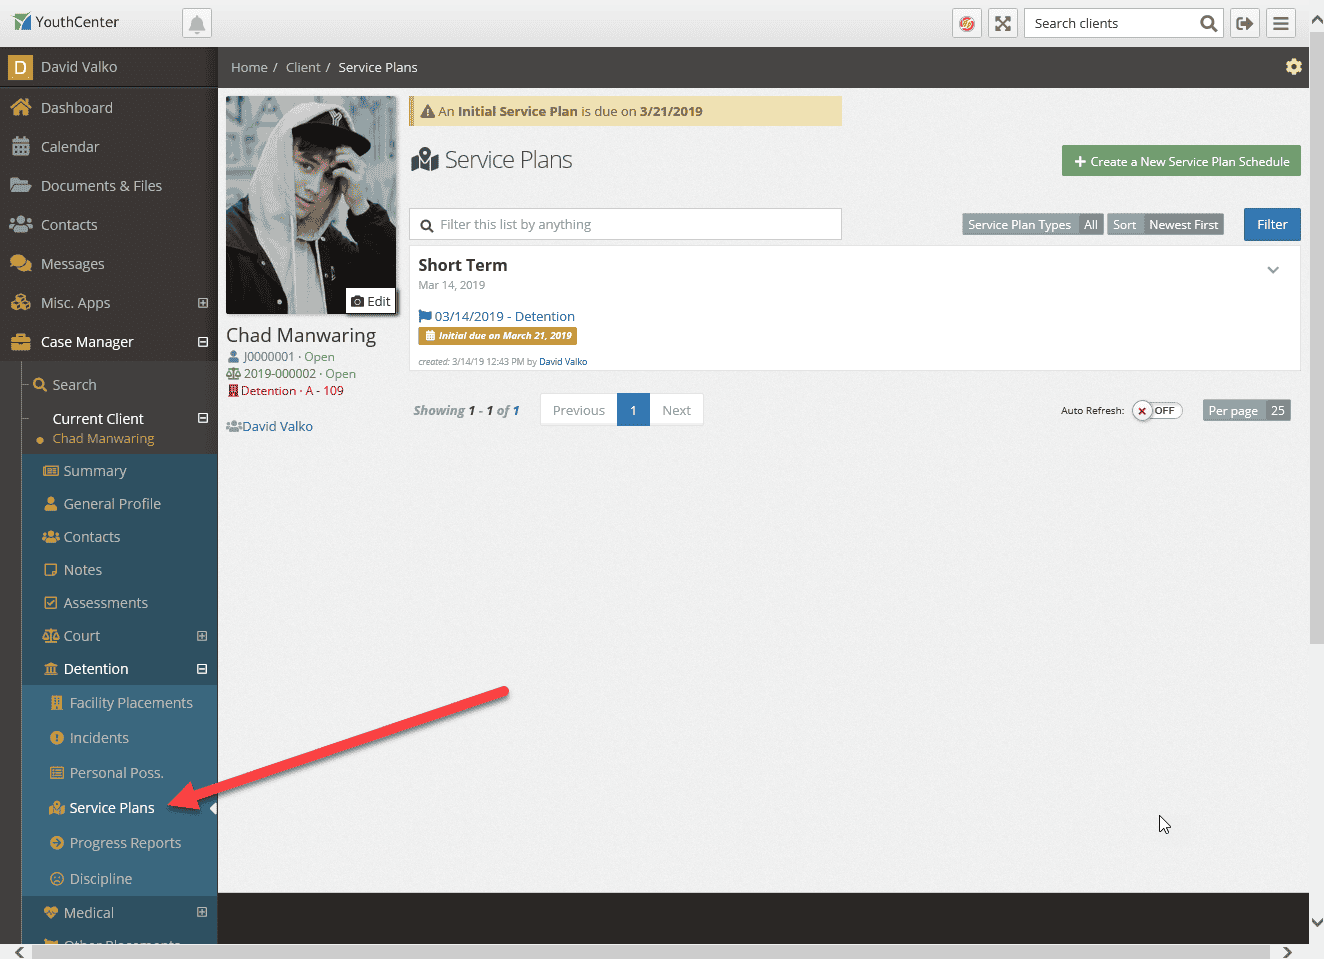
Service Plans can be found by selecting a client and opening up the Detention application group and selecting service plans as shown.
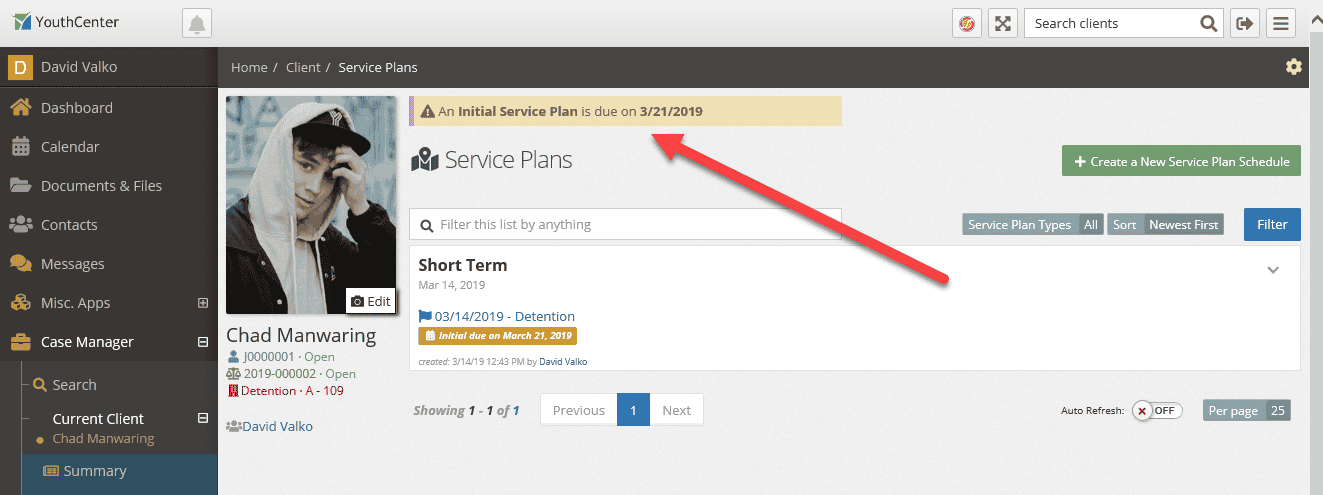
If a service plan has been added to a client, the service plan notification flag will be added to the client’s display as a reminder when a service plan is due. The colors yellow(warning)/red(alert) are set in the administration of the Service Plan Types. Yellow starts X days before it’s due. Red starts Y days before it’s due. Administrators set the X and Y dates.
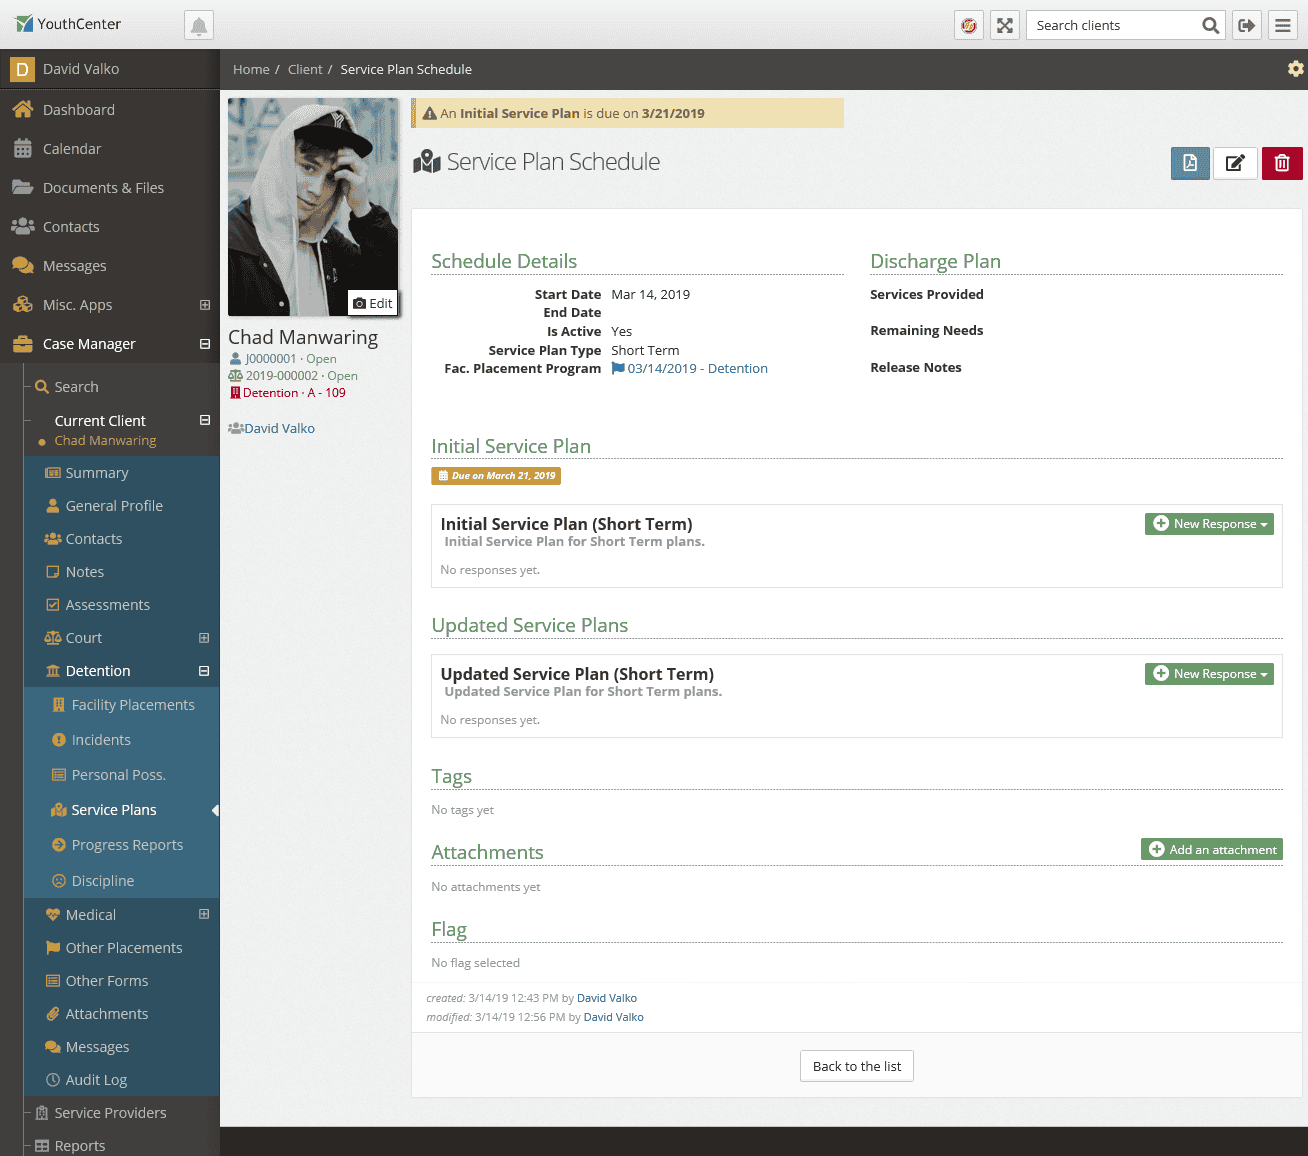
If a service plan has not been added to a client, you may add a Service Plan by using the green + Create a New Service Plan Schedule button which will open the Service Plan Schedule editor as shown below:
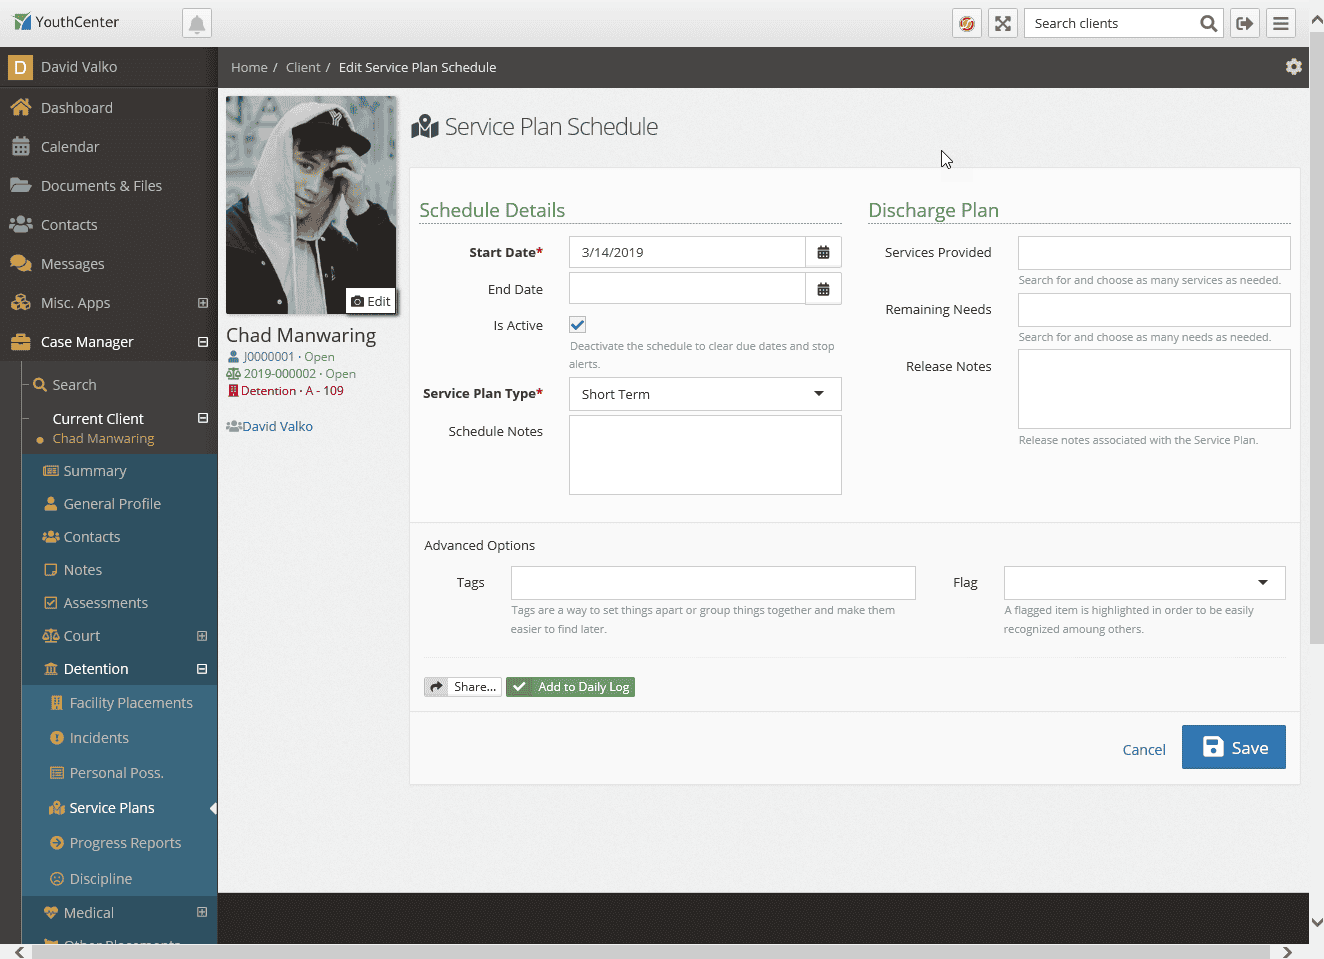
Fill out the Service Plan Schedule Details, however do not add an end date. The end date will be entered when you are ready to close out the Service Plan. You will enter Discharge Plan notes along the end date. Once a Service Plan Schedule has been saved, you will be brought to the Service Plan.
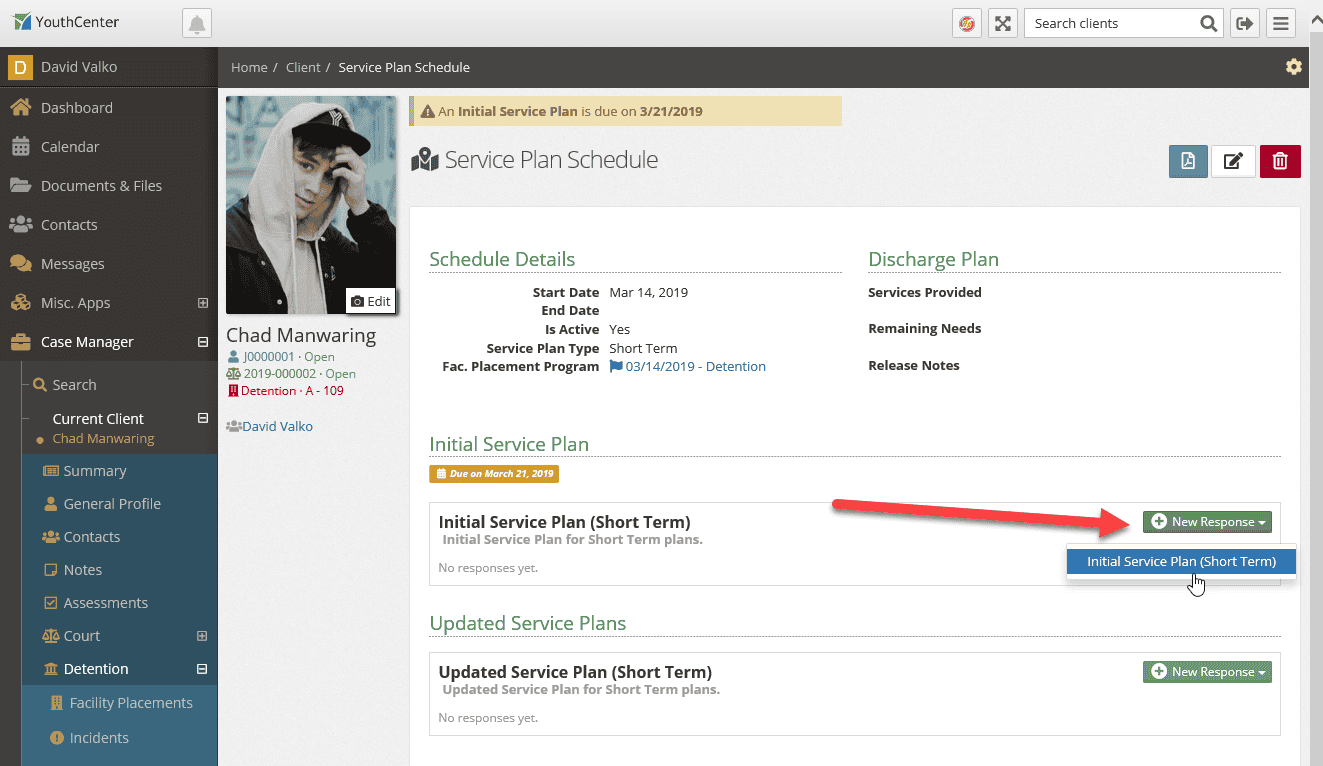
To add a response for the initial service plan, use the green + New Response button and select a form. Your forms may be different than shown here, your administrators may set up their own form names.
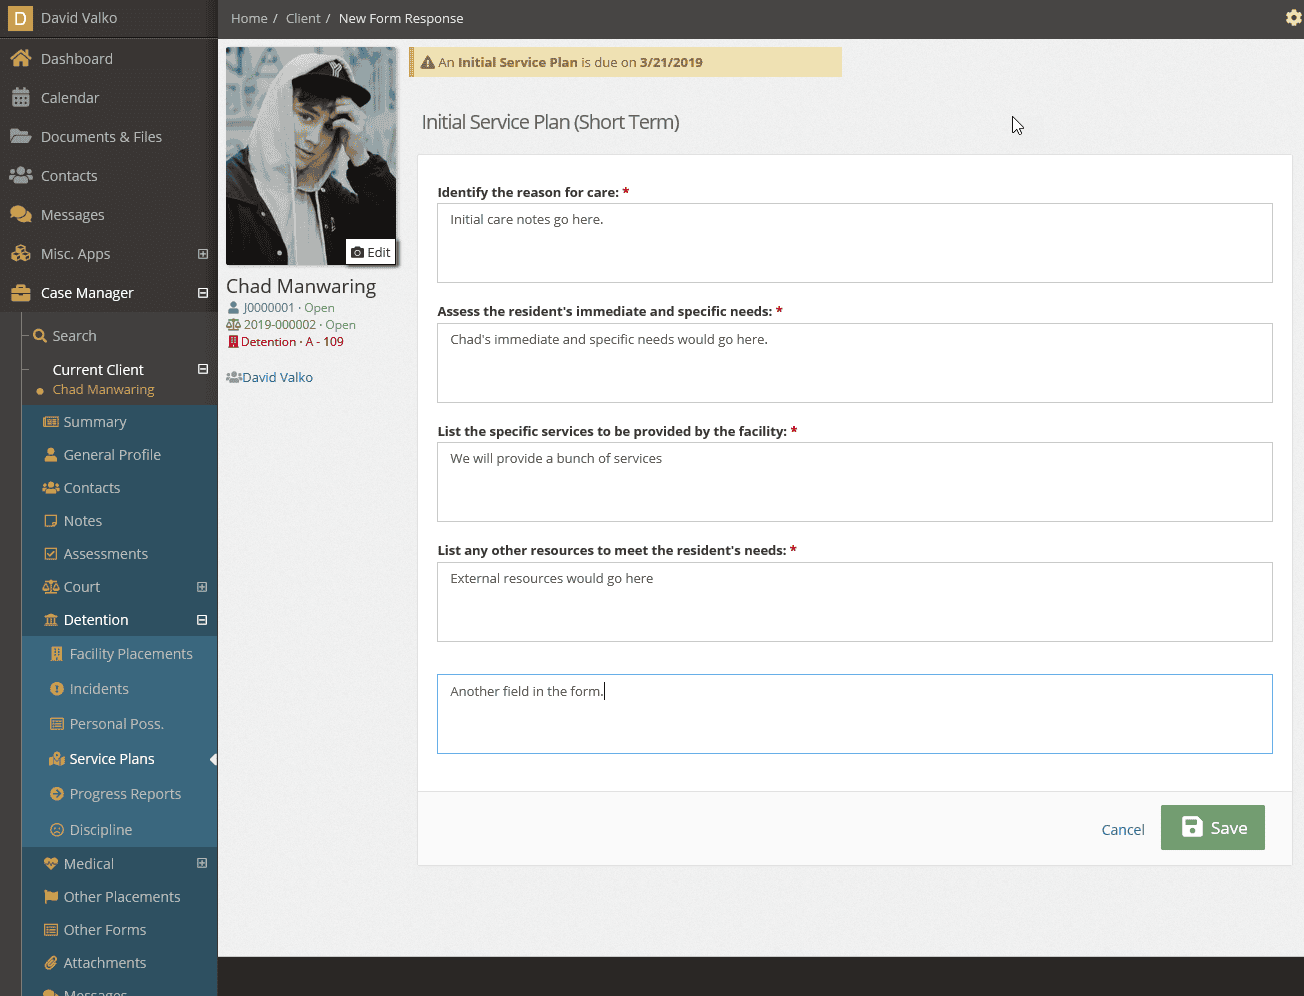
The initial service plan form will be shown. Your form may be different depending on how your administrator has set up the form. Fill in your responses and select the save button to save the response.
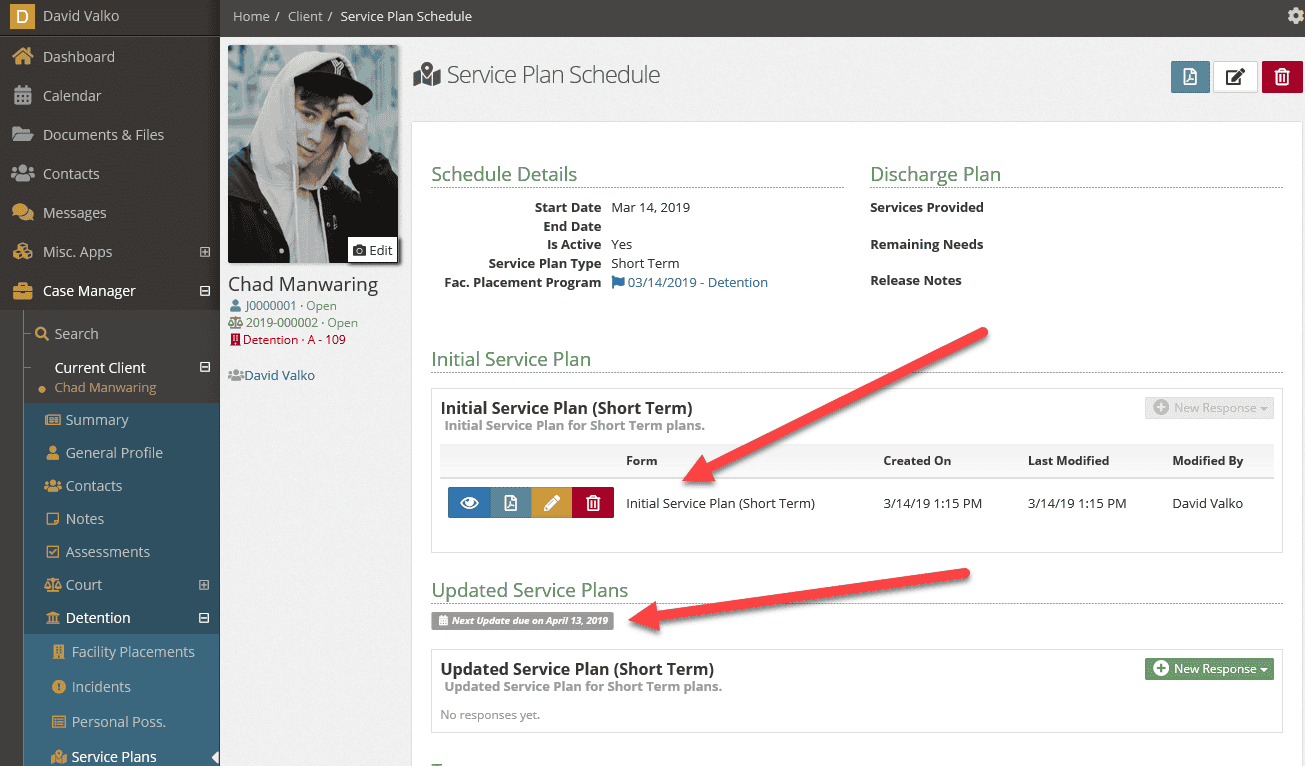
Once saved you will see the Service Plan with the Initial Service Plan response. Depending on your access, you may see buttons for the response including view, pdf, edit, and delete.
With the initial service plan recorded the Updated Service Plans section will show when an updated service plan is due. A flag will appear on the top of a client page as the date gets nearer to remind you when a service plan is due.
Adding an Updated Service Plan response is done by using the Green + New Response button and selecting a form from the drop down. Dates for the next Updated Service Plan response will be updated after the response is entered.
Closing out a Service Plan
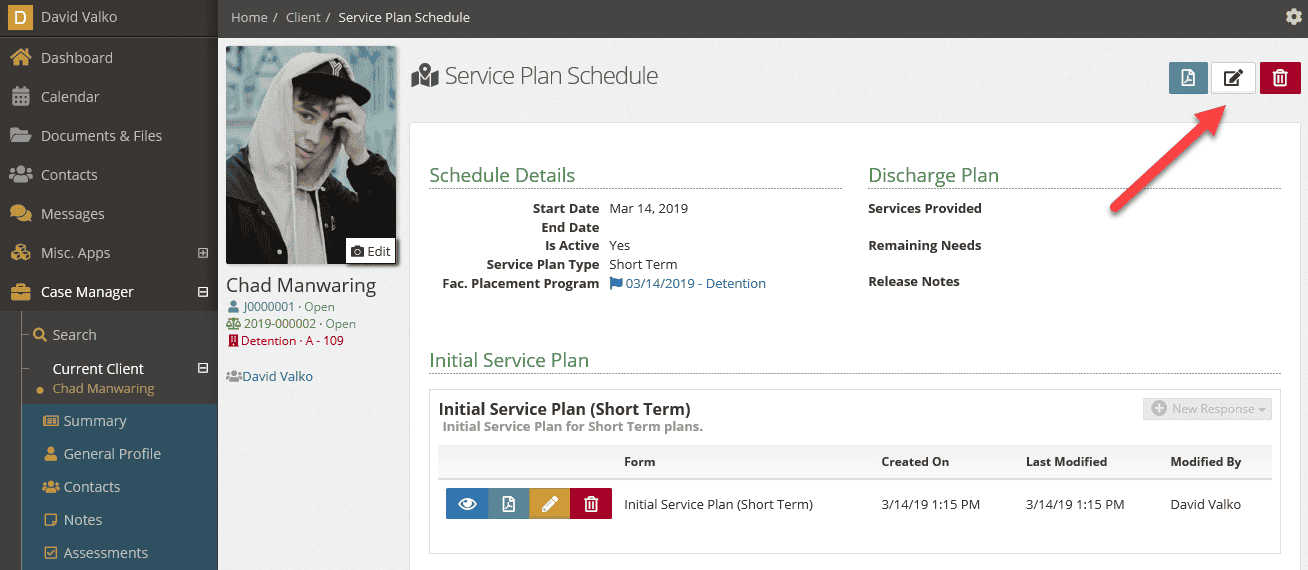
To complete a service plan, edit the plan using the edit button as shown below.
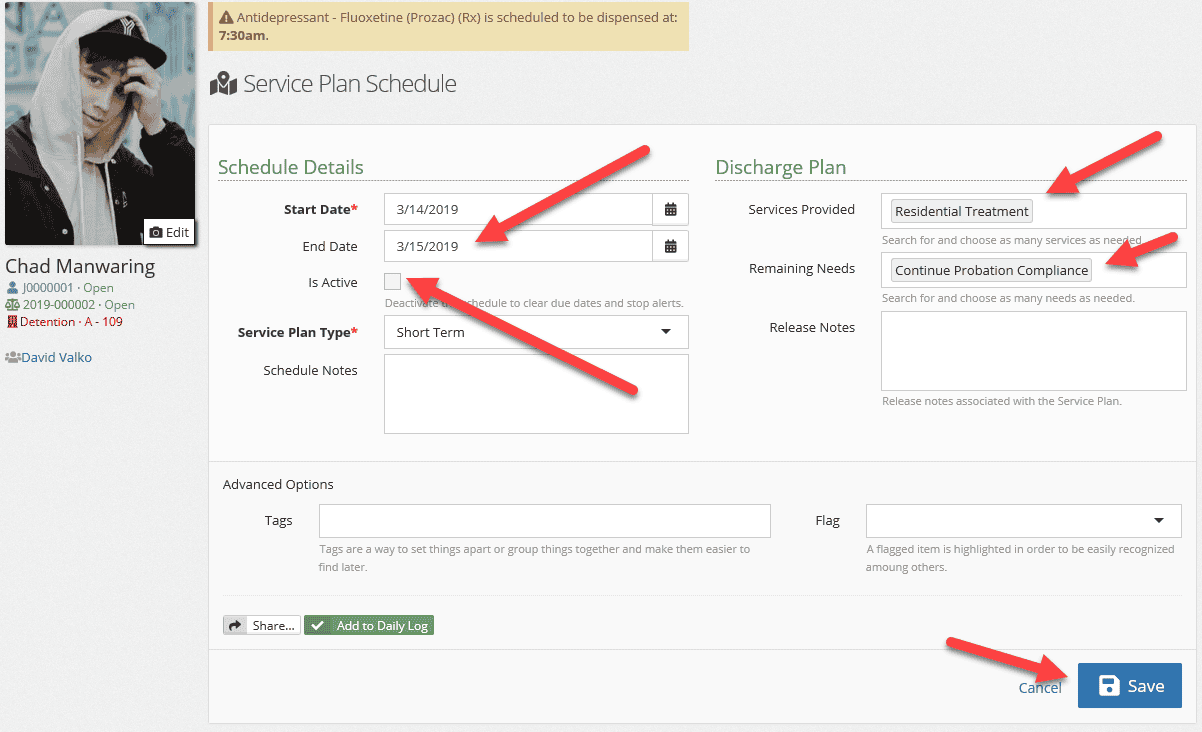
Add an end date, uncheck the “Is Active” box, add services provided and remaining needs, then save the Service Plan Schedule – the Service Plan Schedule will be closed and you will no longer receive notifications about it.
Service Plans Administration
All administration for Service Plans are done in the old interface. There are 2 pieces to administering Services Plans:
- Service Plan response forms
- Services
- Service Plan Schedule Type
- Services Provided
- Remaining Need
Service Plan Response Forms
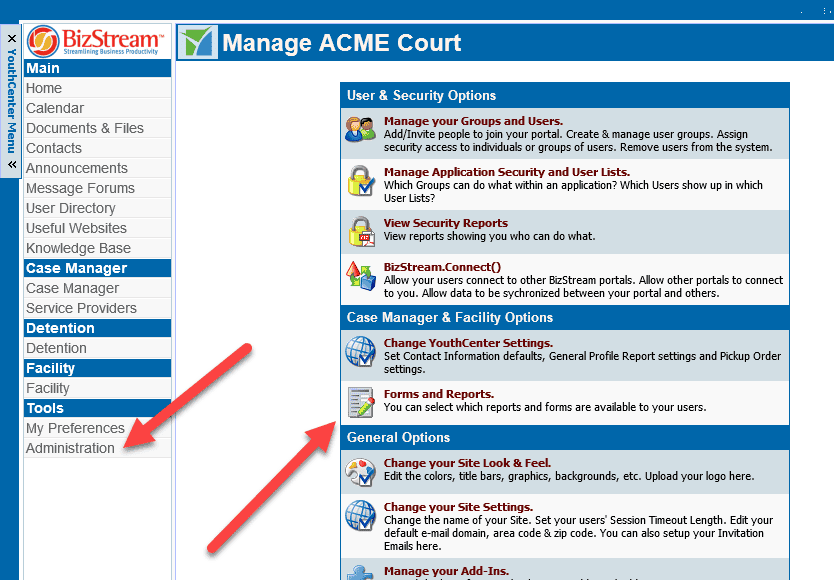
Each Service Plan Schedule has a customizable form the is required to be filled out. These forms can be found under Tools > Administration > Forms and Reports as shown below:
Once you’ve opened the Forms and Reports editor, navigate to the Client Tab: Service Plans form group as shown below.
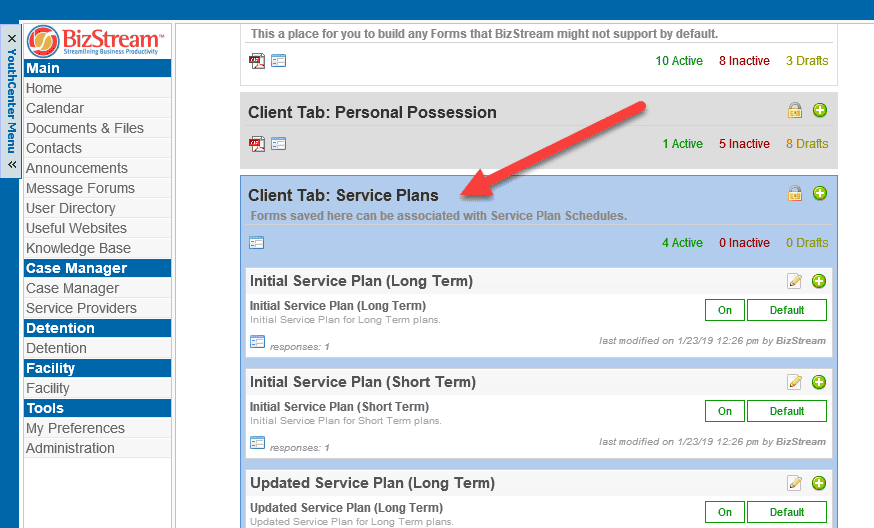
Once there, you may add a new form to the group or edit an existing form. These forms will be available for you to select from in the Service Plan Schedule Type administration tool.
Service Plan Services
To administer the Service Plan Schedule types and the services associated with the Service Plans, you will need to be in the old interface and navigate to Detention > Administration > Services as shown below:
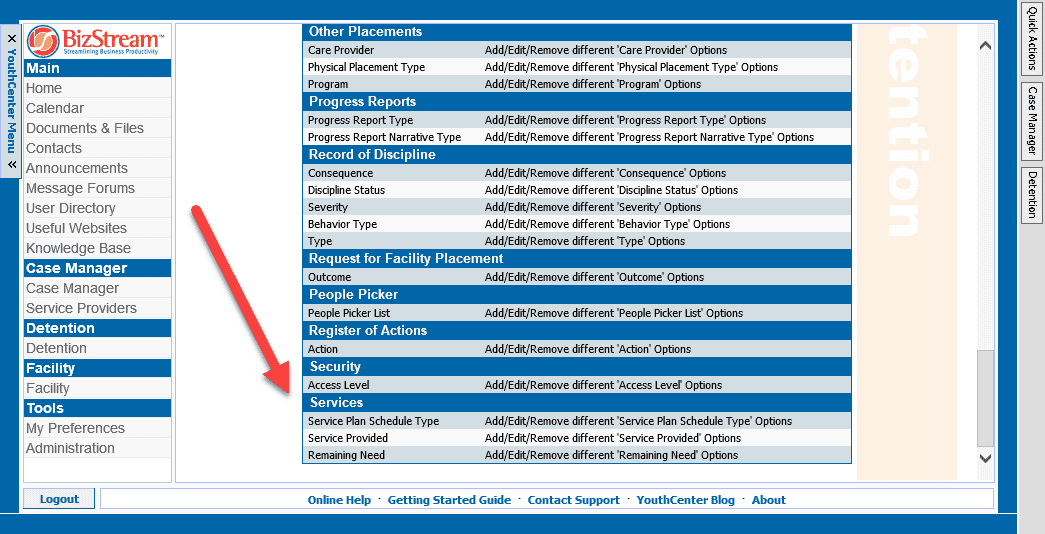
Service Plan Schedule Types
Administrators may setup different Service Plan schedules to suit your organizations needs. YouthCenter provides 2 basic templates to start with, Long Term and Short Term.
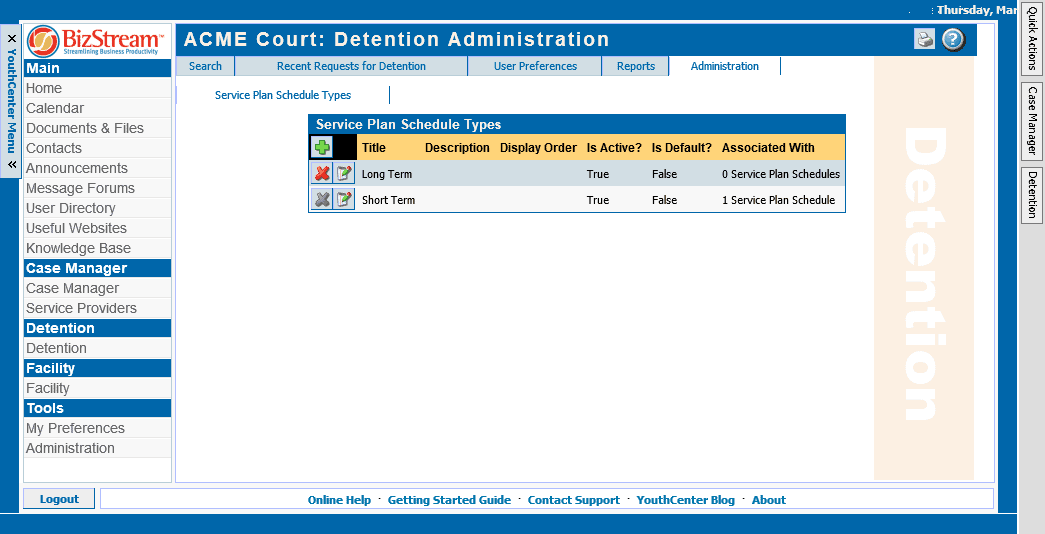
You may edit an existing service plan using the notepad icon or add a new service plan by using the green + button under the title which will bring up the Service Plan Schedule Type editor.
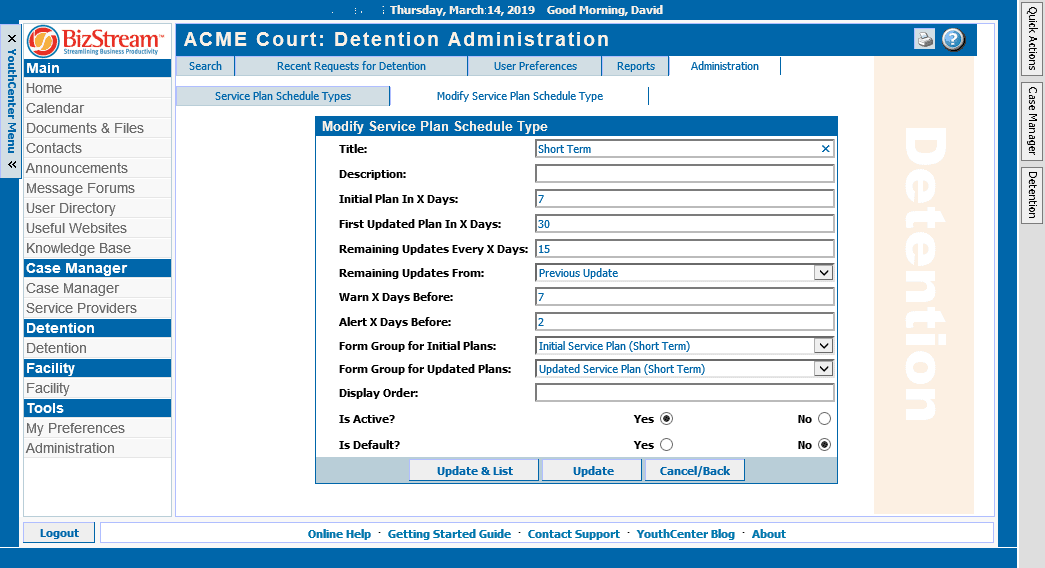
In our example above, we’re showing attributes for the service plan. The fields themselves should be self explanatory, however it is important to note that there are 2 different forms for the plans, the Initial and the Updated. These forms are the form builder forms you can create in the Client Tab: Service Plans section of the Form Builder application.
Be sure to mark the Service Plan Schedule to Active to utilize it.
Services Provided & Remaining Needed
Both of these lists correspond to the Discharge Plan within the Service Plan for a client.
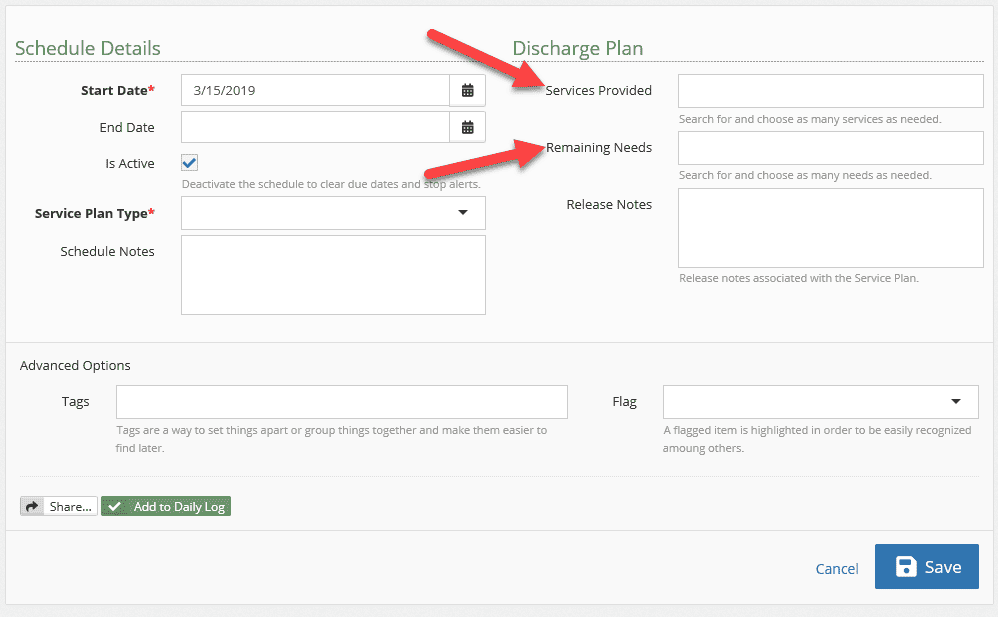
These are simply a listing of services and remaining needs that are associated with the fields. Add a name, description, and a order if you would like to have them added to the dropdown of the field on the Service Plan.
Once you’ve setup your forms, added a schedule, and added services – your team can use service plans.
User Profile
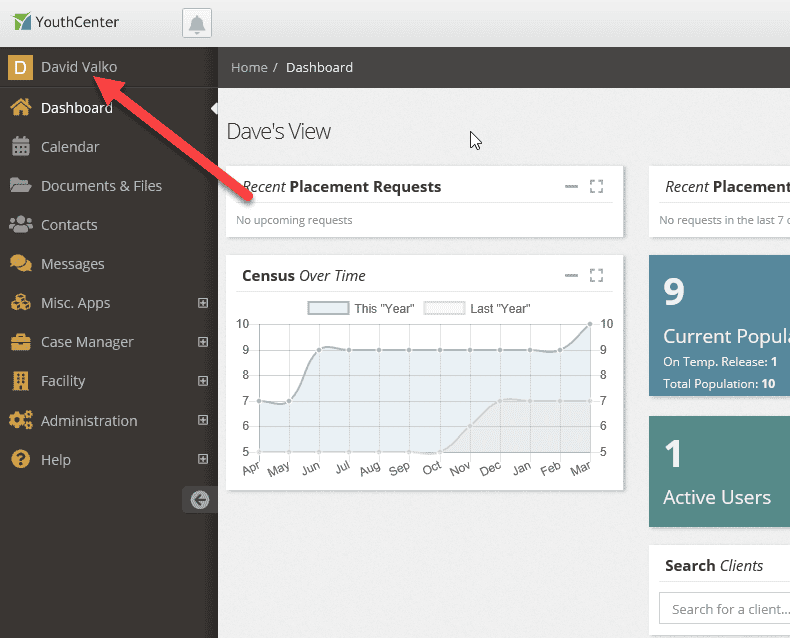
Editing your user profile and updating your password can be done in the new interface now. To view your profile, click your name in the top of the navigation.
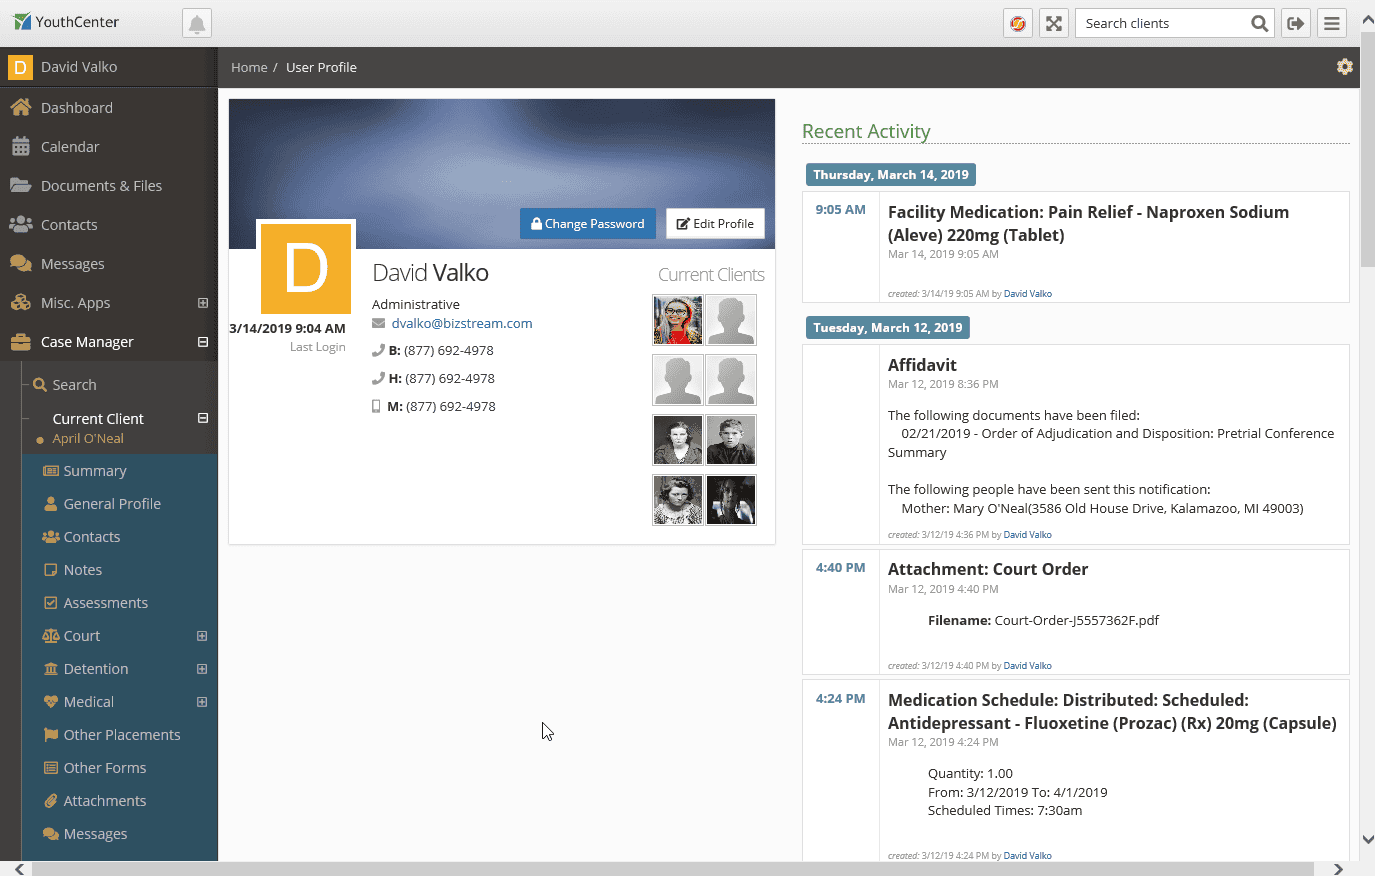
This will bring up your user profile that includes your basic information, a listing of your clients, and a listing of your recent activity.
Recent Activity
Interacting (click or touch) with any of the items in the Recent Activity listing will take you to that items detail in YouthCenter.
Current Clients
Interacting with any of the avatars of your current clients will take you to their client summary page.
Change Password
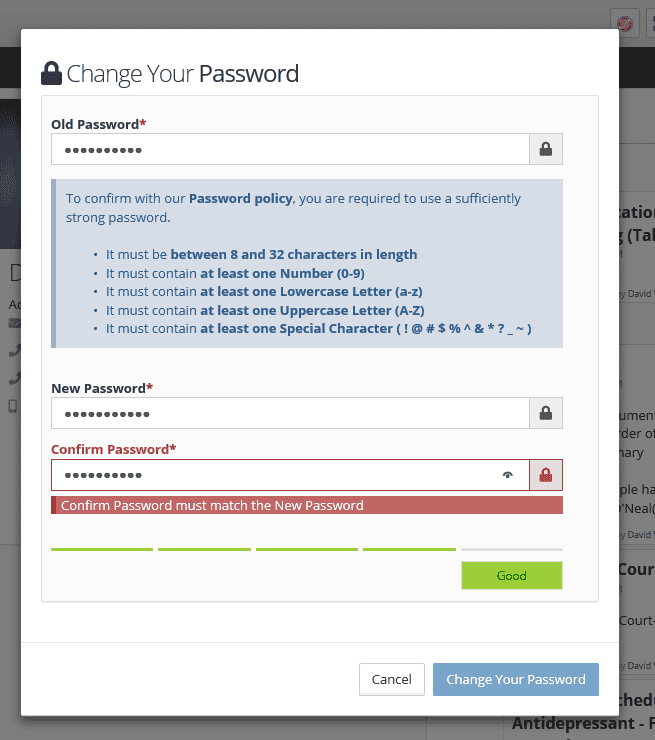
Interacting with the Change Password Button will bring up the change password window. You will be required to enter your old password prior to changing it. Your organizations Password Policy will be shown to give you insight into what is required for your new password.
Edit Profile
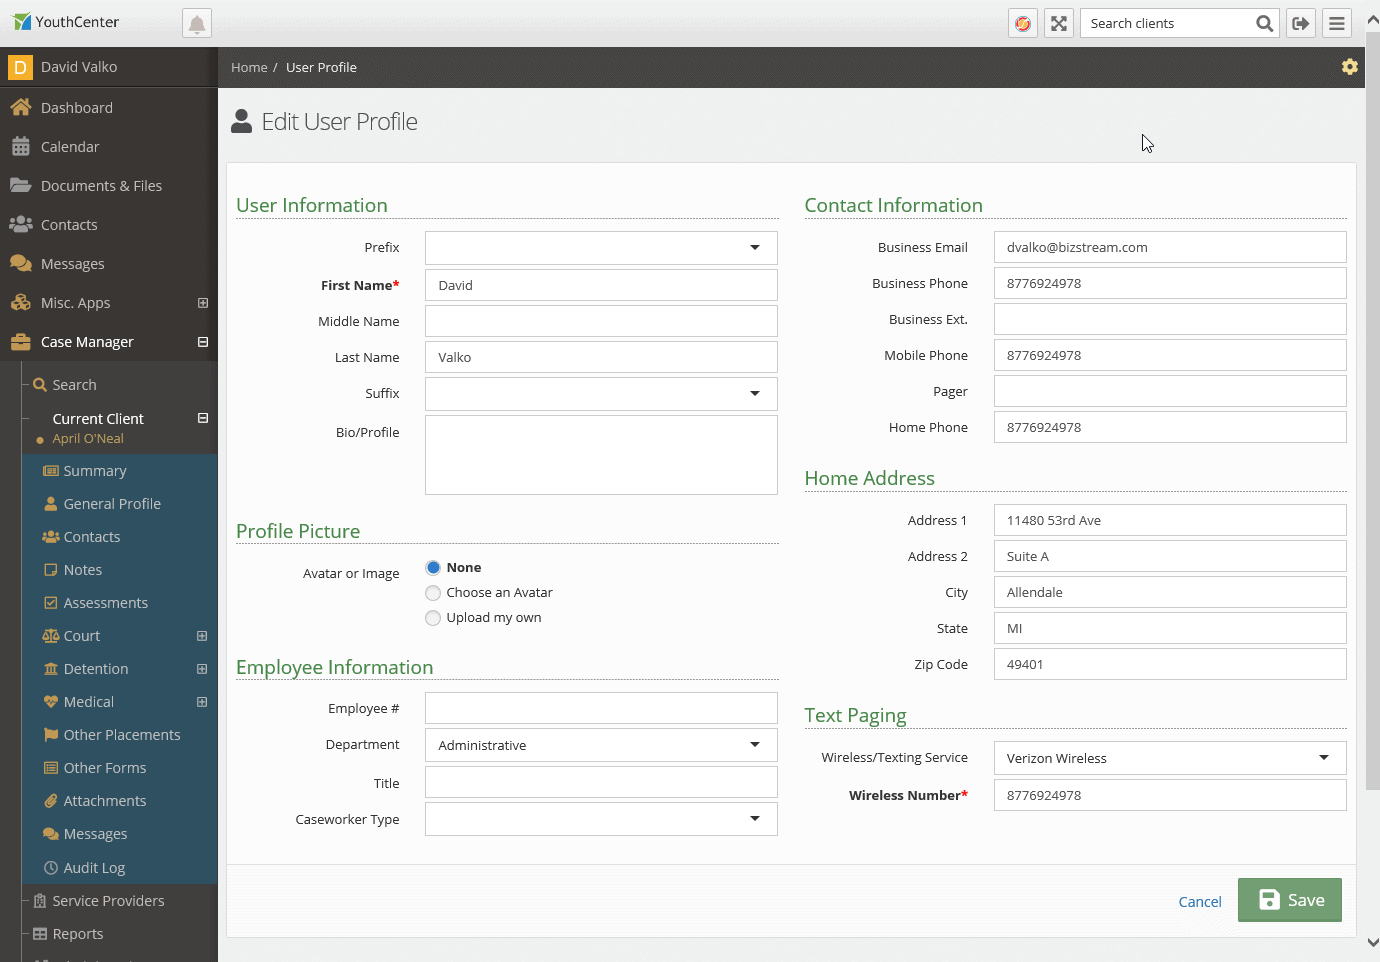
The edit profile button will allow you to add detail to your profile in YouthCenter. Any detail entered in your profile is only available to users of YouthCenter. This is also where you will change your “avatar” or choose “None” to use the 1st initial of your name.
Your input is valuable!
Along with the above beta items, with your input, we’ve made some additional improvements around the speed of the application, general design, and usability. These improvements don’t come without your input. Please take some time and enter a few clients into your Beta site and use the new features. Finding and fixing bugs prior to a live release makes it easier on us all. Your team gets improvements made before going to live – not after it’s out there.
If you need assistance on how to access your Beta site, please contact us and we’ll work with you to get you logged in and using the Beta site.
