Our July release adds several new features to the software focusing on residential (Detention and Residential) including an updated meal tracking system, improved personal possession tracking, and separations between residents. This release is expected to go live on 7/28/2024 at 11 PM EST. (Click here to see the time in your timezone).
Advanced Meal Counts
Facilities and programs that need detailed meal tracking to comply with the national school lunch programs or those who wish a more thorough inventory of meals served can benefit from this advanced meal tracking system.
Turning on Advanced Meal Counts
Advanced meal counts must first be enabled via the site settings. To enable advanced meal counts:
- Expand the Administration menu
- Choose Site Settings
- Select YouthCenter Settings
- Scroll down to the Meal Count Options section

- Select Advanced
- (OPTIONAL) If there are programs like Day Treatment that have clients that are not in detention but should still be tracked, select the relevant programs in the Programs for Meal Count typeahead.
- Press Save
Setting up Meals
If you do not already have meals and snacks you wish to track set up, administrators can adjust the tracked meals via the Picklist Admin.
- Expand the Administration Menu
- Select Picklist Admin
- Search for Facility Meal Type
- Add additional meal types by selecting the green “Create a New Facility Meal Type” button
- If you already have meal types set up, we recommend adding Meal Time to your existing meals.

Tracking Specific Meal Types (OPTIONAL)
If you wish to track how special meal type distribution like for vegetarian, kosher, non-dairy, etc. meals, you can set that tracking up in the Meal Food Type picklist.
- Expand the Administration Menu
- Select Picklist Admin
- Search for Meal Food Type
- Add additional meal types by selecting the green “Create a New Meal Food Type” button
- Create as many entries as needed
Tracking Meals
Using the advanced meal tracking functionality of YouthCenter is simple.
- Expand the Facility Manager menu
- Select Meal Count
- If you do not already have an entry for the desired date, select the +Create a New Meal Count button in the top right corner

- (OPTIONALLY) Enter the meal date
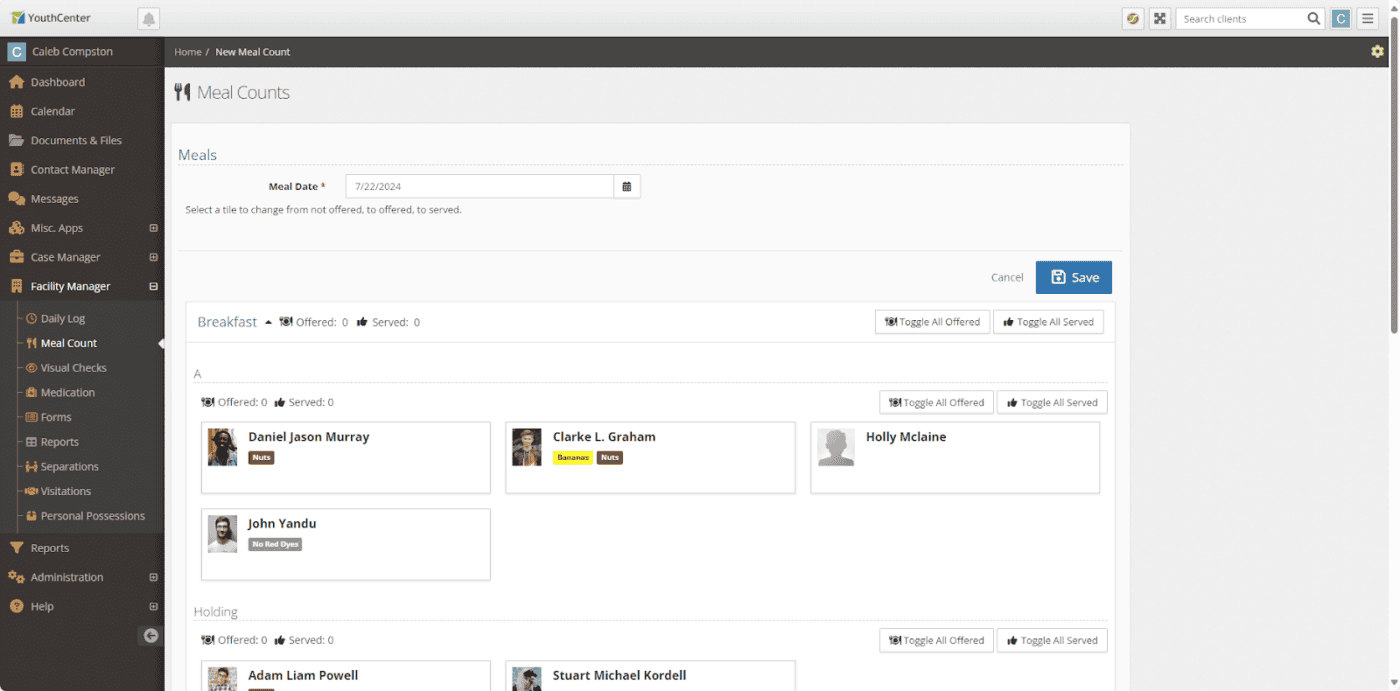
- You can note offered or served for the entire population, a unit, or a program by using the Toggle All Offered or Toggle All Served options
- Alternatively, you can denote by individual or make changes after selecting the mass toggles by selecting the card of the individual you wish to modify
- Individuals who are served are noted in green
- Individuals who have been offered a meal but did not accept are noted in blue

- If you have any non-residents served, you can add them to the meal count at the bottom of the meal.
- Press Save
Designating clients who have received special meals
If you are tracking special meals that have been prepared and served, a carrot menu will be added to every client’s tile. Simply click the menu and select the meal type you offered or served. The tile will update with the type of meal offered or served:


In addition to the visual display, you can report on special meal types offered and served through the reports application.
Adding meals later in the day
If you’ve served breakfast and are ready to track lunch, for instance, you can simply click the context menu button next to the date you wish to add to and select Edit this Meal Count.

Personal Possession Tracking
Previously, Personal Possessions in YouthCenter was a form that allowed intake the ability to fill in a form with items a youth had in their possession. We’ve heard from many facilities that they’ve needed more functionality including check-in, check-out, and release along with a transaction log and receipts of these events. The new Personal Possessions allows for all of that functionality and more.
Set-Up
Before using the new personal possessions, a few things need to be set up to allow for its use.
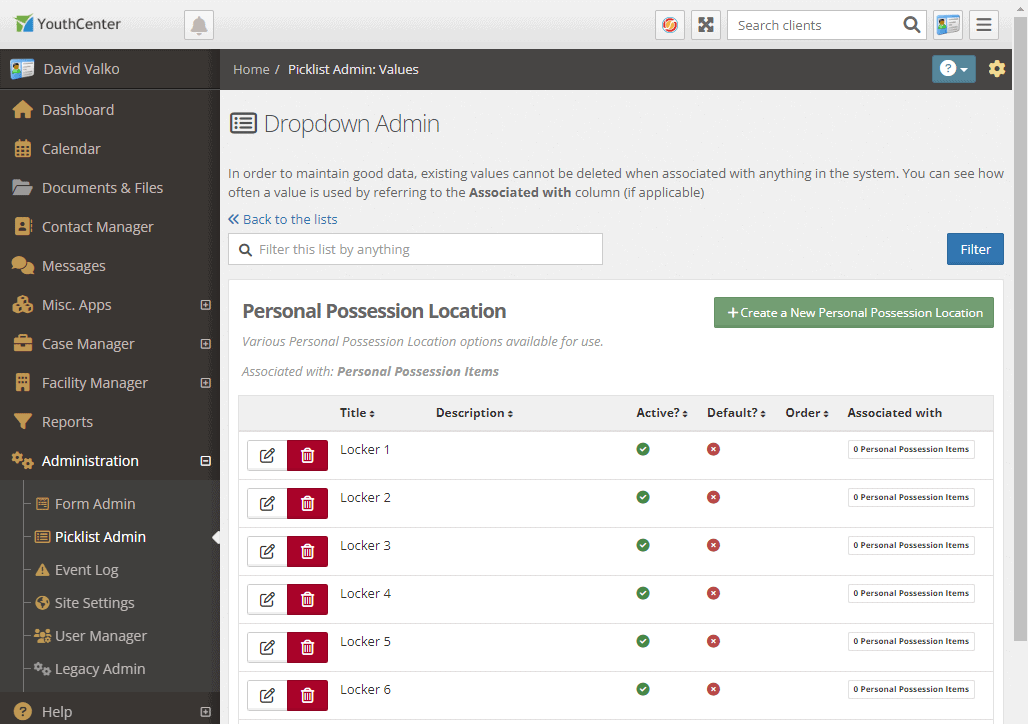
- An administrator must go into the Picklist Administrator and find the “Personal Possession Item Type” and “Personal Possessions Location” items.
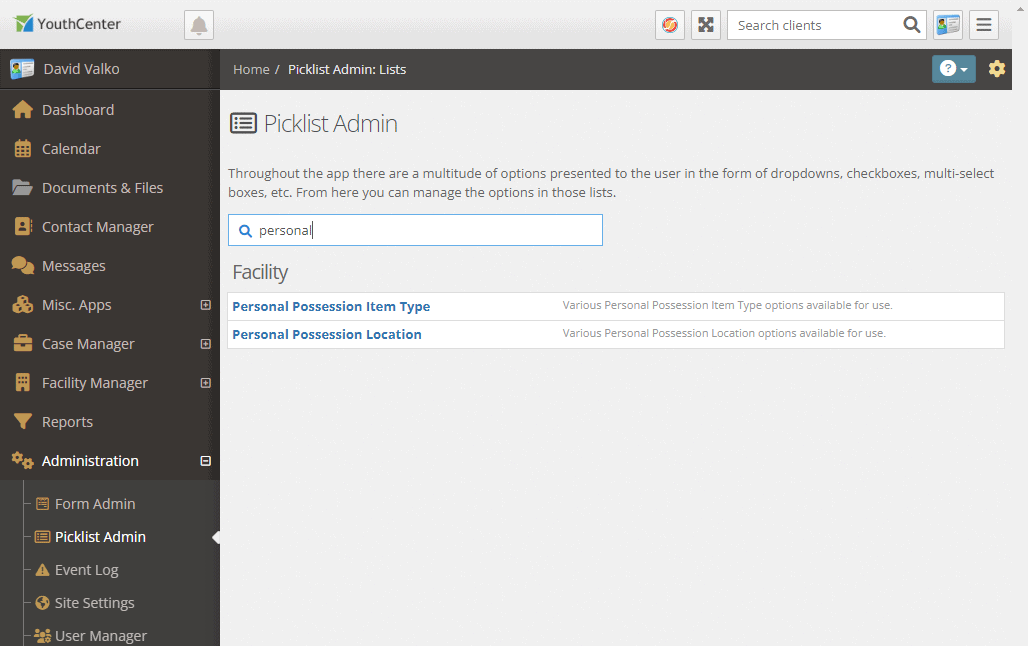
Picklist Set-Up
Personal Possession Item Types
You may categorize your personal possession items. Many intake forms include categories like Clothing and options for different types of clothing. In YouthCenter, you may choose to set up possession item types as “Clothing” or “Clothing – [item type]” as shown below.
When cataloging items during intake, there is a description field that will allow you to provide additional details.
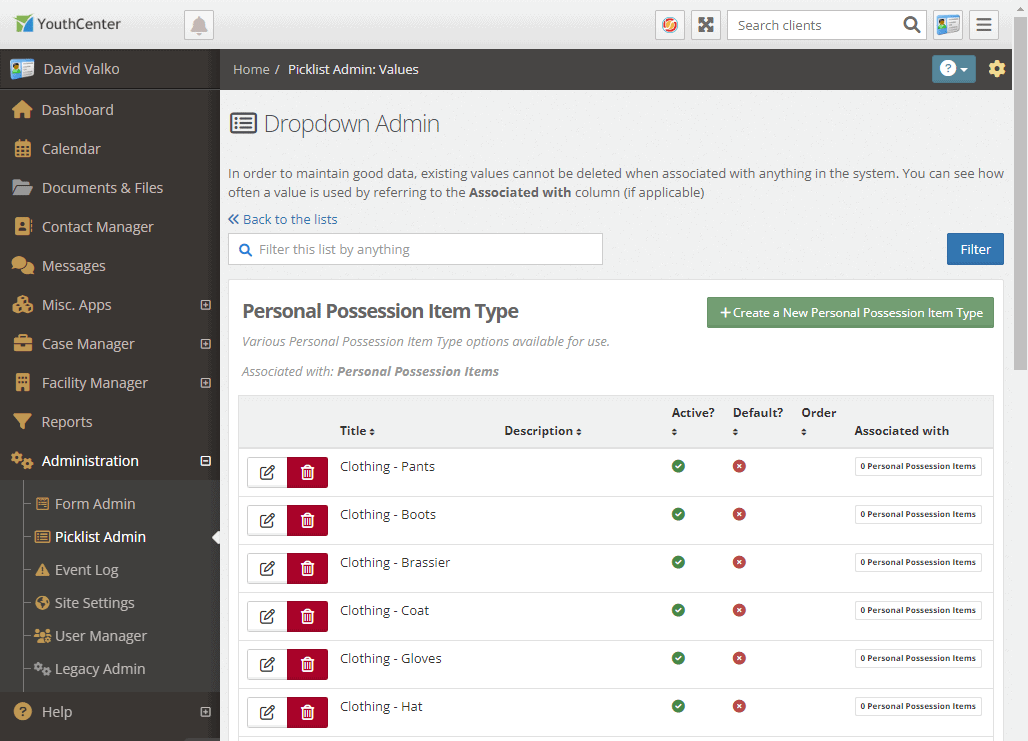
Personal Possession Location
If your facility has designated locations for youth’s personal possessions, you will need to enter those in. Many facilities have “bins” or “lockers.” You may also need to set up a location for valuables such as “Safe” or “Vault.” You may need to designate bags or folders within the valuable location such as “Safe—Bag 1” etc.
Requiring Signatures for Transactions
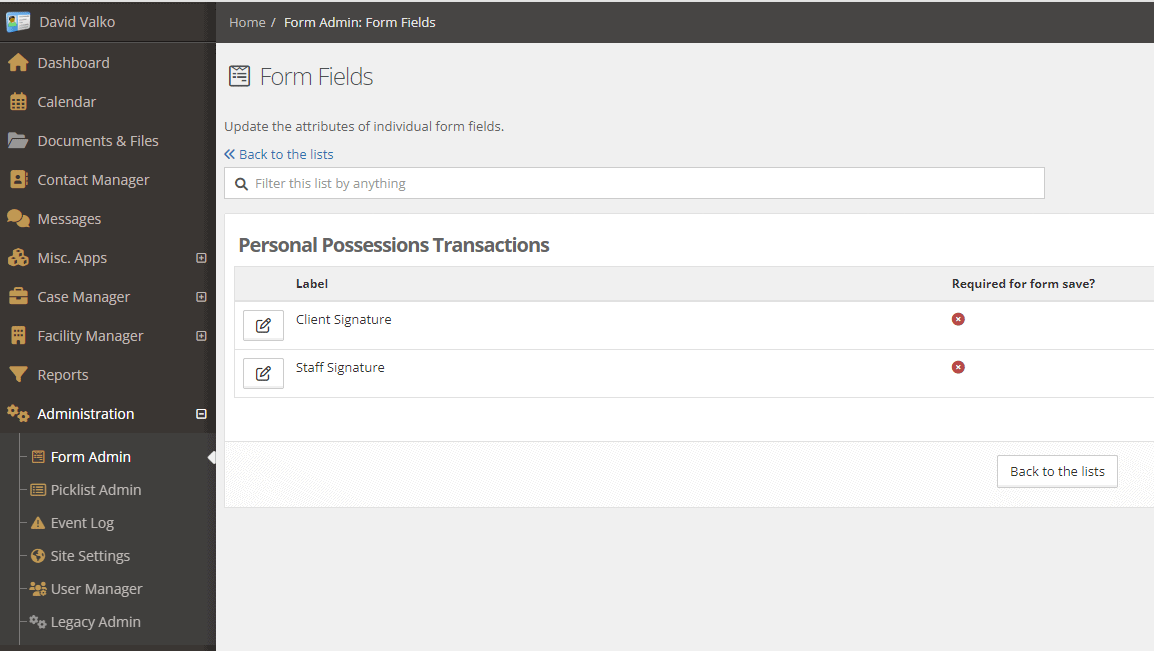
If your organization requires signatures from clients for any of their personal possessions (Intake, Check-Out, Check-In, Release, etc.), you may require signatures of clients or staff by going to:
- Administration > Form Admin > Personal Possessions Transactions
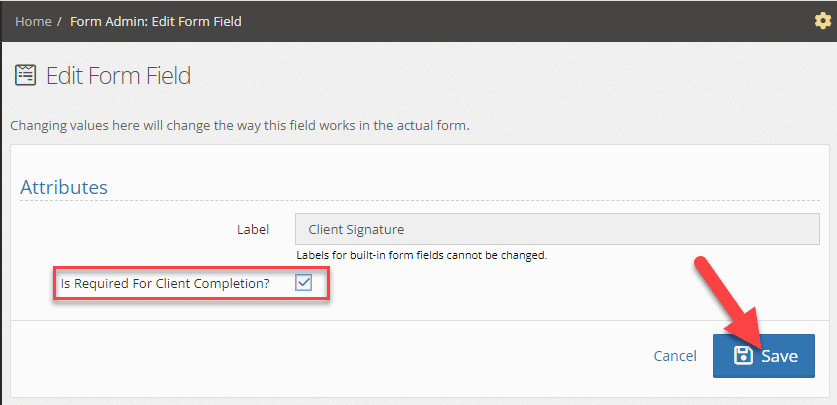
Edit the field and make sure “Is Required For Client Completion” is checked and click save.
Adding to Audit Checklist
If you would like to include the new Personal Possessions to your intake checklist, navigate to Administration > Picklist Admin > Audit Checklist Item
There are two checks that can be performed as shown below:

To add to an Audit Checklist for intakes, add a new Audit Checklist item, select “Facility Placement Intake” as the Object Type Checklist, give it a title, and select one of the above tests as shown below:
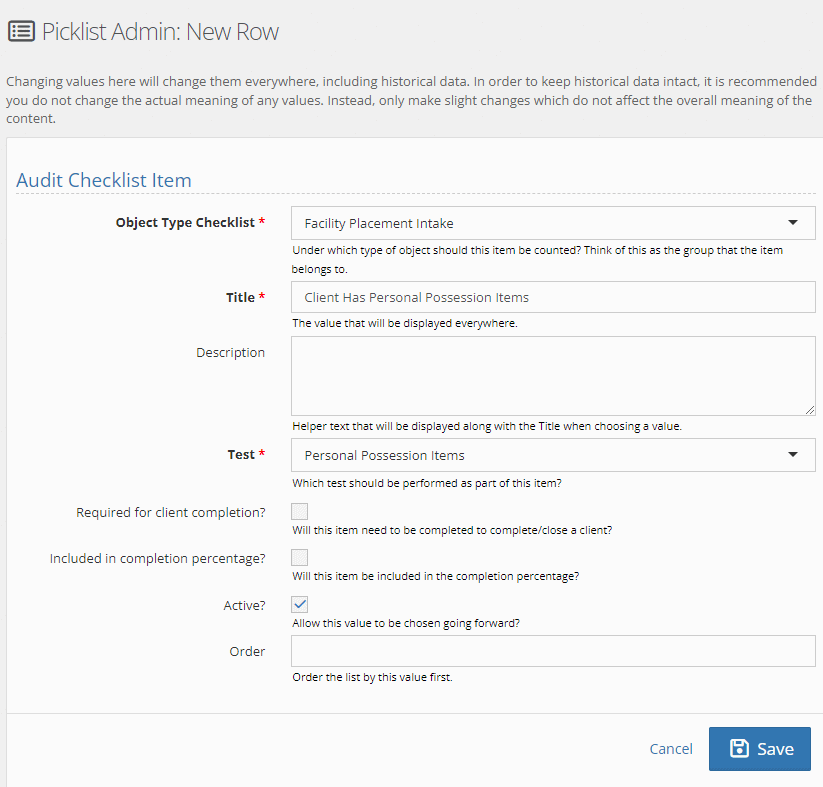
Click save and the audit checklist item will be active.
Note: Any clients that currently have an open intake will not have the new audit checklist added. Any new intakes will have the checklist item – existing intakes will not.
Allowing Camera Access
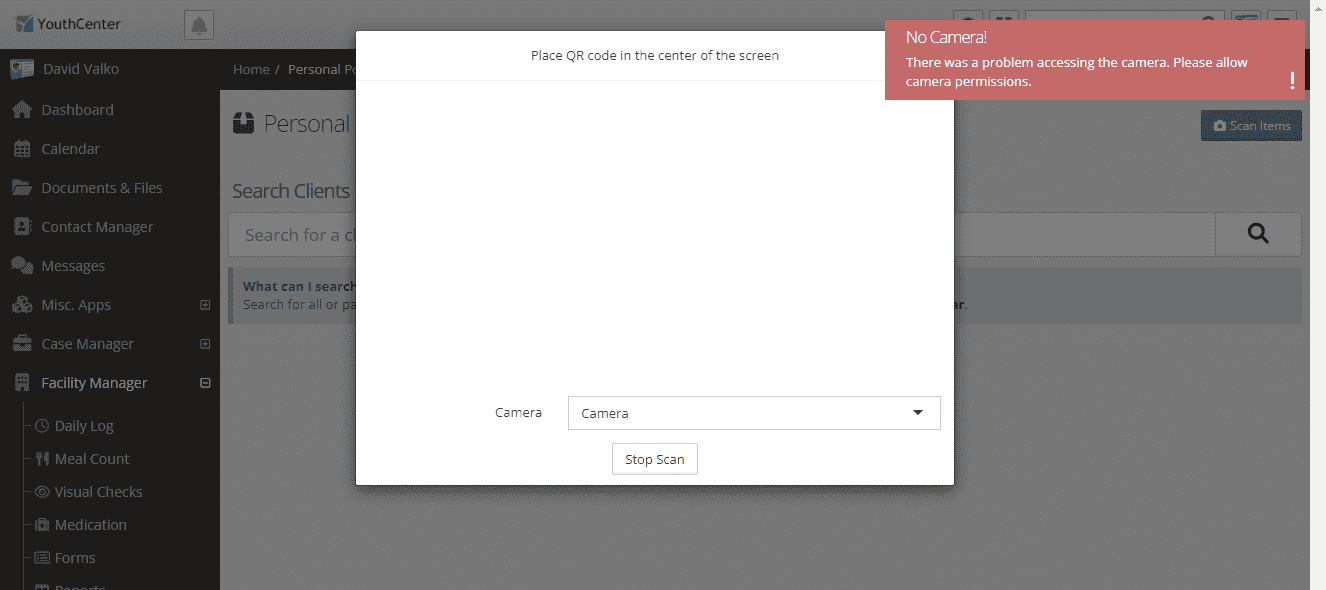
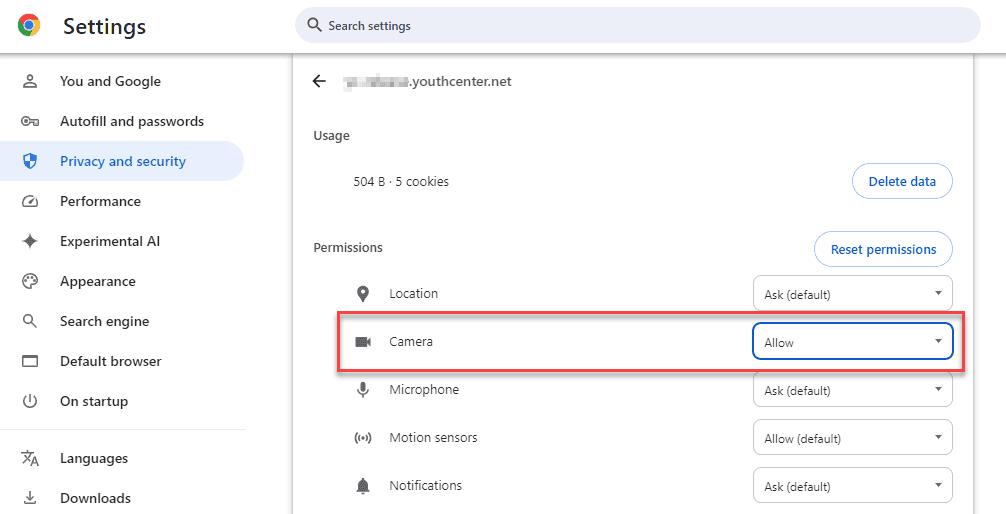
If you plan on using the QR codes generated by the application to “quick scan” an item to see a youth’s inventory, you will need to allow the computer’s camera access. Instructions are below for how to allow camera access. Your machine or browser may be different than shown below.
If your camera is not allowed, you will get an error like this:
Chrome
Open Chrome, click the lock icon in the top left next to the URL, then navigate to the “site settings” option. Allow the camera for your YouthCenter site.
Open Edge, click the lock icon in the top left next to the URL, then “Permissions for this site.” Allow the camera for your YouthCenter site.

Using Personal Possessions
Personal possessions used to be located in the Case Manager under the client in the Facility tab. We have moved “Personal Possessions” to the “Facility Manager”.
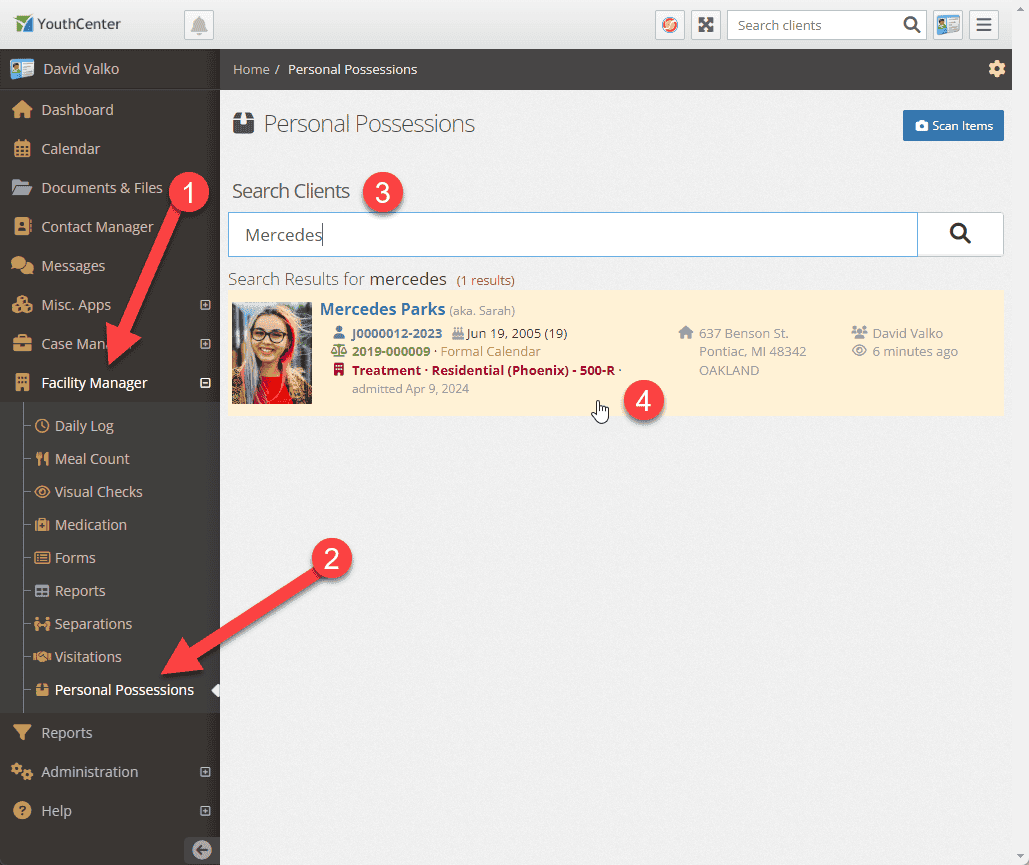
After you’ve added a client to YouthCenter and placed them in the facility (assigned a room), you can search for the client as shown above. Alternatively, you may scan a QR code of a youth’s item to be shown their inventory.
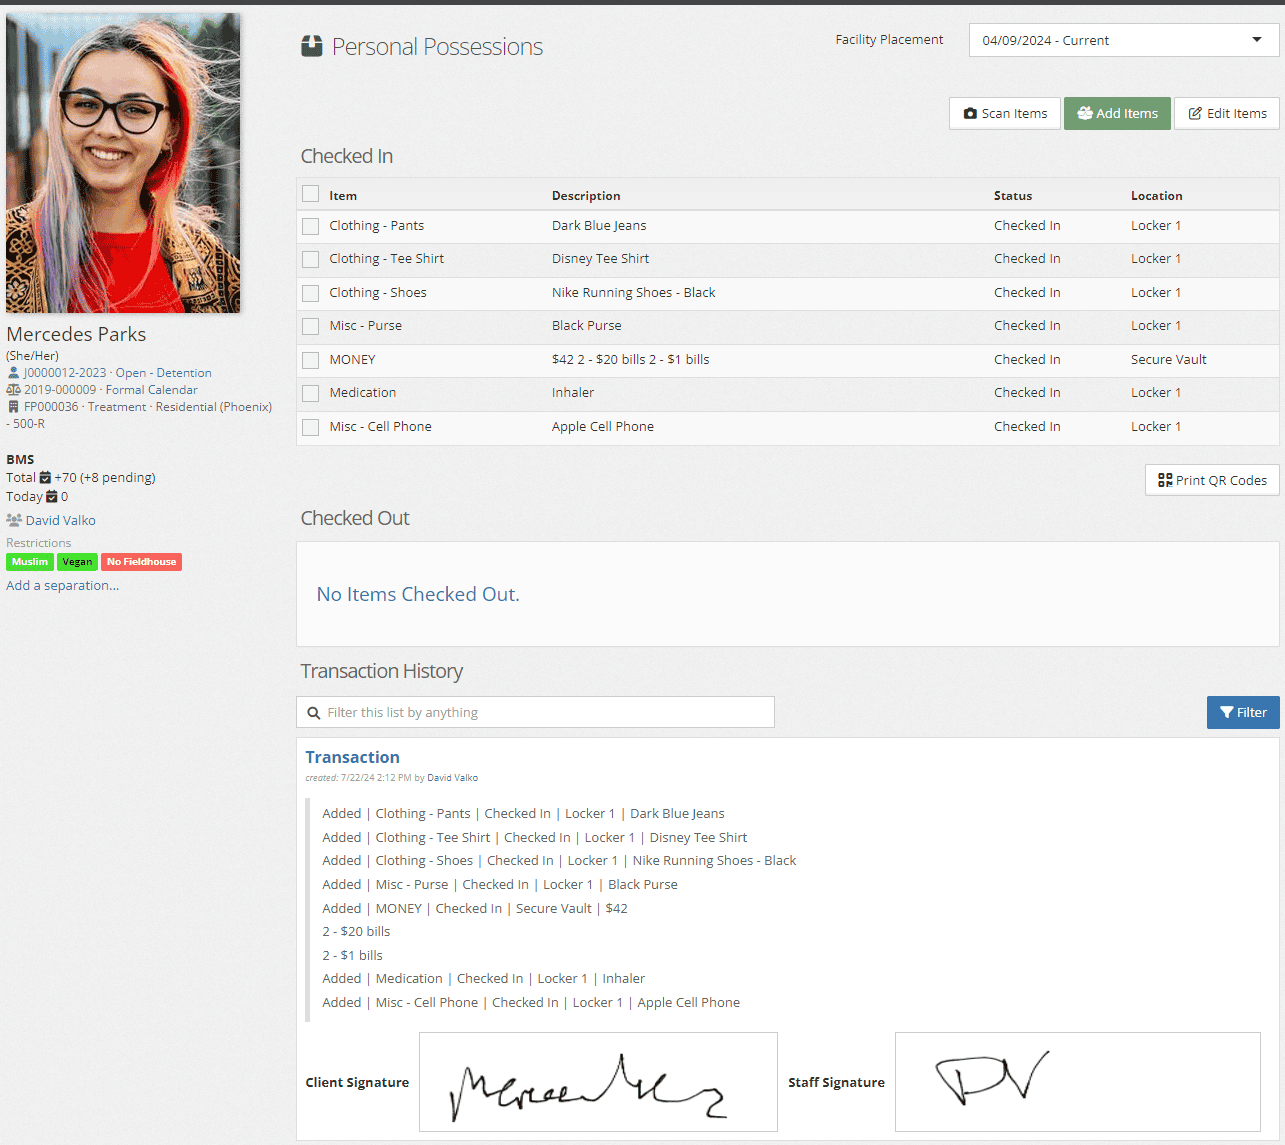
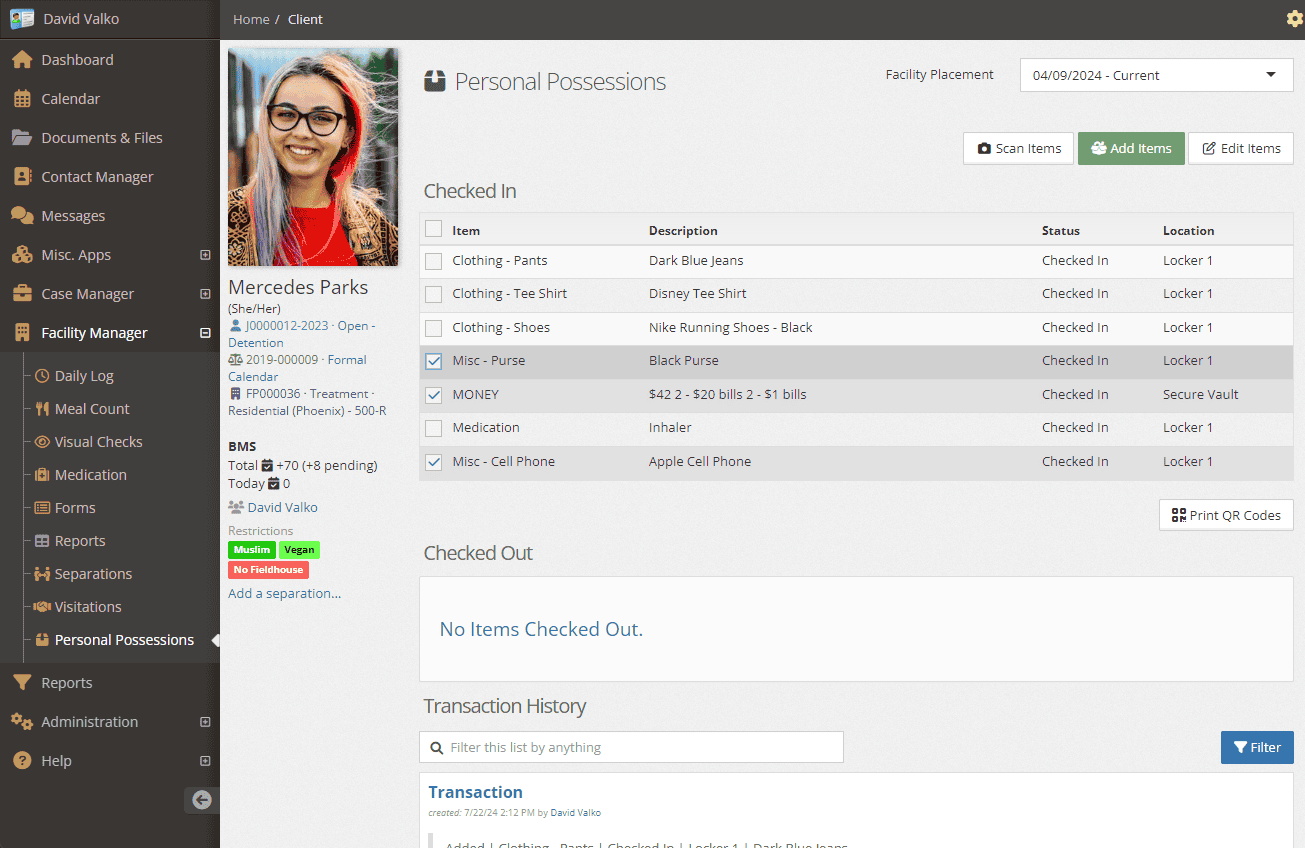
Once you’ve selected the client, you will see their item listings “Checked In”, “Checked Out”, and “Transaction History”.
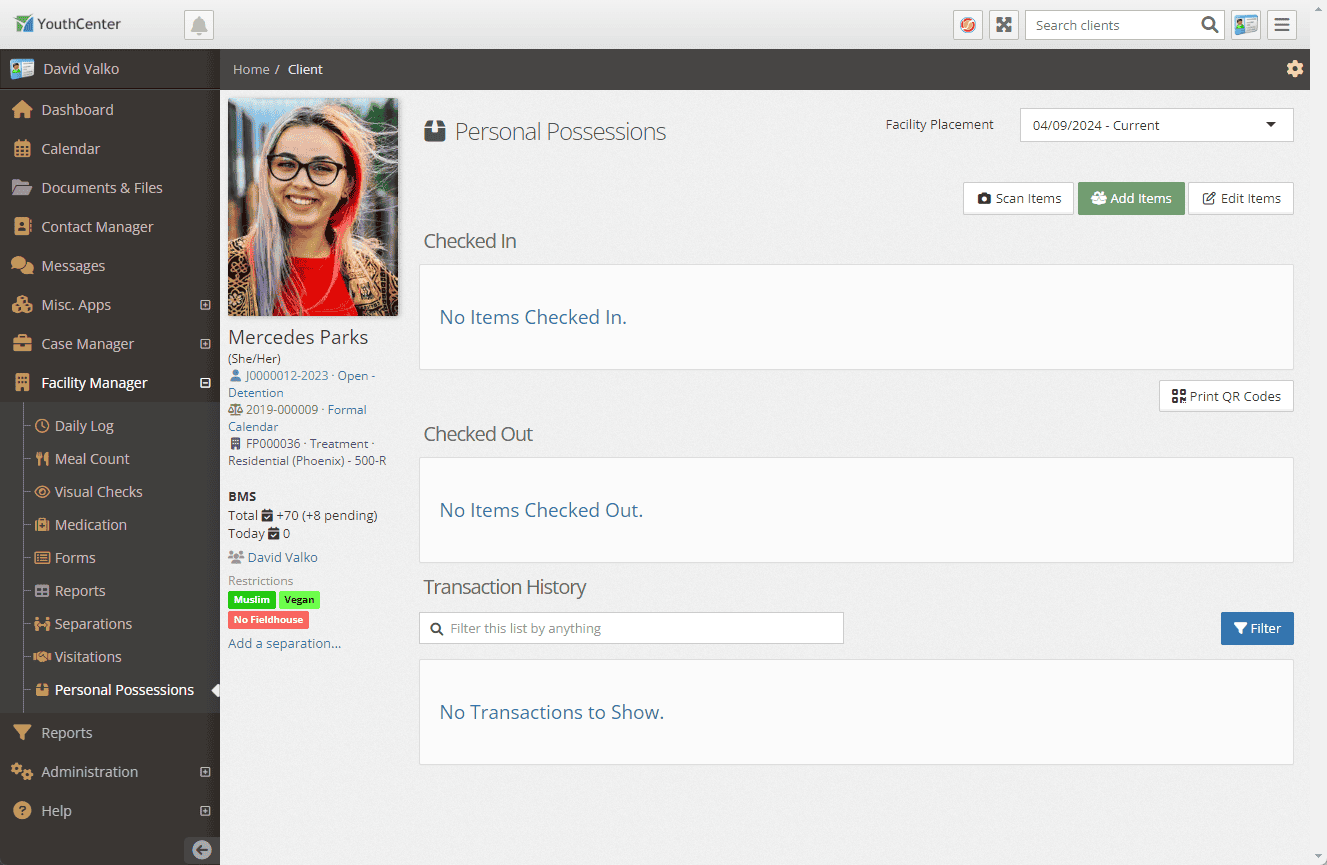
Adding Items
To add items to their inventory, press the green “Add Items” button.
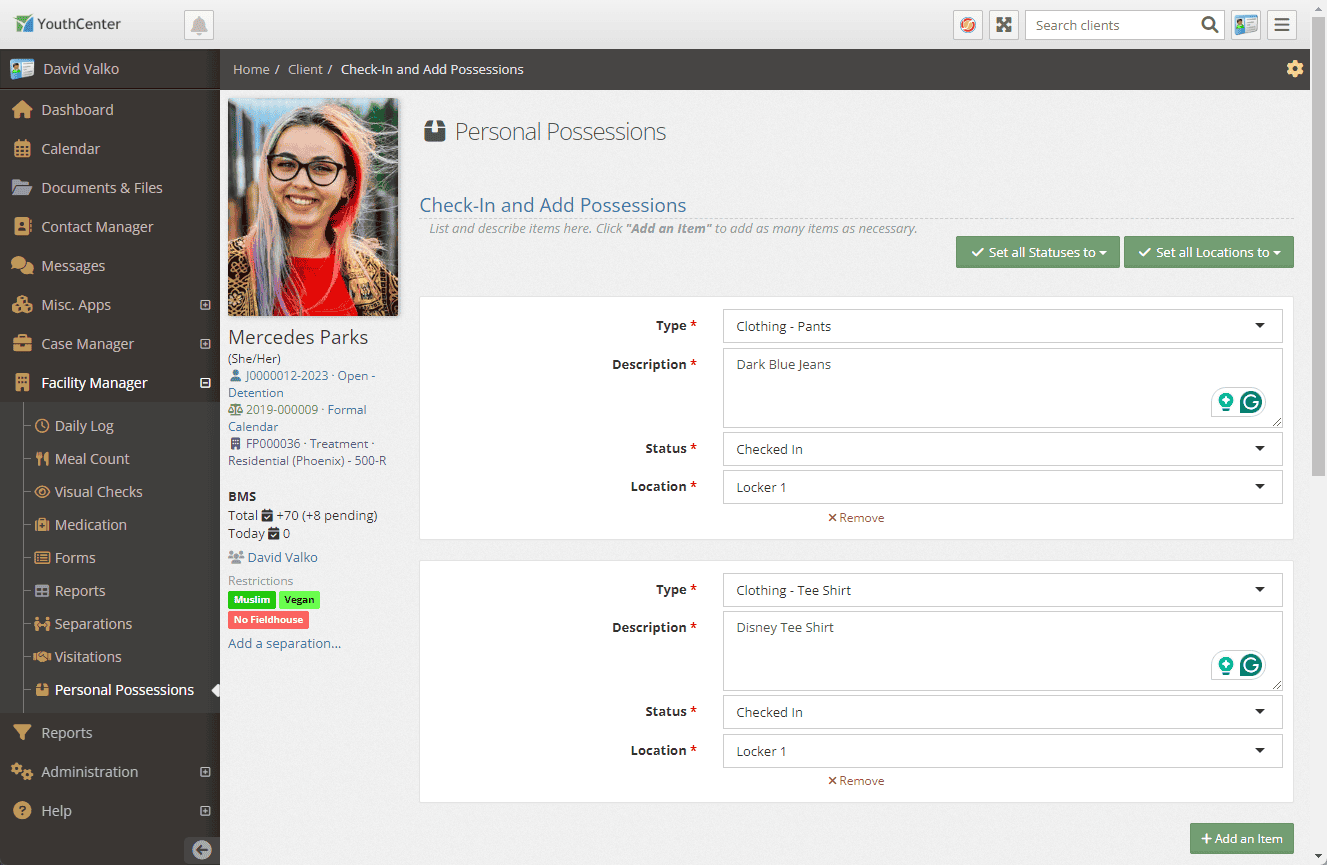
You may begin adding items to the youth’s personal possession inventory. Select the type, provide a description, a status, and a location for the item(s).
To add more items, use the green “+Add an Item” button.
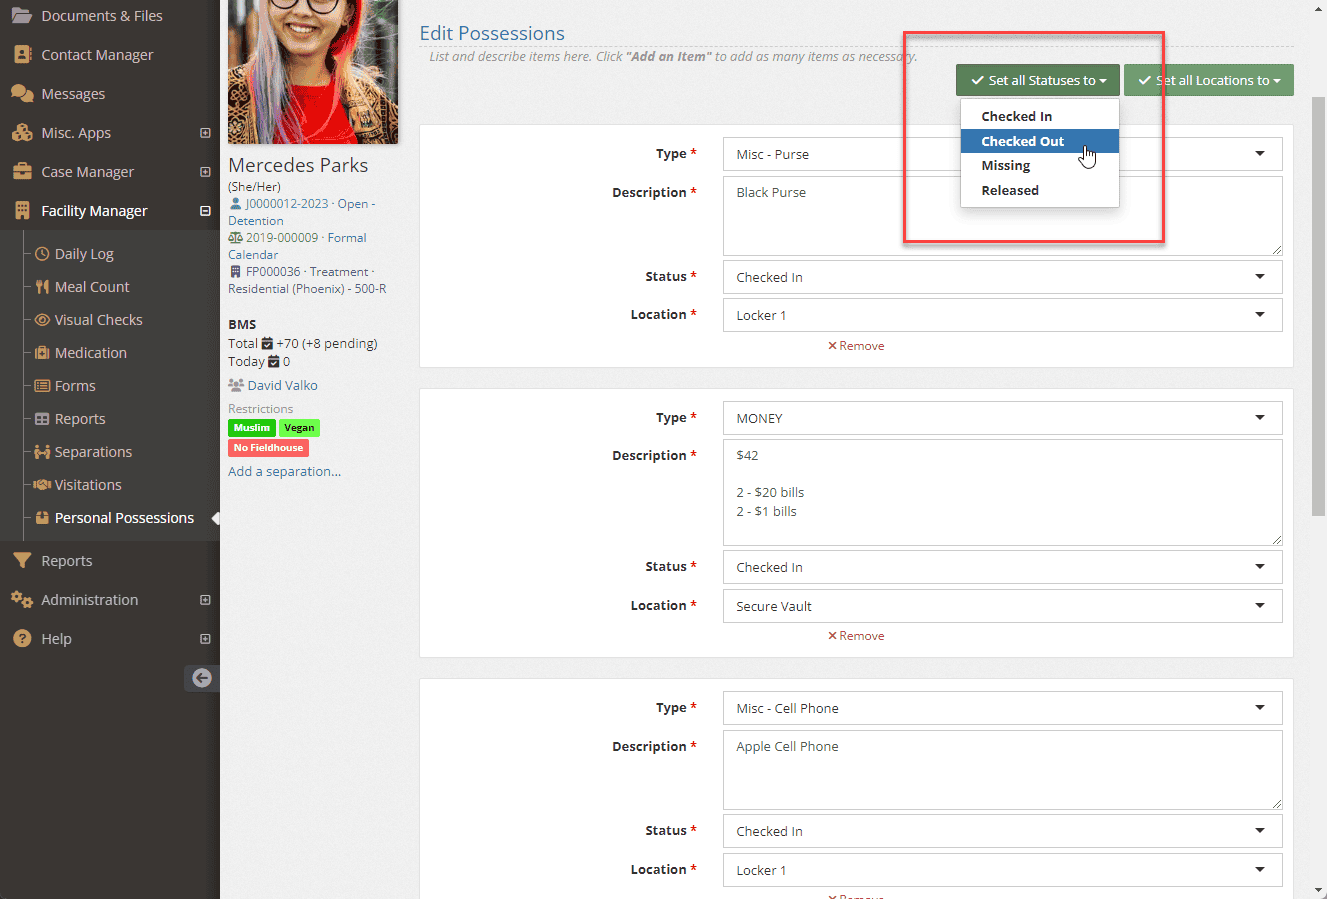
For bulk editing, you may use the green buttons at the top of the listing to set statuses for all items listed or set locations of all items.
Signatures
Once you’ve taken in all the items, you may have the youth sign for the items along with having the intake staff sign as well. YouthCenter will log who did the inventory based on the user logged in.
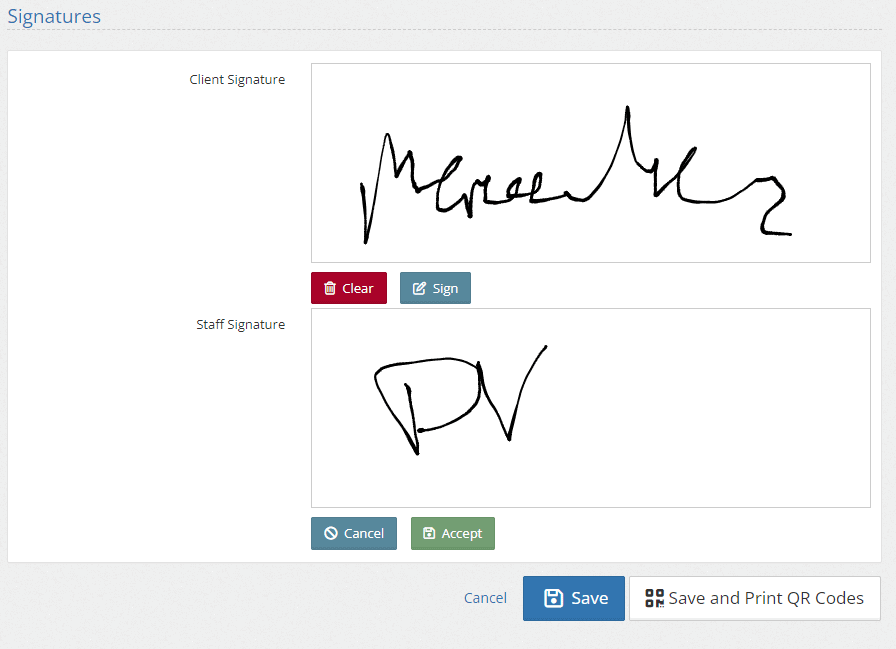
“Save and Print QR Codes” or “Save”
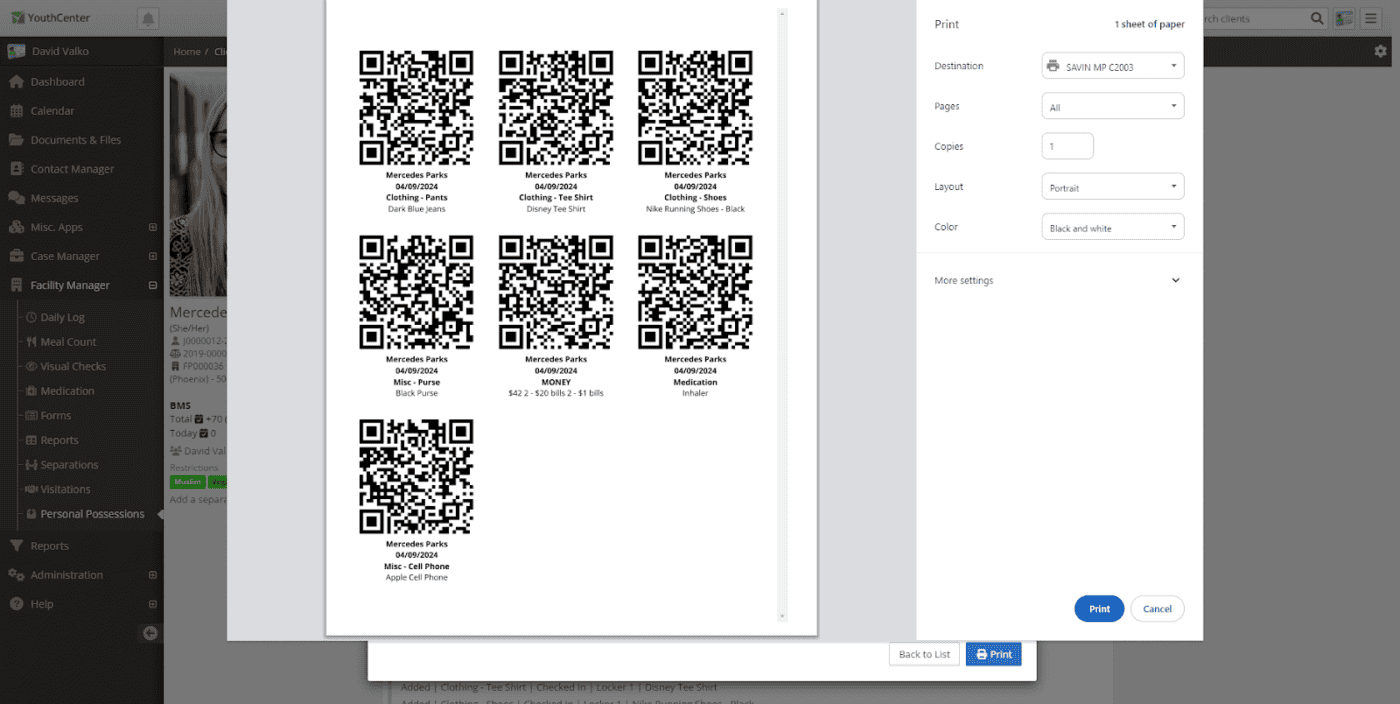
Some facilities tag each item put in inventory or will tag the locker or bag with a label. By pressing the “Save and Print QR Codes” you will be presented with a QR Code listing for all of the items you did an intake for and an option to print those codes.
If you select “Save” you will be presented with the inventory of the youth’s Personal Possessions and the transaction history as shown below:
Checking Out Items
To check out items of a client, simply navigate to Facility Manager > Personal Possessions and enter the client name in the search bar or click the blue Scan Items button to activate the camera and hold up a QR Code from the client’s inventory.
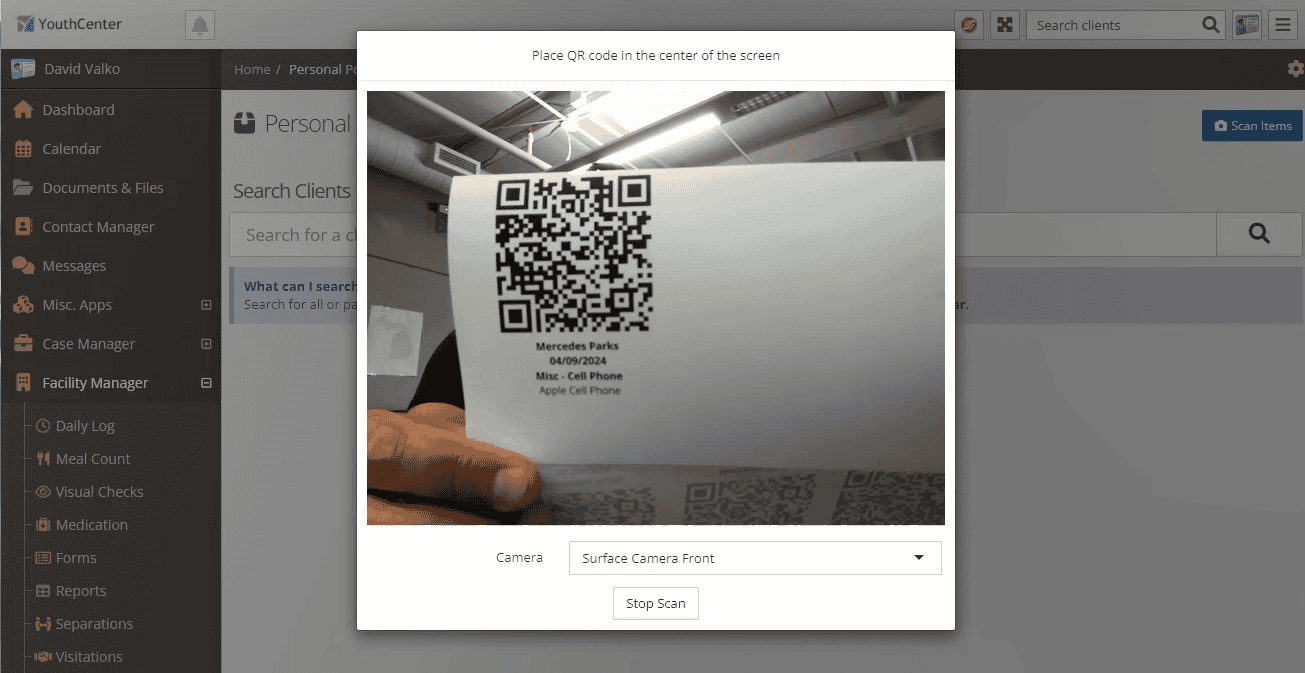
The youth’s inventory will come up with the item on the QR code selected. You may manually select other items or scan their QR codes to select them.
Select the white “Edit Items” button in the upper right corner to modify the location or status of those items.
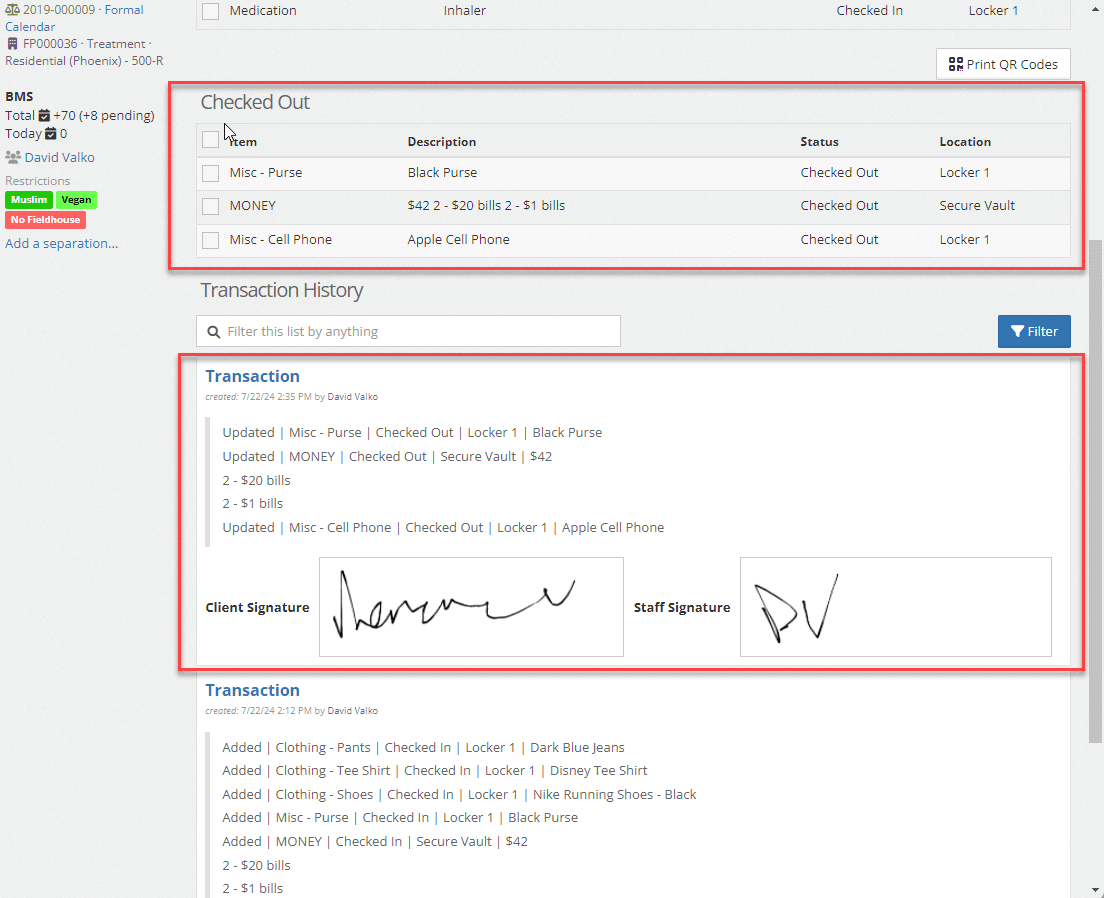
Again, have the youth or guardian sign for the items and have a staff member sign for the items and save to view the item listing and transaction log:
Release Items
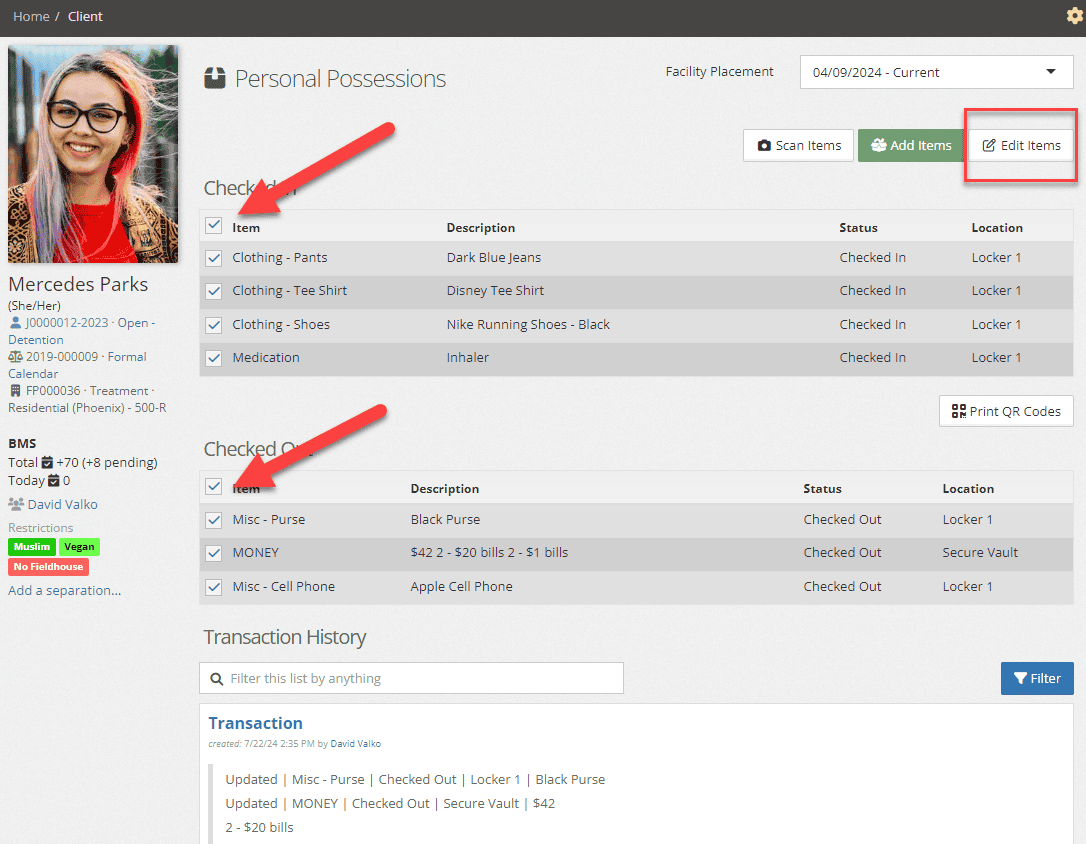
When a client is ready for discharge/release, you may select all items in their Personal Possession Inventory by clicking the top checkbox above their items and using the “Edit Items” button to change all their statuses.
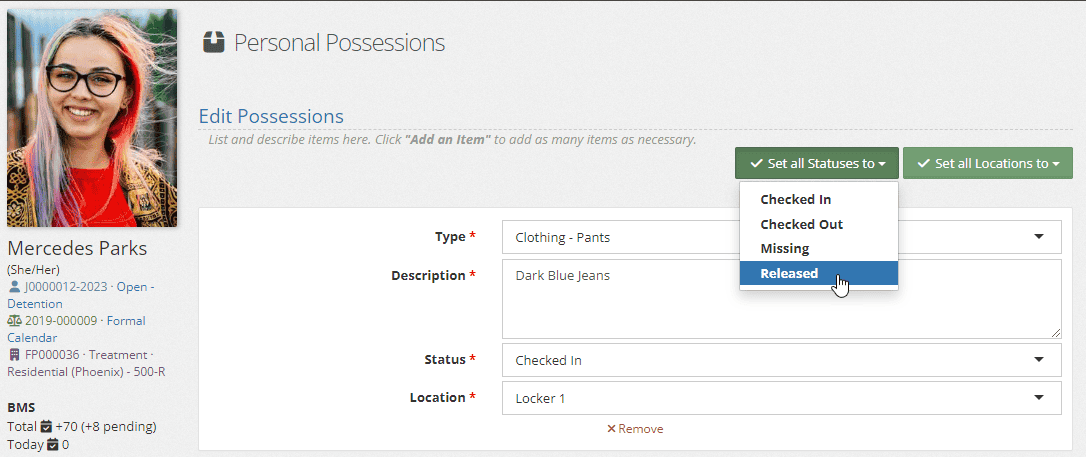
Using the drop down, Set all Statuses to “Released”
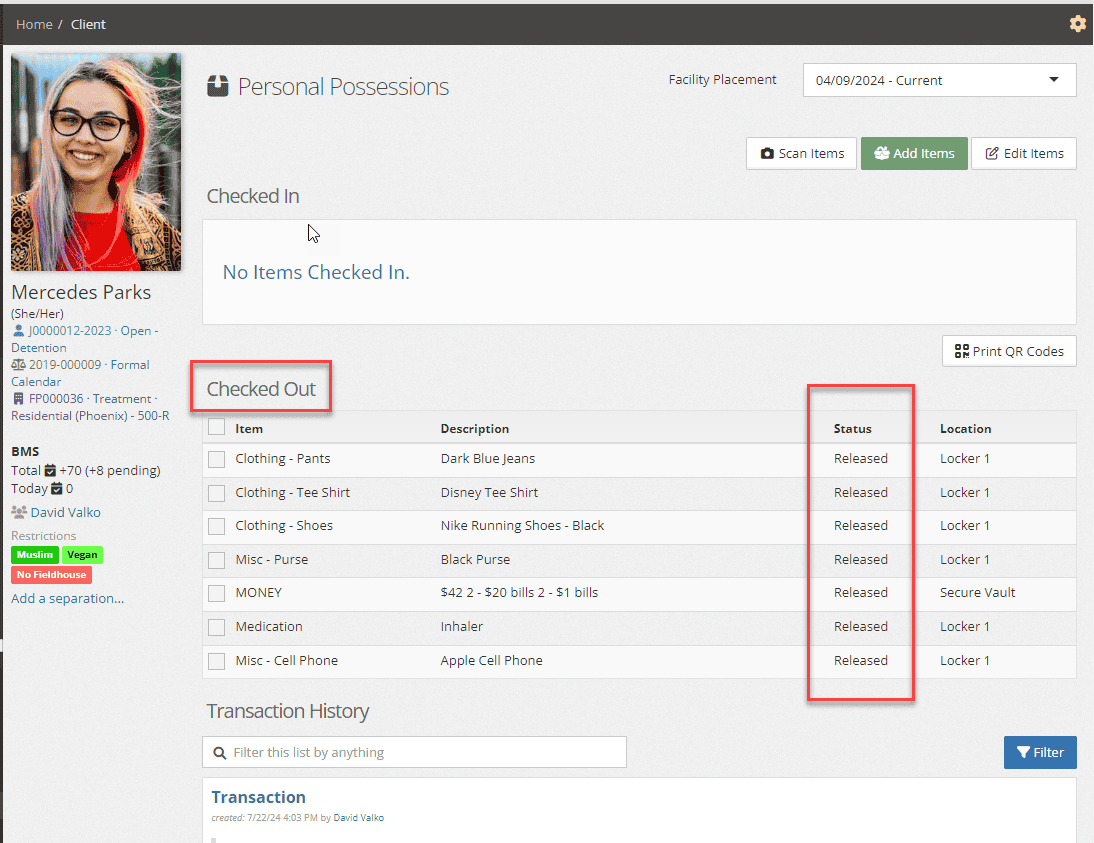
Have the client or guardian sign for their materials along with the staff member and press save. The client’s Personal Possessions inventory will show all items “Checked Out” and their status “Released”.
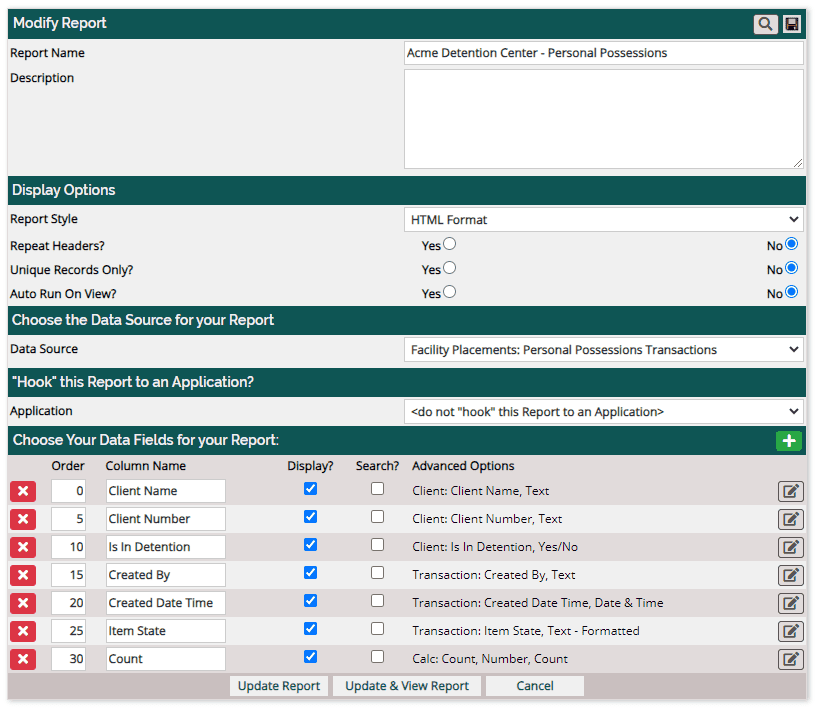
Adding to Reporting
To report on the new Personal Possessions, you may use the Detention Reports and choose the Data Source: “Facility Placements: Personal Possessions Transactions.”
Separations
Occasionally, facilities and programs will have individuals who shouldn’t be in the same area for various reasons. YouthCenter now supports the tracking of these separations.
Where can I see active separations?
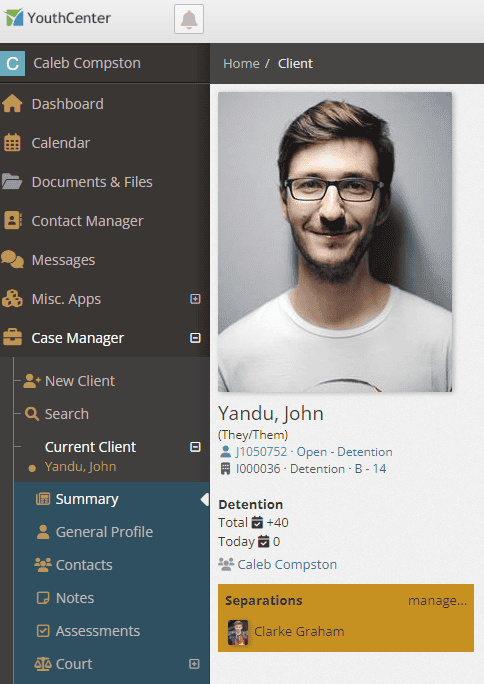
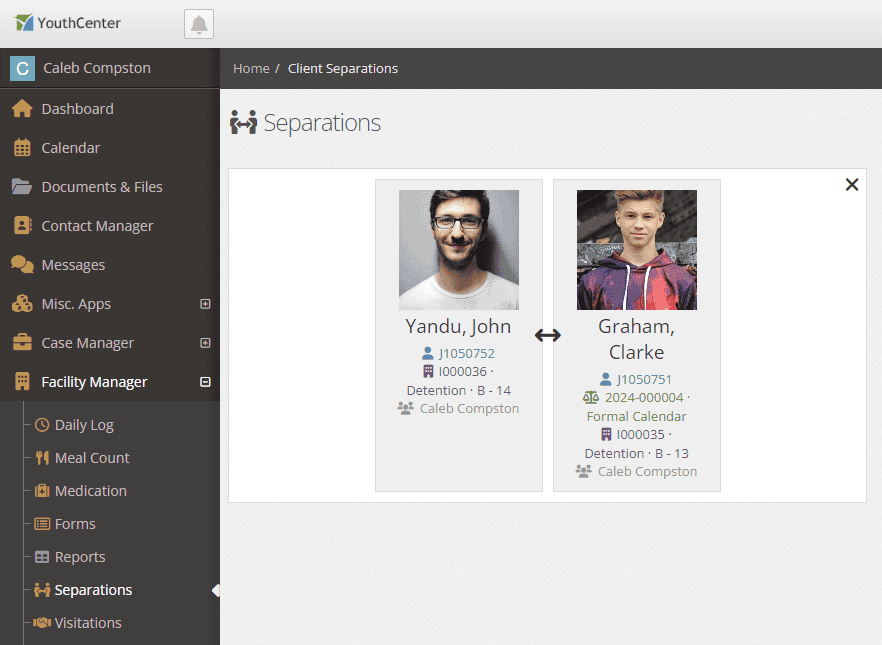
Active separations can be viewed directly on the client summary screen and on the separations list screen.
Adding a separation
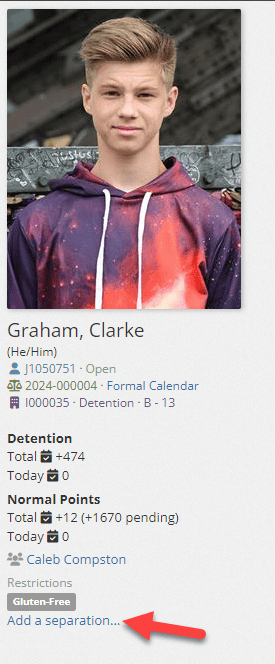
You can add a separation directly from the client by clicking on manage separations under their profile image.
Or by selecting the + New separation in the separations application.

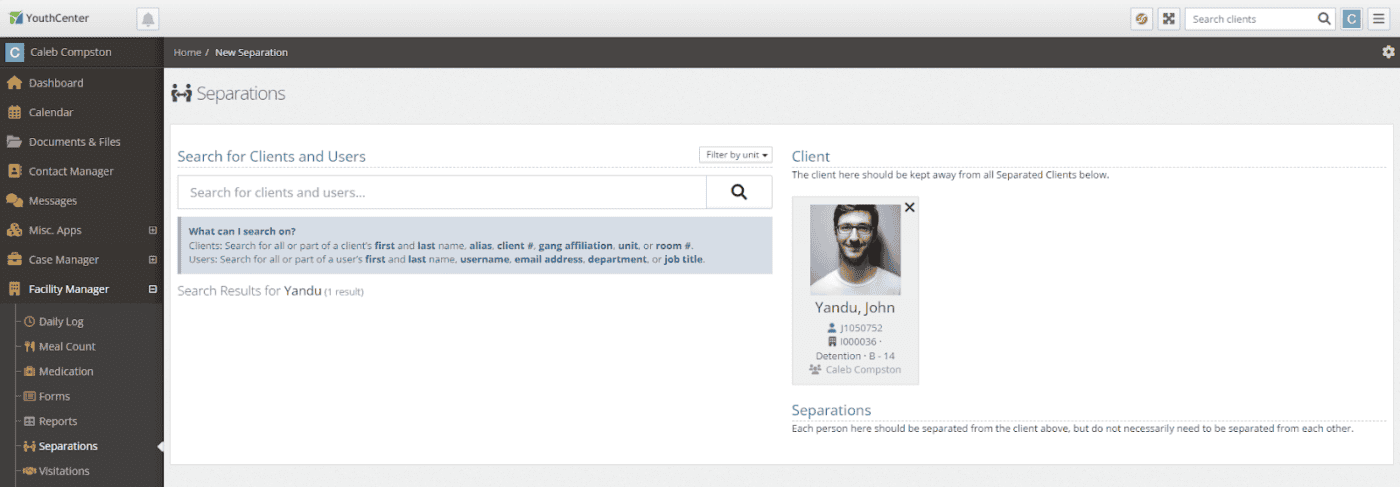
You can search for the first client by name, date of birth, ID number, or gang. Once you have found the client you are looking for, simply press the client button to the right of their information. They will move into the client section.
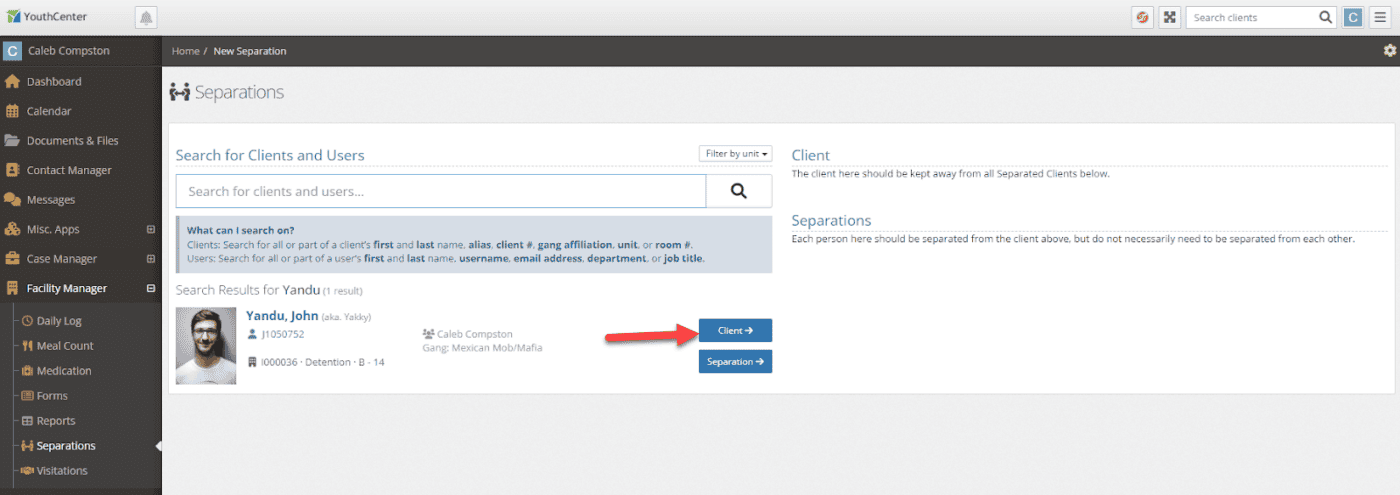
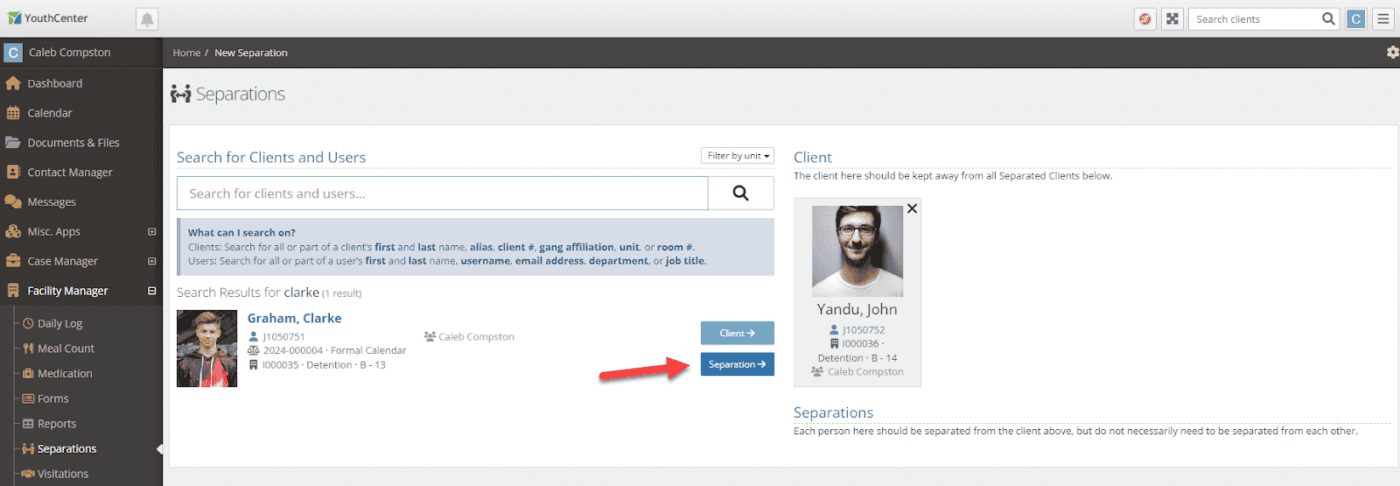
Next, to add the client(s) they are supposed to be separate from, search the other separations’ name, date of birth, ID number, or gang. When you locate the client, press the separations button.
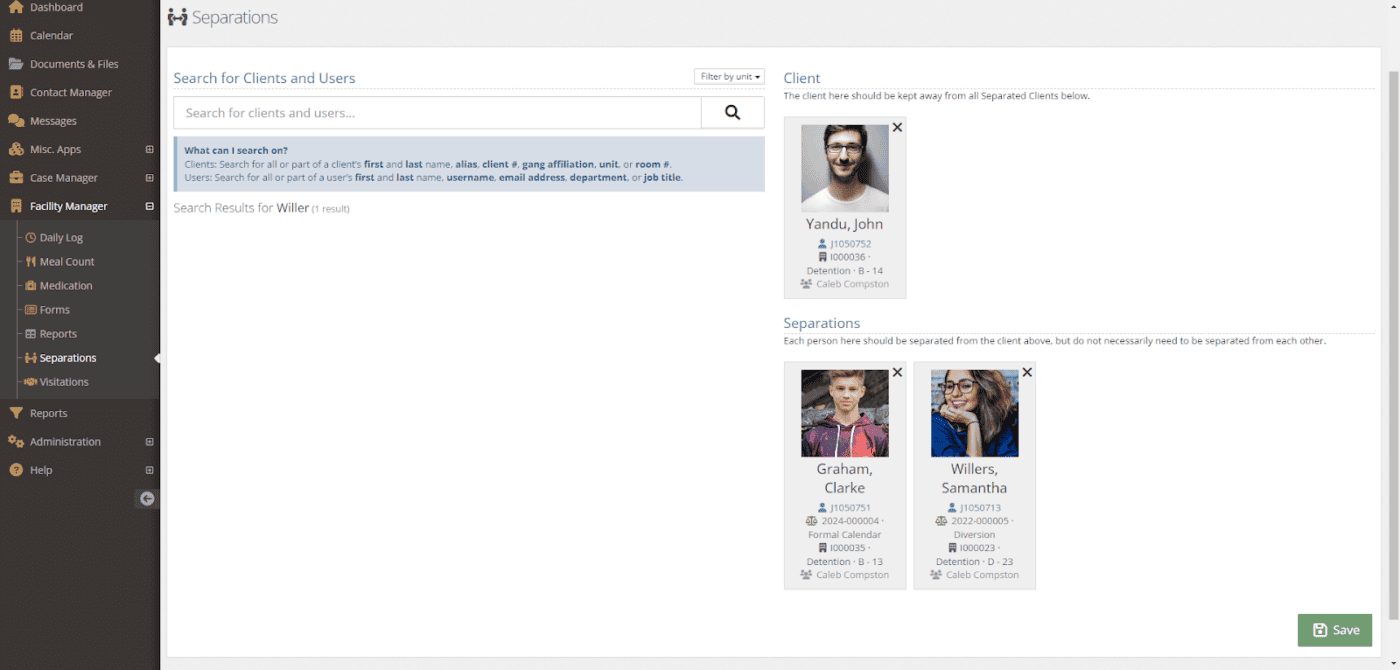
You can add as many separations as you want to the client. Once you are finished adding clients that should be separate from the primary client, click save.
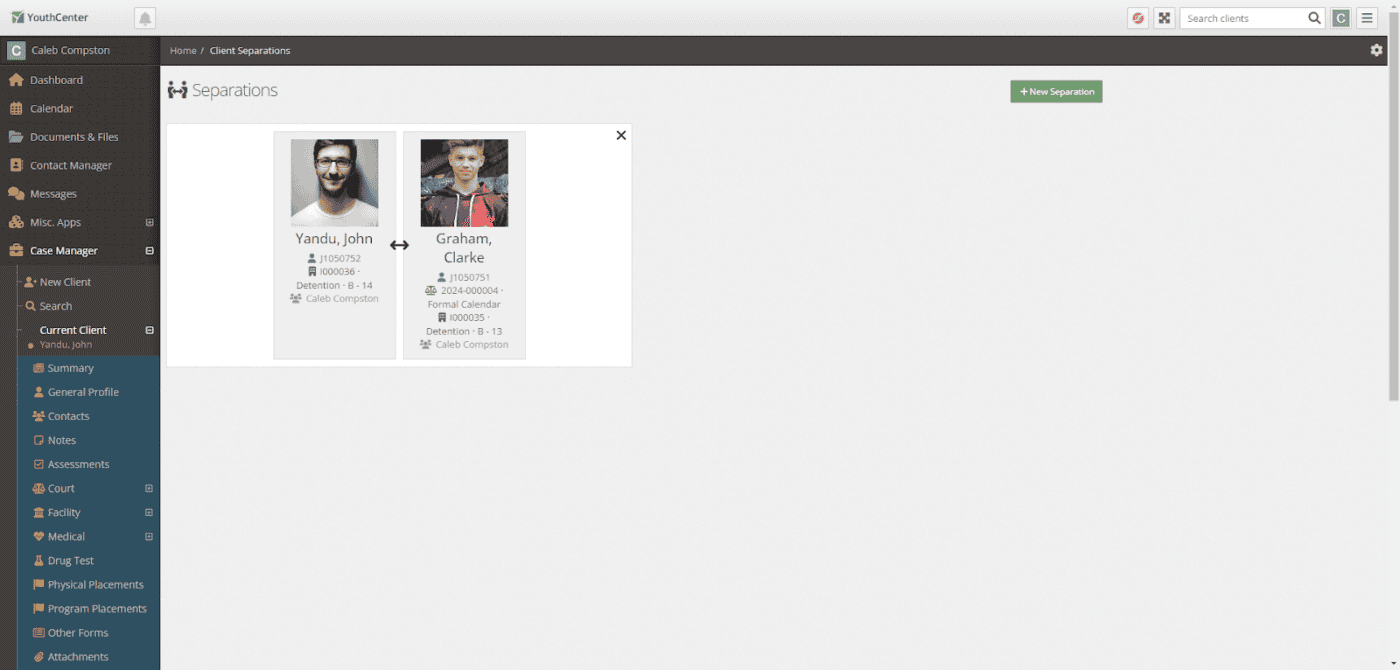
You will be taken back to the Separations page and will be able to view all the new separations.
Deleting a separation
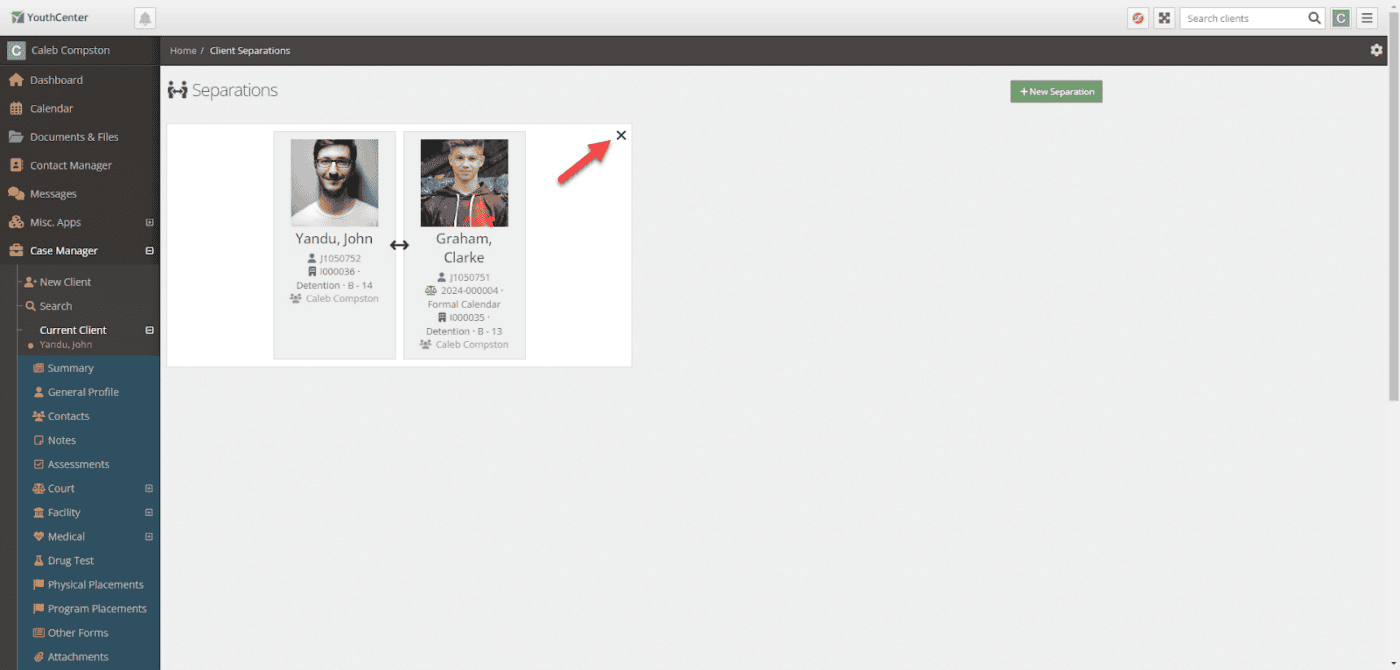
If you no longer want a separation, you can simply locate the separation and press the x on the top right of the separation. A warning message will appear and confirm you want to delete the separation before removing it.
Reporting on Separations
As with all other data inside of YouthCenter, you can generate ad-hoc or regularly scheduled reports that highlight separations. Simply use the Client: General Profile data source.
Providing Feedback
YouthCenter continues to be a solution built for and directed by your needs as caseworkers, JPOs, administrators, and more. Your feedback is very valuable. If you have any thoughts or ideas on how we can improve the software, please reach out to us via our suggestion form. New ideas are reviewed on a bi-weekly basis.
